C++
Building Projects
If you use vim, you can bind CTRL-B to build a cmake project
nnoremap <C-b> :!cmake -S . -B ./build/ && cmake --build ./build
Building from Bash
Within bash, you can easily build a single C++ source file into an executable with g++ -g -Wall source.cpp, this will output an a.out file which is the default name for the resulting executable. If you want to name this file, pass the -o argument as follows g++ -g -Wall source.cpp -o executable
Now, we can run the executable with ./executable or ./a.out, so long as you are within the directory where it exists and the build completed normally.
Note that you can also build with clang++, and a C++ standard can be specified with clang++ -std=c++11 cource.cpp
Make
A simple makefile can be seen below, which can compile a project with a single make command. Create your own with details specific to your project, and name it Makefile
# Makefile
#------------------------------------------------------------------------------
# Set Local Variables
CXX = g++
CXXFLAGS = -g -Wall

#------------------------------------------------------------------------------
# Build executable
exe:	driver.cpp lib.o
	${CXX} ${CXXFLAGS} driver.cpp lib.o -o exe

#------------------------------------------------------------------------------
# Compile sources
lib.o:	lib.cpp lib.h
	${CXX} ${CXXFLAGS} -c lib.cpp -o lib.o

#------------------------------------------------------------------------------
# Clean last build
clean:
	rm -f *.o exe
Note that CXX and CXXFLAGS are just local variables that define our compiler, g++, and the flags we'd like to set for it to use. Later, within this makefile, we can use them with the ${VARNAME} syntax. This lets us define things like filepaths, flags, and other lines we reuse frequently within our makefile.
So, the ${CXX} ${CXXFLAGS} -c lib.cpp -o lib.o line is equivalent to g++ -g -Wall -c lib.cpp -o lib.o - In this case, we add the -c argument to tell g++ to only compile and output object files without linking and building an executable.
make clean will remove all previous build files, make will recompile our project given the sources have been updated. Make will not recompile sources that are not modified or dependent on modified files.
For a more portable makefile, feel free to use the template below, and just replacce the variables with whatever is relevant to your project.
CC = cc

FLAGS = -g -Wall

SRC = source.c mylib-source.c

LINK_TARGET = ls3

REBUILDABLES = $(LINK_TARGET)

# Build the example
###############################################################################

all: $(LINK_TARGET)

$(LINK_TARGET): $(SRC)
	${CC} $(FLAGS) $^ -o $@

# Clean previous builds
###############################################################################

clean:
	rm -f $(REBUILDABLES)
CMake
Our example project will have the following file structure -
some/dir/project/
├── src
│   ├── CMakeLists.txt
│   ├── header.h
│   ├── lib-test.cpp
│   ├── one.cpp
│   └── two.cpp
└── CMakeLists.txt
This is a simple format and useful for learning CMake, once you have this working you can reorganize it as needed or follow a more in-depth tutorial elsewhere, this is only an example of a simple 'hello world program', so we won't need to create any extra subdirectories.
Within the root directory we can setup our project by defining the relevant subdirectories and cmake options, see the CMakeLists.txt file below
################################################################################
## A basic example of building an executable with CMake and linking libraries
## Legal  : All content (c) 2020 Shaun Reed, all rights reserved.
## Author : Shaun Reed
################################################################################
# project/CMakeLists.txt

# Project setup
cmake_minimum_required(VERSION 2.8)
# Here, we name our project
project(hello-world CXX)

include_directories(${CMAKE_CURRENT_SOURCE_DIR} ${CMAKE_CURRENT_BINARY_DIR})

# Testing
# An example of how an option could create multiple build paths
option(CMAKE_FIRST_TEST "Should we build our test application?" ON)
if(CMAKE_FIRST_TEST)
	# Since this is set to ON, we add the subdirectory for our source code
	# Be sure this reflects the folder name containing the next CMakeLists to further direct cmake
    add_subdirectory(src)
endif()
Now, from within the project/src/ directory, we create the following CMakeLists.txt to build our libraries and executable -
################################################################################
## About  : Building an executable with CMake and linking custom libraries
## Legal  : All content (c) 2020 Shaun Reed, all rights reserved.
## Author : Shaun Reed
################################################################################
# project/src/CMakeLists.txt

# Creating executables
set(FIRST_EXECUTABLE_CMAKE_SOURCES one.cpp)
add_executable(one ${FIRST_EXECUTABLE_CMAKE_SOURCES})

set(SECOND_EXECUTABLE_CMAKE_SOURCES two.cpp)
add_executable(two ${SECOND_EXECUTABLE_CMAKE_SOURCES})

#Creating libraries
set(FIRST_STATIC_LIBRARY lib-test.cpp)
add_library(TestLibrary STATIC ${FIRST_STATIC_LIBRARY})

#Linking libraries to executables
target_link_libraries(one TestLibrary)
target_link_libraries(two TestLibrary)
Now, assuming all the source files configured with CMake above are present and valid, we can run the following commands to build and compile our project.
mkdir build
cd build
cmake .. && cmake --build .
That's it! Running the commands above ensure that our build files output won't clutter up our project. First, we create a new directory to build into, then we move inside it and run cmake .. - this tells cmake to run on the previous directory and as a result outputs the build files into our current directory. Then, we can cmake --build . to build the files cmake created, which outputs and executables defined in our project.
Basics
Maybe worth looking through these - Wikipedia: Index of C++ Idioms
See Bjarne Strostrup's C++11 FAQ for several examples
C++ Core Guidelines GitHub repository
You can get offline versions of cppreference, for me the most notable option is the offline cppreference manpages available on GitHub. Installation instructions are provided in the github repository README. They're nice when you need to take a quick look, but maybe the full HTML page is better if you're exploring / browsing.
In a C++ program you can check which version is being ran with the following code.
if (__cplusplus == 201703L) std::cout << "C++17\n";
else if (__cplusplus == 201402L) std::cout << "C++14\n";
else if (__cplusplus == 201103L) std::cout << "C++11\n";
else if (__cplusplus == 199711L) std::cout << "C++98\n";
else if (__cplusplus == 202002L) std::cout << "C++20\n";
else std::cout << "pre-standard C++ (__cplusplus ==" << __cplusplus << ")\n";
When writing #include "lib-custom.h", the compiler checks the CWD first, then the includes directory, and will check system includes last.
When we write #include <iostream>, the compiler checks the includes directory first, then system includes.
An lvalue is any value that has a location in memory. These can also be viewed as any value that is accessible in more than one place anywhere within your code. These could be named objects, pointers, or references. A general rule of thumb: if you can take it's address, it is an lvalue.
An rvalue refers to objects that are only accessible at one exact location within your code. These could be temporary objects like by-value function return values, a collection of operations wrapped in parenthesis that is substituted as the value of a new assignment, literal constants like 1, 10, 'c', or a "string-literal". A general rule of thumb is if it is not an lvalue, it's an rvalue
The definition of these terms provide context for legal and illegal operations in C++. For example, the following statements are legal
int i = 0;
++i = 55 + 5;
But the following statement is not legal, since in this context i++ is not an lvalue. That is, i++ doesn't have a location in memory until after the increment is applied, which makes this assignment invalid.
i++ = 55;
Some examples of lvalues and rvalues in C++
int x;
x = 10; // x is an lvalue; 10 is an rvalue

int sizeDiff(const int &a, const int &b); // sizeDiff, a, and b are all lvalues; The int that is returned by sizeDiff, is an rvalue
Combining the two statements described above, we can better understand an assignment operation
int v = 0; // v and s are both lvalues
int s = 5; // 0 and 5 are both rvalues

int *px = sizeDiff(v, s); // *px is an lvalue; sizeDiff(v, s) is an rvalue
An expression is a mechanism for generating new values. May or may not contain operators, constants, variables;
Literal constant is a value that is stated literally, without representation through a variable.
Constants are variables defined as const given a type, name, and value
Const qualifiers are easiest when read right-to-left. For example, consider the following declarations, where we look at differences in const values or pointers. If a value is const, it cannot be changed. If a pointer is const, the location in memory that stores the data cannot be changed. A const reference is considered undefined behavior, but a reference to a const value is permitted, and often used to avoid the unnecessary copying of data.
We should notice in the examples below that we cannot assign a const value to a reference or pointer to non-const data
int const x = 5; // A constant integer x
const int x = 5; // Also a constant integer x

int const & a = x; // Valid, a is a reference to the const value stored at the memory location of x
const int & b = x; // Valid, b is a reference to the const value stored at the memory location of x (Same as above)
int & c = x; // Error! Cannot assign a reference of const data(x) to reference to non-const data(c)

int const * d = &x; // Valid, d is a non-const pointer to the const data stored at the memory location of x
const int * e = &x; // Valid, e is a non-const pointer to the const data stored at the memory location of x (Same as above)
int * f = &x; // Error! Cannot assign pointer with non-const data to a reference with const data
int const * const g = &x; // Valid, g is a const pointer to const data stored at the memory location of x
const int * const h = &x; // Valid, h is a const pointer to const data stored at the memory location of x (Same as above)
When dealing with non-const data, the rules are slightly different. We should notice in the examples below that we can assign a non-const value to a reference or pointer to const data
int y = 10; // A non-const integer y

int * i = &y; // Valid, i is a non-const pointer to non-const data stored at the memory location of y
int * const j = &y; // Valid, j is a const pointer to non-const data stored at the memory location of y
int & k = y; // Valid, k is a reference to non-const data stored at the memory location of y

// With the below declarations, we add the const qualifier to previously non-const data
// This makes the value const when we attempt to access it through d, but y is still non-const to those who are within it's scope and able to access it.
int const & l = y; // Valid, l is a reference to const data stored at the memory location of y
const int & m = y; // Valid, m is a reference to const data stored at the memory location of y

// Any declaration with a const reference like those seen below is considered to be unspecified
// If you can find a compiler that lets this happen, the results can vary wildly
int & const n = y; // Error! Unspecified behavior when applying const to reference
int const & const o = y; // Error! Unspecified behavior when applying const to reference
const int & const p = y; // Error! Unspecified behavior when applying const to reference
Array initialization can be done using any one of the examples below
int array[10]; // All values in array are initialized to an undetermined (arbitrary) value
int arr[10] = {1, 2, 3, 4}; // arr[0] = 1, arr[1] = 2, arr[2] = 3, arr[3] = 4, arr[4] = 0, arr[5] = 0...
int a[10] = { }; // a[0] = 0, a[1] = 0, a[2] = 0, ... , a[9] = 0
int a[5] = {2}; // a[0] = 2, a[1] = 0, ... , a[4] = 0
for (auto &e : a) e = 1; // a[0] = 1, ... , a[4] = 1
// Pay close attention to prefix and postfix decrement and increment below
// + As well as the use (or lack of) of referencing
for (auto e : a) std::cout << --e << std::endl; // 0 0 0 0 0
for (auto &e : a) std::cout << e++ << std::endl; // 1 1 1 1 1
for (auto e : a) std::cout << e << std::endl; // 2 2 2 2 2
Pretty Printing
These can simply be used inline with cout statements, as in the example below
#include <iostream>
#include <iomanip>
using namespace std;

int main() {
    double A; cin >> A;
    double B; cin >> B;
    double C; cin >> C;

    std::cout << std::showbase << std::hex << std::left << std::nouppercase
              << (long long) A << std::endl
              << std::right << std::showpos << std::setprecision(2)
              << std::setw(15) << setfill('_') << std::fixed
              << B << std::endl
              << std::setprecision(9) << std::scientific << std::uppercase << std::noshowpos
              << C << std::endl;
}
Exceptions
We can define a custom exception with the class below
#include <iostream>
#include <string>
#include <sstream>
#include <exception>
using namespace std

class BadLengthException : public std::exception {
  public:
    std::string err;
    BadLengthException(int n) : err(std::to_string(n)) { }
    virtual inline const char * what() const throw() { return err.c_str(); }
};
And we can then treat this class as a normal exception, since we inherit from the std::exception interface
throw BadLengthException(n);

try {
  // ...
} catch (BadLengthException e) {
  cout << e.what() << '\n';
  // ...
}
Unknown exceptions can be caught using ... for the catch. Below, we provide a condition for the std::bad_alloc exception, a condition for general std::exceptions (any exception that inherits from std::exception), and a final condition for any other exceptions that may occur.
    try {
      std::cout << Server::compute(A, B) << std::endl;
    }
    catch (std::bad_alloc &e) {
      std::cout << "Not enough memory" << std::endl;
    }
    catch (std::exception &e) {
      std::cout << "Exception: " << e.what() << std::endl;
    }
    catch (...) {
      std::cout << "Other Exception" << std::endl;
    }
Time Parsing
C++ has the above I/O helpers for formatting date and time output, and parsing input. Unfortunately, while working on the Time Conversion problem on HackerRank, I stumbled into a bug with parsing the AM / PM porition of the time string. The bug caused the infomation to be lost, and thus all time strings were defaulting to AM when I used the std::get_time function to initialize a std::tm struct.
My final solution is below. Here is a link to the StackOverflow question that led me to this solution. In the code below, I use strptime and strftime from the C header time.h. I'm sure there's a C++ way to do this, but currently this is the only method I'm familiar with.
#include <time.h>

// Example: s == "7:30:15PM"
// Returns: "19:30:15"
string timeConversion(string s) {
  char result[100];
  std::tm t;
  strptime(s.c_str(), "%I:%M:%S%p", &t);
  strftime(result, sizeof(result), "%H:%M:%S", &t);
  return std::string(result);
}
Locales
Another HackerRank question that gave an opportunity to play with managing time in C++ was Day of the Programmer. This question required we use a custom locale, and consider dates several hundred years in the past. The locale for this question was RU, and we had to factor in a calendar change that occured in 1917 for the Russian calendar. This is the reason for the if statement and second call to strptime in the example below.
#include <time.h>

string dayOfProgrammer(int year) {
  std::tm t;
  char result[25];
  setlocale(LC_TIME, "ru_RU.UTF-8");
  strptime(std::string("256" + to_string(year)).c_str(), "%j%Y", &t);
  // The t.tm_year value represents number of years since 1900
  if (t.tm_year <= 17 && t.tm_year % 4 == 0) {
    strptime(std::string("255" + to_string(year)).c_str(), "%j%Y", &t);
  }
  strftime(result, sizeof(result), "%d.%m.%Y", &t);
  return std::string(result);
}
It's worth noting that using the above method, strptime accounts for leap year and outputs correct dates back to year 1900. See the official documentation for more information.
Classes
Encapsulation is a concept that is used to protect member variables and ensure that the object is always in a certain state.
Inheritance With Access Specifiers
When creating classes in C++ we should use the access specifier below that best fits our scenario. By default, when defining a class, all members are private unless otherwise specified. In contrast, when we define a struct, all members are public unless otherwise specified. This is the only difference between a class and a struct in C++, and all other concepts are interchangable between the two. Both can have member functions, variables, friends, destructors, constructors, etc.
class Test {
	int w;  // W is private in this context
  public:
  	int x;	// X is accessible from outside or inside of the class
  protected:
  	int y;	// Y is accessible from within the class, by members of the same class, and any derived classes
  private:
  	int z;	// Z is only accessible from within the class or by members of the same class
};
struct Test {
	int w;  // W is public in this context
  public:
  	int x;	// X is accessible from outside or inside of the class
  protected:
  	int y;	// Y is accessible from within the class, by members of the same class, and any derived classes
  private:
  	int z;	// Z is only accessible from within the class or by members of the same class
};
When using inheritance access specifiers we should pay attention to how member access is impacted. Consider the code below, where we notice a change in the way we access public and protected members of the base class, A. In main, we try to access some of these members and show which ones we can and cannot access. In each inheriting class, we define new public members that access private or protected members to show that we have the ability to do so through inheritance, but only within the scope of the class or member definitions.
#include <iostream>

class A {
  // Private is the default access modifier within classes in c++
  int private_y; // This member will never be accessible from any derived class

public:
  A() {};
  // Because the destructor was declared virtual, every deriving class will call this destructor in sequence when being destroyed
  // So for class PublicA;  ~PublicA() -> ~A() is the order destructors will be called when leaving scope...
  //   or deleteing the object on the heap
  virtual ~A() { std::cout << "Deleting A\n";};

  int pub_x;

protected:
  int protected_x;

private:
  int private_x; // This member will never be accessible from any derived class
};

class PublicA : public A {
public:
  ~PublicA() {std::cout << "Deleting PublicA\n";};

  int a = pub_x; // In this context, pub_x is protected
  int b = protected_x; // In this context, protected_x is protected
};

class ProtectedA : protected A {
public:
  ~ProtectedA() {std::cout << "Deleting ProtectedA\n";};

  int a = pub_x; // In this context, pub_x is protected
  int b = protected_x; // In this context, protected_x is protected
};

class PrivateA : private A {
public:
  ~PrivateA() {std::cout << "Deleting PrivateA\n";};

  int a = pub_x; // In this context, pub_x is private
  int b = protected_x; // In this context, protected_x is private
};


int main (int const argc, char const * argv[])  {
  // Test destructor for base class A
  A * baseA = new A; // Allocate A on the heap
  delete baseA; // Free (delete) A from the heap

  PublicA publicA;
  publicA.pub_x = 5; // Valid, since pub_x, a, and b are all public
//  publicA.protected_x = 5; // Error! protected_x is protected in this context

  ProtectedA protectedA;
//  protectedA.pub_x = 5; // Error! pub_x is protected in this context
//  protectedA.protected_x = 5; // Error! protected_x is protected in this context

  PrivateA privateA;
//  privateA.pub_x = 5; // Error! pub_x is private in this context
//  privateA.protected_x = 5; // Error! protected_x is private in this context


  // Destructor called for each object on the stack at exit
  // Note: Since these are on the stack, they will be destroyed in reverse order
}
In summary, this chart helps to describe the various combinations and results between base class access identifiers and their derived class's inheritance access specifier.

const member functions that return bool can be referred to as predicates
class Test {
  public:
	bool empty() const;	// empty() is a predicate in this context
};
Multiple-Inheritance is when a class inherits from more than one parent object or class.
Abstract Classes
An abstract class is one that cannot be instantiated without first being inherited from. This means that by itself an abstract class can only be used as a base class for further implementation. An abstract class may not be multiple-inherited, but they may contain state values (member variables), and/or implementation (methods). Abstract classes can be inherited without implementing the abastract methods, though such a derived class is abstract itself.
An example of an abstract classs Animal that uses its own constructor. Notice that derived classes Human and Dog each have specific constructors with respect to their parent class, Animal. The use of the virtual keyword in defining pure virtual functions makes this an abstract class, where the implementation of speak is definined for each derived class (Human, and Dog, in this case) -
#include <iostream>

class Animal {
public:
  // A constructor the AbstractClass depends on in order to be instantiated
  Animal(std::string name_) : name(name_) {};

  // Implementation the AbstractClass takes with when derived from
  void showName() {
    std::cout << "Name: " << name << std::endl;
  }

  // A pure virtual function, required to be implemented by deriving classes
  virtual void speak() = 0; //...() = 0; required to be considered pure virtual
  // The declaration above makes this class abstract; We need to define speak() before instantiating
  // The class can be instatiated by deriving from this base class, and instantiating the derived class

protected:
  // Protected member allows deriving classes to inherit while acting as private
  std::string name;
};

class Human : public Animal {
public:
  // A constructor for the Human class with respect to it's base class (Animal)
  Human(std::string name_) : Animal(name_) {};

  // speak() is defined for all Humans
  void speak() {
    std::cout << name << ": Hello!\n";
  }
};

class Dog : public Animal {
public:
  // A constructor for the `Dog` class with an additional unique parameter
  // Must still respect it's base class constructor parameter, and pass to Animal's ctor
  Dog(std::string name_, std::string sound_="Bark!")
  : Animal(name_), sound(sound_) {};

  // speak() is defined for all Dogs
  void speak() {
    std::cout << name << ": " << sound << std::endl;
  }

private:
  // Note: The `sound` value could not be inherited further
  std::string sound;
};

int main (int const argc, char const * argv[])  {
  Human h("Shaun");
  h.speak();

  Dog d("Spot", "Bark!");
  d.speak();

  Dog f("Fluffy", "Yap!");
  f.speak();
}
Abstract class with no pure virtual member functions -
#include <iostream>

/******************************************************************************/
// KeyData struct to hold data related to key ciphers
struct KeyData {
  explicit KeyData(std::string key) : keyWord_(std::move(key)) {};
  explicit KeyData() : keyWord_(GetKey()) {};
  // Pure virtual dtor to make abstract class despite no pure virtual members
  // + This works, because a base class should have a virtual dtor anyway
  virtual ~KeyData() = 0;

  // Allows getting keyWord when using KeyData default ctor
  static std::string GetKey()
  {
    std::string key;
    std::cout << "Enter the keyword: ";
    std::getline(std::cin, key);
    std::cout << "Keyword entered: \"" << key << "\"\n";
    return key;
  }

protected:
  std::string keyWord_;
};
// Definition of pure virtual dtor (required)
KeyData::~KeyData() {}
Interfaces
An interface has no implementation, and contains only a virtual destructor and pure virtual functions. virtual destructors ensure that when an interface is destroyed, the correct destructors will be called down the inheritance hierarchy. Interfaces have no state or implementation, they may be multiple-inherited.
// TODO: Example of an interface
Constructors and Resource Management
When dealing with dynamic memory allocation both operators new or delete are aware of constructors and destructors. In contrast, malloc and free are not aware of class constructors or destructors.
A deep copy is when we create or allocate new memory addresses and assign the values at these addresses to match that of an existing object. See the example below, where A(A & rhs) implements a deep-copy of the rhs object. In the examples below, we also take advantage of C++11's range-based-for by implementing begin() and end members that return an iterator (int *) to the beginning and end of the dynamic array.
#include <iostream>

class A {
  // Private is the default access modifier within classes in c++
  int private_y; // This member will never be accessible from any derived class

public:
  // ctor
  A(int size, int value)
  : size_(size), intArray_(new int[size]) {
    for (auto &e : *this) e = value;
  };

  // Copy ctor implementing a deep-copy of rhs
  A(A & rhs) :size_(rhs.size_), intArray_(new int[size_]) {
    std::copy(&rhs.intArray_[0], &rhs.intArray_[size_], intArray_);
  }

  // dtor of base class with dynamic member is virtual to handle destruction
  ~A() {
    std::cout << "Deleting A\n";
    delete [] intArray_;
  }

  // Assignment operator utilizes copy ctor to create local copy
  A & operator=(A rhs) {
    std::swap(intArray_, rhs.intArray_);
    std::swap(size_, rhs.size_);
  }

  // Implementing begin and end for use with objects derived from this class
  int * begin() { return &intArray_[0];};
  int * end() { return &intArray_[size_];};

  void print() {
    for (auto e : *this) {
      std::cout << e << std::endl;
    }
    std::cout << std::endl;
  }

protected:
  int size_;
  int * intArray_; // Dynamic memory requires defintition of ctor, dtor, and op=
};

int main (int const argc, char const * argv[])  {
  // Test destructor for base class A
  A * baseA = new A(5, 1);
  baseA->print();
  delete baseA;
}
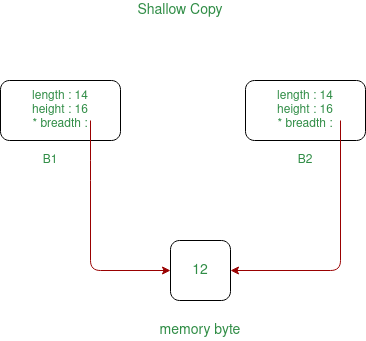
A shallow copy is when we create a copy of an object using references to the original location of the data, as in the example below
#include <iostream>

class A {
  // Private is the default access modifier within classes in c++
  int private_y; // This member will never be accessible from any derived class

public:
  // ctor
  A(int size, int value)
  : size_(size), intArray_(new int[size]) {
    for (auto &e : *this) e = value;
  };

  // Copy ctor implementing a shallow-copy of rhs
  A(A & rhs) :size_{rhs.size_}, intArray_{rhs.intArray_} {};

  // Warning: If this object is ever used to initialize another, we will face an error on destruction
  //   Because we created a shallow-copy, we cannot delete the dynamic allocation without corrupting another object
  ~A() {
    std::cout << "Deleting A\n"; //
    delete [] intArray_; // Error! Double free detected; Since we created a shallow copy in dynamic memory
  }

  // Assignment operator utilizes copy ctor to create local copy
  A & operator=(A rhs) {
    std::swap(intArray_, rhs.intArray_);
    std::swap(size_, rhs.size_);
  }

  // Implementing begin and end for use with objects derived from this class
  int *begin() { return &intArray_[0];};
  int *end() { return &intArray_[size_];};

  void set(int value) {
    for (int &e : *this) e = value;
  }

  void print() {
    for (auto e : *this) {
      std::cout << e << std::endl;
    }
    std::cout << std::endl;
  }

protected:
  int size_;
  int * intArray_; // Dynamic memory requires defintition of ctor, dtor, and op=
};

int main (int const argc, char const * argv[])  {
  A * baseA = new A(5, 1);
  baseA->print();

  A b(*baseA); //
  b.print();
  b.set(5); // Since the class uses a shallow copy, the changes are refelcted within both objects

  // baseA and b both point to the same location in memory for intArray_
  baseA->print();
  b.print();

  A c(b);
  c.print();

  c.set(10); // Since the class uses a shallow copy, the changes are refelcted within all objects

  baseA->print();
  b.print();
  c.print();

  delete baseA;
}
A conversion constructor is a constructor with a single parameter that converts the argument at invocation to the type of the object. A constructor with multiple parameters is considered implicit if all but one parameter provide default values. For example, consider the code below
Implicit conversion ctors can cause trouble w/ function overloading through unintended type conversions. Below, we see examples of applying explicit to our constructors in class B, and compare the results to a similar class A that did not. See the main function for the final test and comparisons between the classes, then check the definitions to see why.
#include <iostream>

class A {
public:
  // No explicit declaration allows implicit usage, converting to class type
  A() {};
  A(int val) : x(val), y('~') {};
  A(char character, int value = 5) : y(character), x(value) {};
  ~A() {};

  void show() {
    std::cout << "x: " << x << std::endl;
    std::cout << "y: " << y << "\n\n";
  }

  int x;
  char y;
};

class B {
public:
  // Declaring constructors explicit forces more strict usage
  explicit B() {};
  explicit B(int val) : x(val), y('~') {};
  explicit B(char character, int value = 5) : y(character), x(value) {};
  ~B() {};

  void show() {
    std::cout << "x: " << x << std::endl;
    std::cout << "y: " << y << "\n\n";
  }

  int x;
  char y;
};

int main (int const argc, char const * argv[])  {
  // All of the below is valid for class A, since we did not declare destructors explicit
  A a = 10;
  A a1(10);
  A a2 = {10};
  A a3 = 'c';
  A a4('c');
  A a5{'c'};
  A a6('c', 10);
  A a7{'c', 10};
  A a8 = {'c', 10};
  A a9 = (A)10;
  A a10 = (A)'x';
  A a11 = A('x');
  A a12 = A('x', 10);
  A a13 = A{'x'};
  A a14 = A{'x', 10};

  // For B, since we declared constructor explicit...
//B b = 5; // Error! Implicit type conversion not allowed with explict ctor
  B b1(5);
//B b2 = {5}; // Error! Implicit type conversion not allowed with explict ctor
//B b3 = 'x'; // Error! Implicit type conversion not allowed with explict ctor
  B b4('x');
//B b5 = {'x'}; // Error! Implicit type conversion not allowed with explict ctor
  B b6('x', 5);
  B b7{'x', 5};
//B b8 = {'x', 5}; // Error! Implicit type conversion not allowed with explict ctor
  B b9 = (B)5;
  B b10 = (B)'x';
  B b11 = B('x');
  B b12 = B('x', 5);
  B b13 = B{'x'};
  B b14 = B{'x', 5};
}
Declaring static const member variables -
// SomeClass.hpp
class SomeClass {
public:
  CarFactory(std::string name, int number):
  		someName(location), someNumber(number) {}
  ~Class(){}
private:
  std::string someName;
  int someNumber;
  const std::array<std::string, 4> someArray;
};
and in a seperate, source file -
// SomeClass.cpp

const std::array<std::string, 4>
    SomeClass::someArray({"Thing1", "Thing2", "Thing3", "Thing4"});
If you want a member variable that is an iterator of this array -
class SomeClass {
public:
  CarFactory(std::string name, int number):
  		someName(location), someNumber(number) {}
  ~Class(){}
private:
  std::string someName;
  int someNumber;
  const std::array<std::string, 4> someArray;
  decltype(someArray)::iterator arrayIter = someArray.begin();
};
Operator Oveloading
Overloading the ostream operator << to allow printing an object directly to stdout for Person objects.
std::ostream & operator<<(std::ostream & o, const Person & a) {
  o << "first_name=" << a.get_first_name() << ",last_name=" << a.get_last_name();
  return o;
}
Multithreading
C++ Concurrency Support
Below are some of the useful methods and objects I found in documentation for the C++ Concurrency Support Library. This is of course not an exhaustive list, and only covers what I've used in the examples later on this page.
std::mutex is a C++11 object which offers mutually exclusive ownership over shared resources within a C++ program. The object is not directly associated with the shared resources via construction or any other initialization, but instead the object is used to block program execution should another thread want to step into a block of code that would attempt to modify a resource that is currently in use elsewhere.
Mutex locks provide many functions, and after instatiation we can use these functions to enforce ownership of shared resources.
#include <chrono>
#include <iostream>
#include <mutex>
#include <thread>

int main(const int argc, const char * argv[]) {
  std::cout << "main() thread id: " << std::this_thread::get_id() << std::endl;

  static std::mutex mtx_A, mtx_B;

  std::thread thread_A([]()->void {
    mtx_A.lock(); // Call mutex member function std::mutex::lock()
    std::cout << std::this_thread::get_id() << " thread_A: Lock A\n";
    std::this_thread::sleep_for(std::chrono::seconds(3));
    mtx_A.unlock(); // Call mutex member function std::mutex::unlock()
    std::cout << std::this_thread::get_id() << " thread_A: Unlock A\n";
  });

  std::thread thread_B([]()->void {
    std::this_thread::sleep_for(std::chrono::seconds(1));
    mtx_A.lock();
    std::this_thread::sleep_for(std::chrono::milliseconds(500));
    std::cout << std::this_thread::get_id() << " thread_B: Lock A\n";
    std::this_thread::sleep_for(std::chrono::seconds(3));
    mtx_A.unlock();
    std::cout << std::this_thread::get_id() << " thread_B: Unlock A\n";
  });

  thread_A.join();
  thread_B.join();
  return 0;
}
The output of this example should show the general idea. If you run this code, you will notice one thread takes ownership, waits a few seconds, releases the object, and then the same is repeated for the next thread.
main() thread id: 140533678282560
140533678278400 thread_A: Lock A
140533678278400 thread_A: Unlock A
140533669885696 thread_B: Lock A
140533669885696 thread_B: Unlock A
You might notice my use of the std::this_thread namespace, specifically std::this_thread::get_id() and std::this_thread::sleep_for().I also use the std::chrono library often to define time periods for the program to wait. For writing examples and testing multithreaded functionality of C++, these methods will prove very useful, but keep in mind they are just to support examples - you typically wouldn't want your program to wait for several seconds, and thus many of these examples can be 'fixed' by removing these methods. For instance, the livelock example on this page often results in no livelock at all if I hadn't intentionally synchronized the iteration of loops within the opposing threads. Sometimes you may see a livelock occur in that example naturally, but more often one thread executes at a slightly different time, which breaks from the livelock and the program exits normally. The examples serve as proof of concept, and not real world problems or scenarios.
std::lock is a function available in C++11 which handles the locking of N mutex objects, avoiding the case of deadlock when any one of them is unavailable. This means that if any one of the mutex objects passed to the call to std::lock, the program execution will be blocked until the resource is available. When it becomes available, the resources are locked and execution continues.
std::try_lock is a function available in C++11 which is similar to std::lock in that is handles locking N objects for us and avoiding deadlock. The major difference here is what you would expect, the return value. This function returns -1 if the resources have been successfully locked, and 0 if not. This means it can be used to programmatically react to resources that are currently unavailable.
RAII: Resource Acquisition Is Initialization descirbes the implementation of certain objects in C++ which encapsulate the initialization and deconstruction of required resources which may be shared or unavailable at any point in time. There are many examples of objects that follow the RAII concept in C++ concurrency libraries, listed below are only a few of these. RAII applies to heap memory management, which is a much more common practice which programmers of all skill levels would already be familiar with.
std::lock_guard is a C++11 object useful for managing a single mutex lock. The lock_guard object has a constructor which supports a single mutex as an argument, and on construction this object will attempt to lock the mutex, obtaining ownership of it. If the mutex is already owned by another object, the thread or program execution will be blocked at this call and will not proceed until the resource has been released by the current owning object. When the program leaves the scope of an owning lock_guard object, the mutex is automatically released - we do not need to remember to call unlock or any similar function.
std::scoped_lock is a C++17 object useful for managing N mutex locks, which means scoped_lock has a constructor that supports N arguments where each is a mutex we want to obtain ownership of. A caveat to this object is that the constructor also supports 0 arguments, which means the programmer can construct a scoped_lock that doesn't ever lock a single mutex. The compiler will not complain, whereas with lock_guard the compiler will reject any attempt to construct the object without providing a mutex to lock. Similar to lock_guard, when the program leaves the scope of a scoped_lock object, it will automatically call unlock on all mutex locks it has ownership of.
std::unique_lock provides a C++11 method of deferred mutex locking, which supports constructing locks without requiring the resource to be immediately available, using lock tags such as std::defer_lock. Notably, unique_lock is used in conjuction with std::condition_variable, which provides sychronization support via notifications for blocked threads.
std::condition_variable is used alongside of unique_lock, where there is a shared value that is modified to to signal the unblocking of a previously blocked thread. This is useful for synchronizing events or jobs to continue processing only once the program has reached a valid state. An example of using this method of synchronization can be seen in the code below.
/*##############################################################################
## Author: Shaun Reed                                                         ##
## Legal: All Content (c) 2022 Shaun Reed, all rights reserved                ##
## About: An example of condition_variables in multithreaded C++              ##
##                                                                            ##
## Contact: shaunrd0@gmail.com  | URL: www.shaunreed.com | GitHub: shaunrd0   ##
################################################################################
*/

#include <chrono>
#include <condition_variable>
#include <iostream>
#include <mutex>
#include <thread>

static std::mutex mtx;
std::condition_variable cv;
bool processing = false;

// Starts a job that waits for kick-off from main
// + When job finishes, handoff result back to main via processing bool
void job(int32_t & shared) {
  std::unique_lock uniqueLock(mtx);
  cv.wait(uniqueLock, []()->bool {return processing;});
  std::cout << std::this_thread::get_id()
            << " thread_A: Initial value of shared = " << shared << std::endl;
  while (shared < INT32_MAX) {
    shared++;
  }
  // We're no longer processing data
  processing = false;
  std::cout << std::this_thread::get_id()
            << " thread_A: Done working." << std::endl;
  uniqueLock.unlock(); // Important! Unlock uniqueLock before we notify
  // Notify main that we've finished, so it can proceed
  cv.notify_one();
}

int main(const int argc, const char * argv[]) {
  std::cout << "main() thread id: " << std::this_thread::get_id() << std::endl;

  int32_t share = 0;
  std::thread thread_A(job, std::ref(share));

  mtx.lock();
  std::this_thread::sleep_for(std::chrono::seconds(3));
  share = INT32_MAX / 2;
  processing = true;
  mtx.unlock();
  // Notify thread_A that its work can begin
  cv.notify_one();

  // Wait until thread_A finishes its work
  std::unique_lock uniqueLock(mtx);
  // Block execution until we are not processing
  cv.wait(uniqueLock, []()->bool { return !processing;});
  std::cout << std::this_thread::get_id() << " main(): final value of shared = "
            << share << std::endl;
  thread_A.join();

  return 0;
}
The output of this program shows that the value of share in the main function is what we would expect upon the unblocking of thread_A. Since this value was passed to the threads job using std::ref, it is a reference to the same value and the modifications made by thread_A are seen in main as well.
main() thread id: 139826095839040
139826095834880 thread_A: Initial value of shared = 1073741823
139826095834880 thread_A: Done working.
139826095839040 main(): final value of shared = 2147483647
std::basic_osyncstream provides a C++20 way to synchronize outputs to a shared stream, which could be constructed with std::basic_osyncstream out(std::cout); and use directly as if it were std::cout. Unfortunately many compilers don't support this yet, but worth mentioning. See C++ compiler support for more up to date information on compiler support in regards to more modern C++ versions.
For now, these are all the methods and objects I'll use in the examples below, but there is surely always more to learn and I will return to update this page in the future as I improve upon or learn new multithreading techniques and practices in C++.
Process Lifetime
Threads should not be confused with processes. A process can own several threads, while any given thread can only be owned by a single process. In general, the lifetime of a process is outlined below, where New-(Admitted)->Ready describes the transisition between the New and Ready process states following the Admitted signal from the OS that created the thread.
- New
- New-(Admitted)->Ready
- Ready
- Ready-(Dispatch)->Running
- Running
- Running-(Interrupt)->Ready
- Running-(Wait for I/O or Event)->Watiting
- Running-(Exit)->Terminated
- Waiting
- Waiting-(I/O or Event Completed)->Ready
- Terminated
Thread Lifetime
When we call std::thread and construct a new thread, we request a new thread from the OS, which is supplied threads by the kernel, which manages the resources available to us by our hardware.
In general, operating systems have the following states for threads that they're managing.
- Creation - Thread has been created but not allocated any resources yet
- Ready - The thread has resources available to it, and is ready to be assigned some work
- Running - The thread is running a job, which may result in any of the below states, which will subsequently return to the Ready state, which transitions to a Running thread.
- Waiting - The thread is waiting for some event or signal to return to the Ready state
- Delayed - The thread has been delayed, usually to support more important processing happening on other threads
- Blocked - The thread requires a resource which is currently in use by another thread, and is blocked until this resource is made available
- Finished - The thread is finished, and is joined back into the owning process
These are the general steps taken by processses, including the operating system, when threads are created, used, and destroyed. To destroy a thread we must first join it back into the owning process which releases the resources back to the kernel for allocating to other threads.
Examples
The sections below contain programs that show examples for various problems and solutions in multithreaded applications. These are just general examples and not real world problems, so many of the problems were intentionally created to showcase a situation that can occur. If only interested in the source code, check out my Git repository shaunrd0/klips where I practice general programming.
Race Conditions
The following program is an example of the problem() and solution() to race conditions in C++. This is a basic example, and just shows what can happen if two or more threads happen to access the same variable simultaneously. Since the value of x is shared, and this value is incremented within a for loop by all 5 threads, the value of x can be the same when the increment is applied in some undefined number of threads.
This means that each time we run the program, the output of problem() will vary from 1000000-5000000. This variation in final output is due to the undefined number of threads that simultaneously access x which incrementing it within the loop. In contrast, each time we run the solution(), the value will always be the expected output of 5000000, because we have utilized the concurrency features of C++ appropriately.
/*##############################################################################
## Author: Shaun Reed                                                         ##
## Legal: All Content (c) 2022 Shaun Reed, all rights reserved                ##
## About: An example of a race condition problem and solution                 ##
##                                                                            ##
## Contact: shaunrd0@gmail.com  | URL: www.shaunreed.com | GitHub: shaunrd0   ##
################################################################################
*/

#include <iostream>
#include <thread>
#include <vector>
#include <mutex>

void problem() {
  std::vector<std::thread> threads;
  const uint8_t thread_count = 5;
  // With no mutex lock, the final value will vary in the range 1000000-5000000
  // + Threads will modify x simultaneously, so some iterations will be lost
  // + x will have same initial value entering this loop on different threads
  uint32_t x = 0;
  for (uint8_t i = 0; i < thread_count; i++) {
    threads.emplace_back([&x](){
      for (uint32_t i = 0; i < 1000000; i++) {
        x = x + 1;
      };
    });
  }
  // Ensure the function doesn't continue until all threads are finished
  // + There's no issue here, the issue is in how `x` is accessed above
  for (auto &thread : threads) thread.join();
  std::cout << x << std::endl;
}

// Create mutex lock to prevent threads from modifying same value simultaneously
static std::mutex mtx;
void solution() {
  std::vector<std::thread> threads;
  const uint8_t thread_count = 5;
  uint32_t x = 0;
  for (uint8_t i = 0; i < thread_count; i++) {
    threads.emplace_back([&x](){
      // The first thread that arrives here will 'lock' other threads from passing
      // + Once first thread finishes, the next thread will resume
      // + This process repeats until all threads finish
      std::lock_guard<std::mutex> lock(mtx);
      for (uint32_t i = 0; i < 1000000; i++) {
        x = x + 1;
      };
    });
  }
  // Ensure the function doesn't continue until all threads are finished
  for (auto &thread : threads) thread.join();
  std::cout << x << std::endl;
}

int main(const int argc, const char * argv[]) {
  // Result will vary from 1000000-5000000
  problem();

  // Result will always be 5000000
  solution();
  return 0;
}
The output of this program is
1374956
5000000
Deadlocks
Deadlocks occur when two threads lock a shared resource from each other. In the example below, thread_A has locked mtx_A, and it wants to lock mtx_B. This is not possible, because thread_B has already locked mtx_B, and is now waiting to lock mtx_A. Neither of these locks will ever pass, because the threads both require a common resource to continue.
For the sake of the example, I provide a way out of the deadlock situation within the problem() function. Note that if it were not for this, the program would simply never finish execution. It would wait forever, as neither resource would ever become available to the opposing thread. I have split this code between several blocks with short explanations of each problem / solution, but all code within this section is within the same program. The full example can be found in my general programming practice repository, klips.
/*##############################################################################
## Author: Shaun Reed                                                         ##
## Legal: All Content (c) 2022 Shaun Reed, all rights reserved                ##
## About: An example and solution for deadlocks in C++                        ##
##                                                                            ##
## Contact: shaunrd0@gmail.com  | URL: www.shaunreed.com | GitHub: shaunrd0   ##
################################################################################
*/

#include <chrono>
#include <iostream>
#include <mutex>
#include <sstream>
#include <thread>

static std::mutex mtx_A, mtx_B, output;

// Helper function to output thread ID and string associated with mutex name
// + This must also be thread-safe, since we want threads to produce output
// + There is no bug or issue here; This is just in support of example output
void print_safe(const std::string & s) {
  std::scoped_lock<std::mutex> scopedLock(output);
  std::cout << s << std::endl;
}

// Helper function to convert std::thread::id to string
std::string id_string(const std::thread::id & id) {
  std::stringstream stream;
  stream << id;
  return stream.str();
}

// In the two threads within this function, we have a problem
// + The mutex locks are acquired in reverse order, so they collide
// + This is called a deadlock; The program will *never* finish
void problem() {
  std::thread thread_A([]()->void {
    mtx_A.lock();
    print_safe(id_string(std::this_thread::get_id()) + " thread_A: Locked A");
    std::this_thread::sleep_for(std::chrono::seconds(1));
    mtx_B.lock(); // We can't lock B! thread_B is using it
    // The program will never reach this point in execution; We are in deadlock
    print_safe(id_string(std::this_thread::get_id())
               + " thread_A: B has been unlocked, we can proceed!\n  Locked B"
    );
    std::this_thread::sleep_for(std::chrono::seconds(1));

    print_safe(id_string(std::this_thread::get_id())
               + " thread_A: Unlocking A, B..."
    );
    mtx_A.unlock();
    mtx_B.unlock();
  });

  std::thread thread_B([]()->void {
    mtx_B.lock();
    print_safe(id_string(std::this_thread::get_id()) + " thread_B: Locked B");
    std::this_thread::sleep_for(std::chrono::seconds(1));
    mtx_A.lock(); // We can't lock A! thread_A is using it
    // The program will never reach this point in execution; We are in deadlock
    print_safe(id_string(std::this_thread::get_id())
               + " thread_B: A has been unlocked, we can proceed!\n  Locked A"
    );
    std::this_thread::sleep_for(std::chrono::seconds(1));

    print_safe(id_string(std::this_thread::get_id())
               + " thread_B: Unlocking B, A..."
    );
    mtx_B.unlock();
    mtx_A.unlock();
  });

  // This offers a way out of the deadlock, so we can proceed to the solution
  std::this_thread::sleep_for(std::chrono::seconds(2));
  char input;
  print_safe("\n"
             + id_string(std::this_thread::get_id())
             + " problem(): We are in a deadlock. \n"
             + "    Enter y/Y to continue to the solution...\n"
  );
  while (std::cin >> input) {
    if (input != 'Y' && input != 'y') continue;
    else break;
  }
  print_safe(id_string(std::this_thread::get_id())
             + " problem(): Unlocking A, B..."
  );
  mtx_A.unlock();
  mtx_B.unlock();

  thread_A.join();
  thread_B.join();
}
There are a few solutions we could use to work around this problem. We could use std::lock, which is available in C++11. With this approach, we still need to remember to unlock each mutex, or else we end up in a deadlock situation again. The only difference is that this time we caused it ourselves by forgetting to unlock the resource instead of two threads with a conflict of interest.
// std::lock will lock N mutex locks
// + If either is in use, execution will block until both are available to lock
void solution_A() {
  std::thread thread_A([]()->void {
    std::lock(mtx_A, mtx_B);
    print_safe(id_string(std::this_thread::get_id()) + ": Locked A, B");
    std::this_thread::sleep_for(std::chrono::seconds(1));

    print_safe(id_string(std::this_thread::get_id()) + ": Unlocking A, B...");
    mtx_A.unlock();
    mtx_B.unlock();
  });

  std::thread thread_B([]()->void {
    std::lock(mtx_B, mtx_A);
    print_safe(id_string(std::this_thread::get_id()) + ": Locked B, A");
    std::this_thread::sleep_for(std::chrono::seconds(1));

    print_safe(id_string(std::this_thread::get_id()) + ": Unlocking B, A...");
    mtx_B.unlock();
    mtx_A.unlock();
  });

  thread_A.join();
  thread_B.join();
}
We could also use std::lock_guard, which is also available in C++11. The benefit to constructing this object is that we are not required to remember to unlock either mutex. lock_guard has a constructor which takes a single argument for one mutex to manage for us. This means we need two lock_guard objects to work around this deadlock situation.
// std::lock_guard is a C++11 object which can be constructed with 1 mutex
// + When the program leaves the scope of the guard, the mutex is unlocked
void solution_B() {
  std::thread thread_A([]()->void {
    // lock_guard will handle unlocking when program leaves this scope
    std::lock_guard<std::mutex> guard_A(mtx_A), guard_B(mtx_B);
    print_safe(id_string(std::this_thread::get_id()) + ": Locked A, B");
    std::this_thread::sleep_for(std::chrono::seconds(1));

    print_safe(id_string(std::this_thread::get_id()) + ": Unlocking A, B...");
    // We don't need to explicitly unlock either mutex
  });

  std::thread thread_B([]()->void {
    std::lock_guard<std::mutex> guard_B(mtx_B), guard_A(mtx_A);
    print_safe(id_string(std::this_thread::get_id()) + ": Locked B, A");
    std::this_thread::sleep_for(std::chrono::seconds(1));

    print_safe(id_string(std::this_thread::get_id()) + ": Unlocking B, A...");
    // We don't need to explicitly unlock either mutex
  });

  thread_A.join();
  thread_B.join();
}
A third and final example of a solution to deadlocks is using the std::scoped_lock object available in C++17. This object has a constructor that takes N arguments, each one being a mutex we want the object to manage for us. This means for N mutex locks, we only need one scoped_lock object. When the program leaves the scope of this object, all mutex locks will be unlocked for us, so we don't need to remember to do this ourselves.
// std::scoped_lock is a C++17 object that can be constructed with N mutex
// + When the program leaves this scope, all N mutex will be unlocked
void solution_C() {
  std::thread thread_A([]()->void {
    // scoped_lock will handle unlocking when program leaves this scope
    std::scoped_lock scopedLock(mtx_A, mtx_B);
    print_safe(id_string(std::this_thread::get_id()) + ": Locked A, B");
    std::this_thread::sleep_for(std::chrono::seconds(1));

    print_safe(id_string(std::this_thread::get_id()) + ": Unlocking A, B...");
    // We don't need to explicitly unlock either mutex
  });

  std::thread thread_B([]()->void {
    std::scoped_lock scopedLock(mtx_B, mtx_A);
    print_safe(id_string(std::this_thread::get_id()) + ": Locked B, A");
    std::this_thread::sleep_for(std::chrono::seconds(1));

    print_safe(id_string(std::this_thread::get_id()) + ": Unlocking B, A...");
    // We don't need to explicitly unlock either mutex
  });

  thread_A.join();
  thread_B.join();
}

int main(const int argc, const char * argv[]) {
  std::cout << "main() thread id: " << std::this_thread::get_id() << std::endl;

  problem();

  print_safe("\nsolution_A, using std::lock\n");
  solution_A();

  print_safe("\nsolution_B, using std::lock_guard\n");
  solution_B();

  print_safe("\nsolution_C, using std::scoped_lock\n");
  solution_C();

  return 0;
}
The output of this program is
main() thread id: 140625995487040
140625995482880 thread_A: Locked A
140625987090176 thread_B: Locked B

140625995487040 problem(): We are in a deadlock.
    Enter y/Y to continue to the solution...

y
140625995487040 problem(): Unlocking A, B...
140625995482880 thread_A: B has been unlocked, we can proceed!
  Locked B
140625987090176 thread_B: A has been unlocked, we can proceed!
  Locked A
140625995482880 thread_A: Unlocking A, B...
140625987090176 thread_B: Unlocking B, A...

solution_A, using std::lock

140625987090176: Locked A, B
140625987090176: Unlocking A, B...
140625995482880: Locked B, A
140625995482880: Unlocking B, A...

solution_B, using std::lock_guard

140625995482880: Locked A, B
140625995482880: Unlocking A, B...
140625987090176: Locked B, A
140625987090176: Unlocking B, A...

solution_C, using std::scoped_lock

140625987090176: Locked A, B
140625987090176: Unlocking A, B...
140625995482880: Locked B, A
140625995482880: Unlocking B, A...

Process finished with exit code 0
All that said, why would one choose to use std::lock_guard over std::scoped_lock? If there is only a need to lock a single resource, the use of scoped_lock just isn't necessary. An added benefit to using lock_guard is it's availability in C++11, whereas scoped_lock isn't available until C++17. Also, the constructor for scoped_lock can technically accept 0 arguments. This means that one can forget to pass the mutex locks required for thread-safe code, and the compiler will happily accept their code. By using lock_guard when possible, we enlist the compiler's help in avoiding a small oversight in the use of scoped_lock.
Livelocks
A livelock occurs when thread_A has ownership of mtx_A, and thread_B has ownership of mtx_B. Each thread attempts to lock the opposing mutex, and when the thread realizes the mutex is already locked, they attempt to take corrective action and unlock their resource. The intention is to free up the resource for the other thread so it can complete it's work, but in some cases the threads continually lock and unlock their resources, running into the same problem each time.
This is a weird one to provide an example for, and I had to do some synchonization between the loops in thread_A and thread_B to make the results consistent. The threads will only enter livelock for 5 iterations, and then thread_B will give up, so the example can continue to show the solution. This is kindof an odd case, since we have intentionally synchronized the loops to produce a livelock situation, but I think the example shows the general idea.
/*##############################################################################
## Author: Shaun Reed                                                         ##
## Legal: All Content (c) 2022 Shaun Reed, all rights reserved                ##
## About: An example and solution for livelocks in C++                        ##
##                                                                            ##
## Contact: shaunrd0@gmail.com  | URL: www.shaunreed.com | GitHub: shaunrd0   ##
################################################################################
*/

#include <chrono>
#include <iostream>
#include <mutex>
#include <thread>
#include <vector>

static std::mutex mtx_A, mtx_B, output;

// Helper function to output thread ID and string associated with mutex name
// + This must also be thread-safe, since we want threads to produce output
// + There is no bug or issue here; This is just in support of example output
void print_safe(const std::string & s) {
  std::scoped_lock<std::mutex> scopedLock(output);
  std::cout << s << std::endl;
}

void problem() {
  // Construct a vector with 5 agreed-upon times to synchronize loops in threads
  typedef std::chrono::time_point<std::chrono::steady_clock,
      std::chrono::steady_clock::duration> time_point;
  std::vector<time_point> waitTime(6);
  for (uint8_t i = 0; i < 6; i++) {
    waitTime[i] = std::chrono::steady_clock::now()+std::chrono::seconds(1+i);
  }

  std::thread thread_A([waitTime]()->void {
    uint8_t count = 0; // Used to select time slot from waitTime vector
    bool done = false;
    while (!done) {
      count++;
      std::lock_guard l(mtx_A);
      std::cout << std::this_thread::get_id() << " thread_A: Lock A\n";
      // Wait until the next time slot to continue
      // + Helps to show example of livelock by ensuring B is not available
      std::this_thread::sleep_until(waitTime[count]);
      std::cout << std::this_thread::get_id() << " thread_A: Requesting B\n";
      if (mtx_B.try_lock()) {
        done = true;
        std::cout << std::this_thread::get_id()
                  << " thread_A: Acquired locks for A, B! Done.\n";
      }
      else {
        std::cout << std::this_thread::get_id()
                  << " thread_A: Can't lock B, unlocking A\n";
      }
    }
    mtx_B.unlock();
  });

  std::thread thread_B([waitTime]()->void {
    // As an example, enter livelock for only 5 iterations
    // + Also used to select time slot from waitTime vector
    uint8_t count = 0;
    bool done = false;
    while (!done && count < 5) {
      count++;
      std::lock_guard l(mtx_B);
      // Wait until the next time slot to continue
      // + Helps to show example of livelock by ensuring A is not available
      std::this_thread::sleep_until(waitTime[count]);
      if (mtx_A.try_lock()) {
        // The program will never reach this point in the code
        // + The only reason livelock ends is because count > 5
        done = true;
      }
    }
  });

  thread_A.join();
  thread_B.join();
}

// The solution below uses std::scoped_lock to avoid the livelock problem
void solution() {
  std::thread thread_A([]()->void {
    for (int i = 0; i < 5; i++) {
      // Increase wait time with i
      // + To encourage alternating lock ownership between threads
      std::this_thread::sleep_for(std::chrono::milliseconds(100 * i));
      std::scoped_lock l(mtx_A, mtx_B);
      std::cout << std::this_thread::get_id()
                << " thread_A: Acquired locks for A, B!" << std::endl;
    }
  });

  std::thread thread_B([]()->void {
    for (int i = 0; i < 5; i++) {
      std::this_thread::sleep_for(std::chrono::milliseconds(100 * i));
      std::scoped_lock l(mtx_B, mtx_A);
      std::cout << std::this_thread::get_id()
                << " thread_B: Acquired locks for B, A!" << std::endl;
    }
  });

  thread_A.join();
  thread_B.join();
}

int main(const int argc, const char * argv[]) {
  std::cout << "main() thread id: " << std::this_thread::get_id() << std::endl;

  problem();

  std::cout << "\nSolution:\n\n";
  solution();

  return 0;
}
The output of this program shows A requesting B, realizing it can't, and then releasing it's resource. What we can't see in this output is the activity of thread_B - this is just because it was very vertical, and I thought the output from thread_A was enough to show as an example.
The solution output shows the threads alternating ownership of the mutex locks between iterations.
main() thread id: 140684728141632
140684728137472 thread_A: Lock A
140684728137472 thread_A: Requesting B
140684728137472 thread_A: Can't lock B, unlocking A
140684728137472 thread_A: Lock A
140684728137472 thread_A: Requesting B
140684728137472 thread_A: Can't lock B, unlocking A
140684728137472 thread_A: Lock A
140684728137472 thread_A: Requesting B
140684728137472 thread_A: Can't lock B, unlocking A
140684728137472 thread_A: Lock A
140684728137472 thread_A: Requesting B
140684728137472 thread_A: Can't lock B, unlocking A
140684728137472 thread_A: Lock A
140684728137472 thread_A: Requesting B
140684728137472 thread_A: Acquired locks for A, B! Done.

Solution:

140684728137472 thread_B: Acquired locks for B, A!
140684719744768 thread_A: Acquired locks for A, B!
140684728137472 thread_B: Acquired locks for B, A!
140684719744768 thread_A: Acquired locks for A, B!
140684728137472 thread_B: Acquired locks for B, A!
140684719744768 thread_A: Acquired locks for A, B!
140684728137472 thread_B: Acquired locks for B, A!
140684719744768 thread_A: Acquired locks for A, B!
140684728137472 thread_B: Acquired locks for B, A!
140684719744768 thread_A: Acquired locks for A, B!
References
Some other references that I found online while working on these examples.
approxion: lock_guard vs scoped_lock
acodersjourney - 20 threading mistakes