Docker
Dockerfile
Official Dockerfile Documentation
Docker Images Docs is also a good place to get information on using various basic images which can be built off of.
Below, we define a Dockerfile within some exclusive directory on our system where we want to work on our docker image. Create this file with any text editor, where the following commands are possible in a CMD input format.
FROM defines the base image to build off of from a repository on dockerhub
LABEL
RUN defines a command to run in sequence as the Dockerfile is built.
SHELL Restarts into a given shell, seen below where we pass --login and -c parameters to bash
EXPOSE defines a port to expose on the container to the host
VOLUME
USER
WORKDIR
ENTRYPOINT
ENV
ARG
COPY \
# Default repository is the same that is used when running `hexo init`
ARG REPO='https://github.com/hexojs/hexo-starter'
# https://hub.docker.com/_/nginx as our base image to build off of
FROM nginx:latest
# Otherwise provide one during build..
# `docker build -t <TAG> . --build-params REPO='https/github.com/username/repo'
ARG REPO
LABEL maintainer='username@gmail.com'
# Install additional packages we need
RUN apt-get update && apt-get -y upgrade && apt install -y curl vim
# Grab NVM and restart shell to load commands into bash
RUN curl -o- https://raw.githubusercontent.com/nvm-sh/nvm/v0.34.0/install.sh | bash
SHELL ["/bin/bash", "--login", "-c"]
# Install NVM stable version and hexo
RUN nvm install stable
RUN npm install -g hexo-cli
EXPOSE 8080
In the Dockerfile above, I use ARG to define a default value REPO which represents the repository to clone when building this docker image. In this case, the repository is the same that is cloned automatically when running hexo init. Since we defined ARG REPO after the FROM command in the dockerfile, it will be accessible for the entire build process, instead of being limited to FOR. If you want to provide a different value for this when building the image, you can do so by using `docker build -t
SHELL restarts our shell to load the nvm commands into bash so we can in the next step nvm install stable. Otherwise, this command would fail saying that nvm did not exist.
Building Docker Images
To build a dockerfile into an image, run the following command, where -t is tagging the built image with a tag in the preferred format of dockerhub-username/dockerhub-reponame:version
docker build -t username/nginx-hexo:0.1 .
Running Built Images
We can run docker images and see the following output displaying all the built docker images on our machine
REPOSITORY                   TAG                 IMAGE ID            CREATED             SIZE
username/nginx-hexo          0.1                 86325466e505        32 minutes ago      331MB
Now to start our newly built image, we run the following command
docker container run -d --name nginx-hexo \
username/nginx-hexo:0.1
To check that our image is running, run docker container ls to see output similar to the below
CONTAINER ID        IMAGE                     COMMAND                  CREATED             STATUS              PORTS               NAMES
7a74d968f0d2        username/nginx-hexo:0.1   "nginx -g 'daemon of…"   30 minutes ago      Up 30 minutes       80/tcp, 8080/tcp    nginx-hexo
Pushing Images to DockerHub
To login to docker, we need to run docker login and follow the prompts, supplying our username and password. On some systems, you could see the below error -
error getting credentials - err: exit status 1, out: `GDBus.Error:org.freedesktop.DBus.Error.ServiceUnknown: The name org.freedesktop.secrets was not provided by any .service files`
To fix this, we run the following
sudo apt install gnupg2 pass
After logging into docker on your machine, since we already properly tagged our image when we built it with docker build -t <TAG> . above, we can simply docker push <TAG>. Below, we look up our image's local ID and retag it to ensure this matches our DockerHub username and preferred image name / tag. Then, we push the image to DockerHub, publicly. If you want this image to be private, which it should be if unstable, you can do so by logging into dockerhub and modifying the repository settings after making the first push.
Get the image ID -
docker images
username/nginx-hexo          0.1                 86513686e505        32 minutes ago      331MB
Assign the image ID a new tag (This is the same as the old in this case) -
docker tag 83213123e515 username/nginx-hexo:0.1
Push the docker image to DockerHub -
docker push username/nginx-hexo:0.1
Saving Images Locally
If you don't want to push to DockerHub for any reason, you can always just save you image locally using docker save, and then reload it later either on the same machine or a new one by using docker load.
Save the image
docker save username/nginx-hexo:0.1 > nginx-hexo.tar
Reload the image
docker load --input nginx-hexo.tar
You should see the following output
a333833f30f7: Loading layer [==================================================>]   59.4MB/59.4MB
68a235fa3cf2: Loading layer [==================================================>]  119.3kB/119.3kB
b402ba6c11cd: Loading layer [==================================================>]  135.7MB/135.7MB
3fc85c9d7bd6: Loading layer [==================================================>]  17.61MB/17.61MB
Loaded image: username/nginx-hexo:0.1
Docker Compose Services
Heimdall
Defining Services
Creating a Heimdall service using docker-compose can be done with the below basic docker-compose.yml -
---
version: "2"
services:
  heimdall:
    image: linuxserver/heimdall
    container_name: heimdall
    environment:
      - PUID=65522
      - PGID=65522
      - TZ=Europe/London
    volumes:
      - ./config:/config
    ports:
      - 8080:80
    restart: unless-stopped
Further customization of the default user and other users can be done within the app itself. Once logged in, set a password for the admin and decide if you want public view on or off. Its important to note that the Heimdall dashboards are user-specific, and act according to their users settings.
Before starting your service, you should take note of the port that your local host will pass to this container. (local:container). Also be sure to mount the volumes you wish to further configure / modify, so you will have easy access to them. To do this, just add a volume to the list above -
volumes:
  - ./config:/config
  - /etc/docker-heimdall/:/config
The above added volume will also mount the /config directory on the container to the /etc/docker-heimdall/ directory on our local host. This feature can be used to store directories in such a way that will make backing up our service and its files much easier.
Stopping / Starting Heimdall
Create a directory to store your Heimdall configuration files and / or mounted volumes, and within it insert a docker-compose.yml file with the above contents and run docker-compose up -d. This will start the services we defined, mount the volumes specified, along the ports we set in the docker-compose.yml. This file can be further modified to suit the needs of your application / local server. Adding mounted volumes is a useful feature when planning your service, since these directories will be available locally they will be easy to backup and modify.
Starting defined services -
admin@host:~/heimdall$ docker-compose up -d
Creating network "heimdall_default" with the default driver
Creating heimdall ... done
admin@host:~/heimdall$
Stop and remove created containers / networks -
admin@host:~/heimdall$ docker-compose down
Stopping heimdall ... done
Removing heimdall ... done
Removing network heimdall_default
admin@host:~/heimdall$
Shlink
Shlink allows for passing of parameters to URLs using # for anchored links
Shlink does not allow you to rename a shortlink. :(
Overview
Shlink is a URL shortner that can be hosted locally or in a docker container. It feels very segmented in the sense that you can mix and match many solutions to different services required under certain Shlink instances. This could be beneficial if for example you had a preference to use a certain database or webserver due to some support or feature. To name a few -
Webservers: Apache, Nginx, and Swoole Databases: mysql, mariadb, postgres, Redis, and mssql
See the docker-compose.yml on the GitHub for a good collection of services and options for each that could be ran.
Shlink also comes apart nicely. Meaning if you want to host an nginx server / database on your host and then utilize the public app.shlink.io web client, you can do so and save yourself the trouble of updating / maintaining the web client yourself.
Shlink Webserver
wget https://github.com/shlinkio/shlink/releases/download/v2.2.1/shlink_2.2.1_dist.zip
unzip shlink_2.2.1_dist.zip
cd shlink_2.2.1_dist/
sudo chmod -R +w data/
PHP Parse error:  syntax error, unexpected '$isUpdate' (T_VARIABLE), expecting ')' in /home/shlink/shlink_2.2.1_dist/vendor/shlinkio/shlink-installer/bin/run.php on line 12
So I grabbed the docker image instead -
After pointing nginx to port 8080, Shlink can be quickly spun up using a docker command. The only values needing changed below are SHORT_DOMAIN_HOST and SHORT_DOMAIN_SCHEMA, if you are not using https.
docker run --name shlink -p 8080:8080 -e SHORT_DOMAIN_HOST=domain.com -e SHORT_DOMAIN_SCHEMA=https -e GEOLITE_LICENSE_KEY=kjh23ljkbndskj345 shlinkio/shlink:stable
Once active, visiting your domain will result in a 404, since we are only running the nginx server for shlink to route links through we'll need to setup a connection to the remote database at app.shlink.io. This is done by first generating an API key from the commandline under the same user that manager the shlink docker service -
docker exec -it shlink_container shlink api-key:generate
This command will output a string of characters that we can input on app.shlink.io by filling out a quick form requesting us to name our server, provide the domain, and the secret API key.

Managing Shortlinks
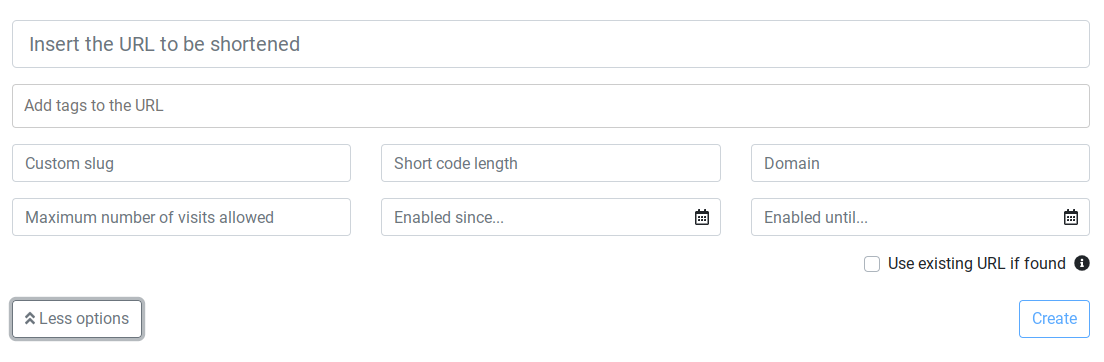
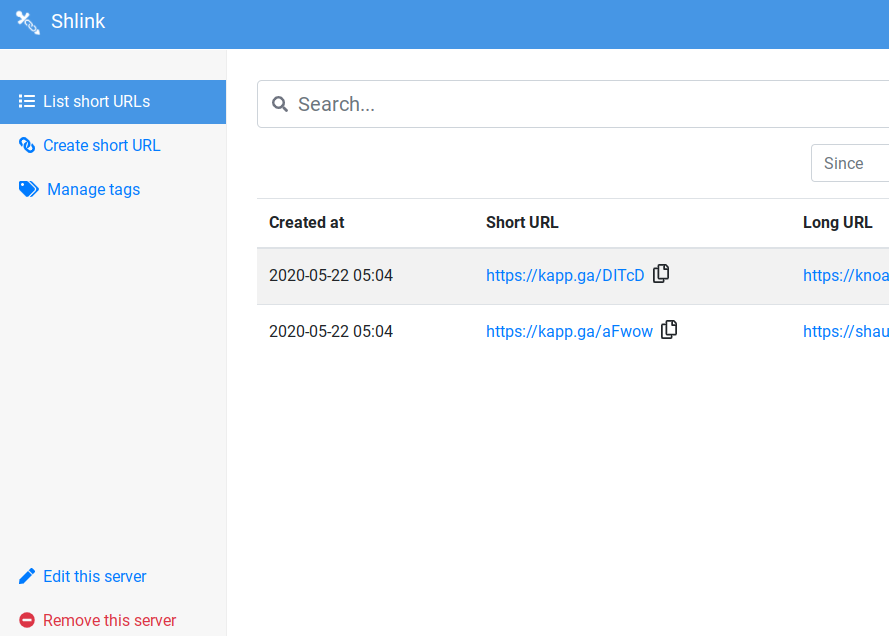
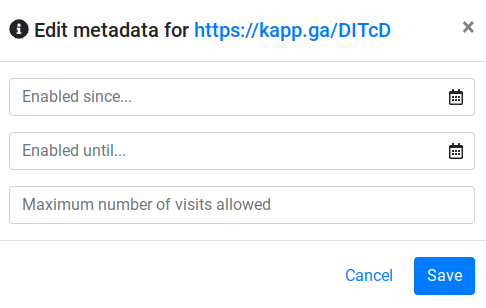
Once this is done, you'll be greeted with the page below, allowing you to create shortlinks and edit or track links that already exist. This could be useful for changing links that are spread across a wider range of services, so you wouldn't need to go back and replace links to reroute to a new or updated location, you could simply update your shortlink within your shlink dashboard.
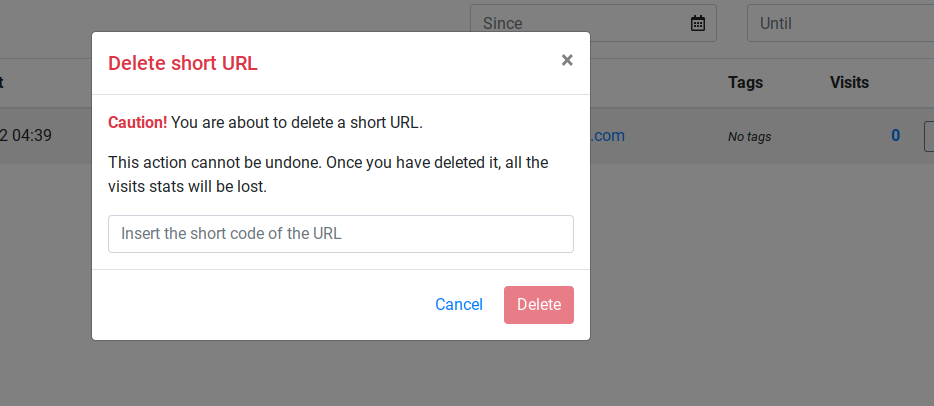
One thing that got old quickly is deleting shortlinks, where the prompt required you to enter the short-code into a prompt that covered the shortcode from view. I only had 3 to remove, and it took quite a bit of time for such a simple task. I did not see a bulk deletion option through the dashboard.
You have the option to set various parameters when creating a shortlink, and can always return to make edits to existing shortlinks that provide the same options -
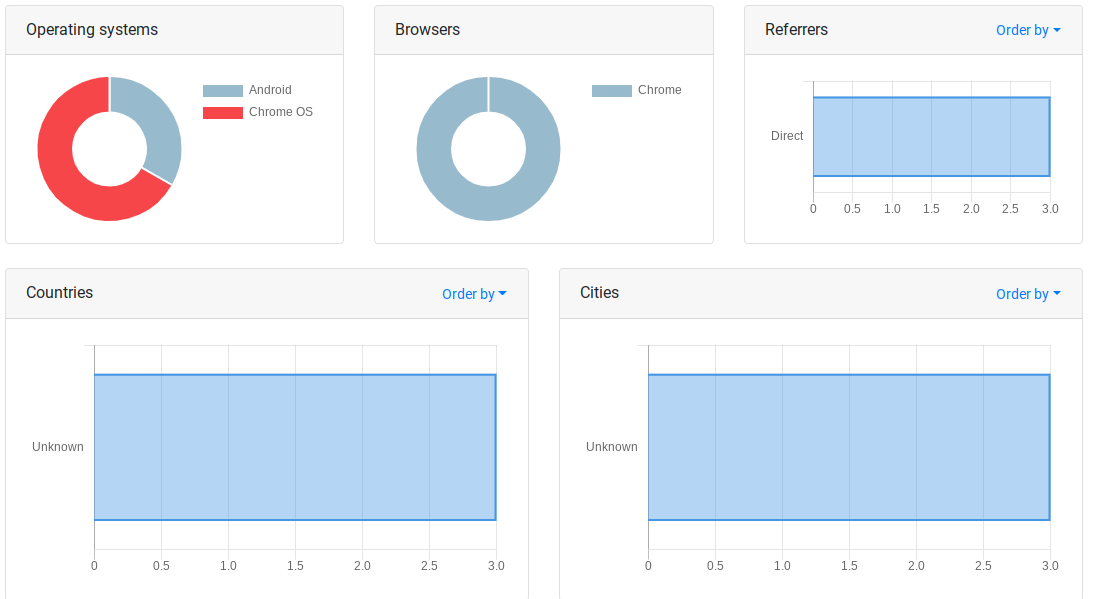
Tracking Shortlinks
The dashboard provided further insight on links, creating some graphs using information like OS, location and browser -
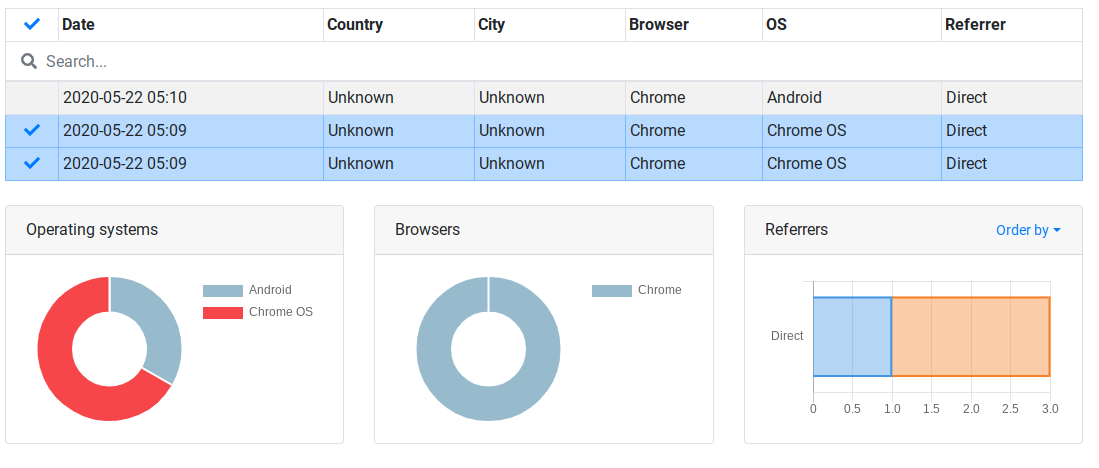
There was even an option to omit results from the generated graphs using an interactive table provided within the dashboard. If you'll notice below, I've deselected the only android hit on the table and the data still appears as though there are still android users. I noticed that modifying the table would only impact the bar graphs.
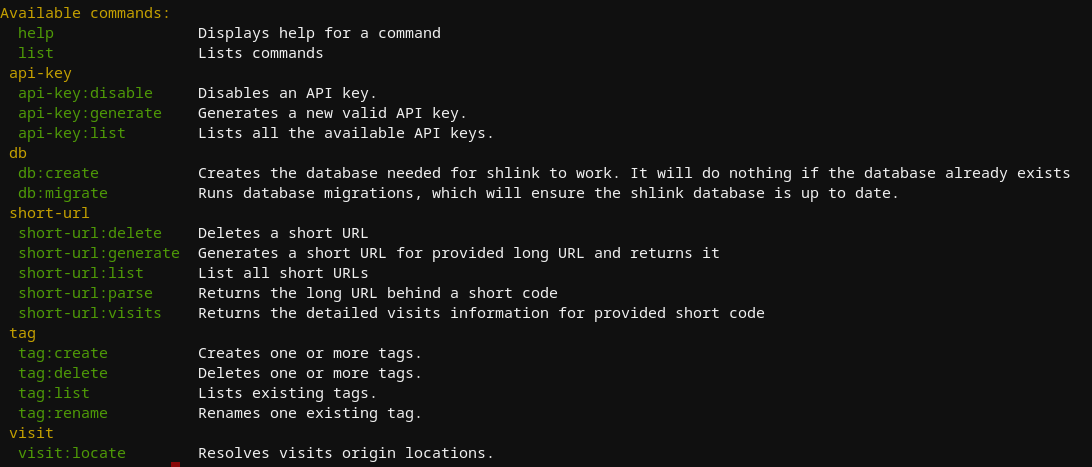
Shlink CLI
Shlink offers a wide range of commands that can be run directly from the terminal that is hosting it. This can be used for any number of things from provisioning / revoking access via API key generation to creating and migrating databases. For a full list of commands, see below
I noticed from the statistics page above that the dashboard didn't seem to be reporting any information on location, though it seemed to support displaying this information. After looking through the commands above a bit, I attempted to see if I had any luck on the back end by running shlink visit:locate
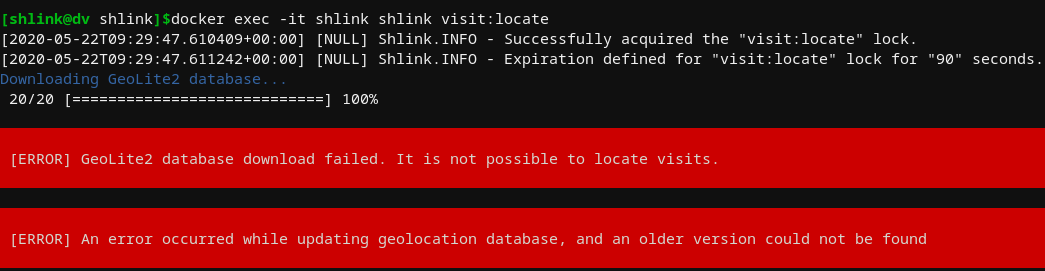
Seems like there's an issue here, but at least its clear and easy to test for a fix. I'll come back to this if I have time.
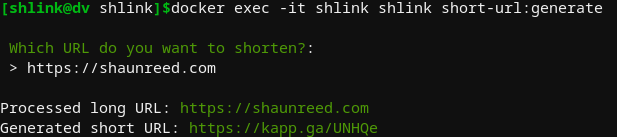
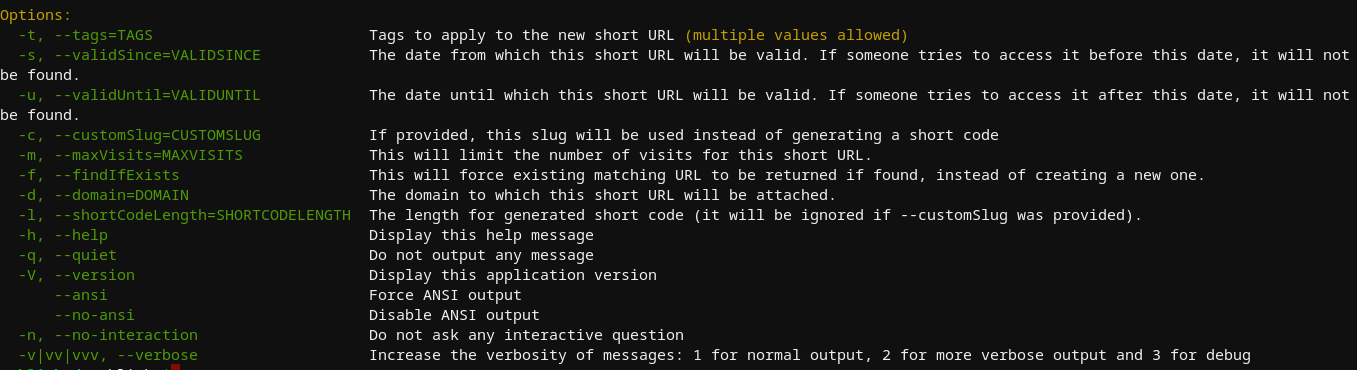
Shortening a link through the CLI was interactive by default, but provided many additional options that could be useful for scripting or automation -
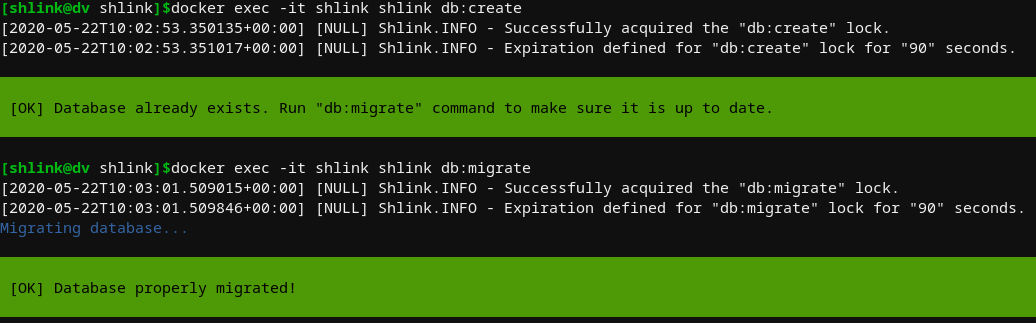
When attempting to track a shortlink via CLI, it basically feeds you the nginx logs of the relative hits to your shortlink. I noticed that when attempting to create a database that already exists, it exits cleanly and there is also a nice tool for updating your database
Shlink Web Client
The Shlink web client is on Docker Hub and instructions on how to use it can be found on the Shlink Documentation. To build the docker image manully -
wget https://github.com/shlinkio/shlink-web-client/archive/v2.3.1.zip
unzip v2.3.1.zip
cd shlink-web-client-2.3.1/
docker build . -t shlink-web-client
The docker-compose.yml looks like the following
version: '3'

services:
  shlink_web_client_node:
    container_name: shlink_web_client_node
    image: node:12.14.1-alpine
    command: /bin/sh -c "cd /home/shlink/www && npm install && npm run start"
    volumes:
      - ./:/home/shlink/www
    ports:
      - "3000:3000"
      - "56745:56745"
      - "5000:5000"
GitLab
Following the link below, GitLab provides a good refence for the many ways to deploy and configure various portions of a self hosted GitLab instance. fo Official Ubuntu Installation Instructions
Versions
GitLab offers two types of instances, SaaS and self-hosted. SaaS is their hosted gitlab.com instance which you can sign up on an purchase different tiers. The second is a self-hosted environment with limitations based on the license purchased.
SaaS
Differences in SaaS GitLab versions
Support for CI tools and dashboards come with Bronze
Support for Conan, Maven, NPM come with Silver.
Support for major security features comes with Gold.
Self-hosted
Differences in self-hosted GitLab versions
Its good to know that you can always upgrade your CE instance to EE just by installing the EE packages ontop of the CE.
Its also good to know what would happen to your instance should your subscription expire if considering a EE license
Installation
GitLab uses their Omnibus GitLab package to group the services needed to host a GitLab instance without creating confusing configuration scenarios.
GitLab can be hosted on a Pi which means you can do some tweaking to improve performance or save some resources on your host. Some options would be splitting the DBs from the host and reducing running processes. Both are described and documented in the link above.
Docker Compose
Official Compose Documentation
Currently, the basic docker-compose.yml shown on the official documentation is seen below.
web:
  image: 'gitlab/gitlab-ce:latest'
  restart: always
  hostname: 'gitlab.example.com'
  environment:
    GITLAB_OMNIBUS_CONFIG: |
      external_url 'https://gitlab.example.com'
      # Add any other gitlab.rb configuration here, each on its own line
  ports:
    - '80:80'
    - '443:443'
    - '22:22'
  volumes:
    - '$GITLAB_HOME/config:/etc/gitlab'
    - '$GITLAB_HOME/logs:/var/log/gitlab'
    - '$GITLAB_HOME/data:/var/opt/gitlab'
By default, docker will name this container by prefixing the web service name with pathname_ relevant to your current working directory. If you want to name this container add container_name: name within the web layer of this docker-compose.yml
Required Modifications
We need to make sure to replace hostname and external_url with relevant URLs for our environment or starting this container will fail.
hostname
The hostname must be in the format of the root domain domain.com - without the schema (http / https) or port.
external_url
The external_url must be in the format of http://domain.com:8080 where 8080 is the port we are serving the content to externally. If you are using the default port 80, you can just use the http://domain.com format.
This error is seen with docker start gitlab && docker logs -f gitlab when we have improperly set the external_url variable within the root docker-compose.yml
Unexpected Error:
-----------------
Chef::Exceptions::ValidationFailed: Property name's value http://myspace.com does not match regular expression /^[\-[:alnum:]_:.]+$/
GITLAB_HOME
We also need to ensure that we either replace the environment varialble $GITLAB_HOME or set it to a value relevant to your environment. Otherwise, when starting this container Docker will not be able to bind the volumes and we will not be able to modify the required configuration files within them.
If you want to see what environment variables are set by default with the gitlab/gitlab-ce Docker image, run the following command
docker run gitlab/gitlab-ce env
For this image, we see the following output.
PATH=/opt/gitlab/embedded/bin:/opt/gitlab/bin:/assets:/usr/local/sbin:/usr/local/bin:/usr/sbin:/usr/bin:/sbin:/bin
HOSTNAME=0a37118aae33
LANG=C.UTF-8
TERM=xterm
HOME=/root
Serving Locally
Working on hosting this container on localhost? Because DNS resolves locally on your host first, you can override any URL within your /etc/hosts file by passing the below configuration, which allows us to visit www.myspace.com within a web browser to see the content being served locally.
127.0.0.1   localhost www.myspace.com myspace.com

# The following lines are desirable for IPv6 capable hosts
::1     ip6-localhost ip6-loopback
fe00::0 ip6-localnet
ff00::0 ip6-mcastprefix
ff02::1 ip6-allnodes
ff02::2 ip6-allrouters
Starting the Services
Since the Omnibus is a self-contained environment that has everything you need to host a GitLab, the docker-compose.yml we configured above needs to only contain the single web service which uses the gitlab/gitlab-ce Docker image. If you configure your hosts file as I did in the above /etc/hosts example you can quickly deploy the entire service with the below docker-compose.yml
web:
  image: 'gitlab/gitlab-ce:latest'
  container_name: gitlab
  restart: always
  hostname: 'myspace.com'
  environment:
    GITLAB_OMNIBUS_CONFIG: |
      external_url 'http://myspace.com'
      # Add any other gitlab.rb configuration here, each on its own line
  ports:
    - '80:80'
    - '443:443'
    - '22:22'
  volumes:
    - '/home/user/docker/gitlab/config:/etc/gitlab'
    - '/home/user/docker/gitlab/logs:/var/log/gitlab'
    - '/home/user/docker/gitlab/data:/var/opt/gitlab'
You should not need to be running NGINX on your box locally.
This simple configuration is meant for testing only and omits the environment variable $GITLAB_HOME so that it is self-contained. That being said, all we need to do it run docker-compose up -d && docker logs -f gitlab, and visit myspace.com in a web browser.
At first, you may see the default GitLab 502 page while the container is starting, but within a few minutes you should be able to refresh the page and see the page below
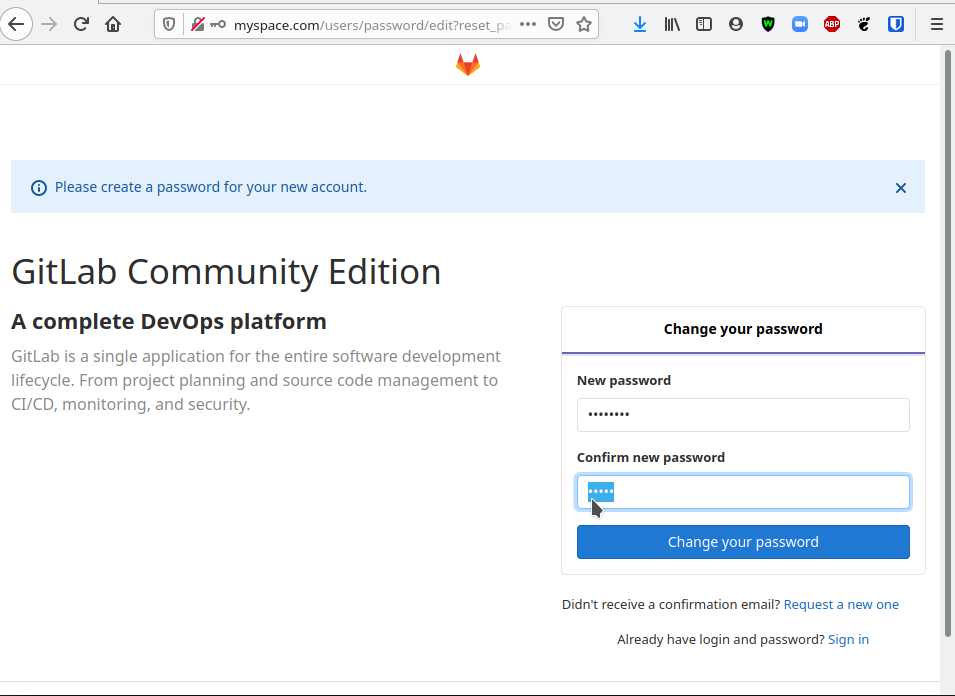
This page is requesting for you to create a password for the root account. After you submit this form you can then login to the GitLab with the username root and the relevant password configured here.
Once logging in as root, we see the below landing page
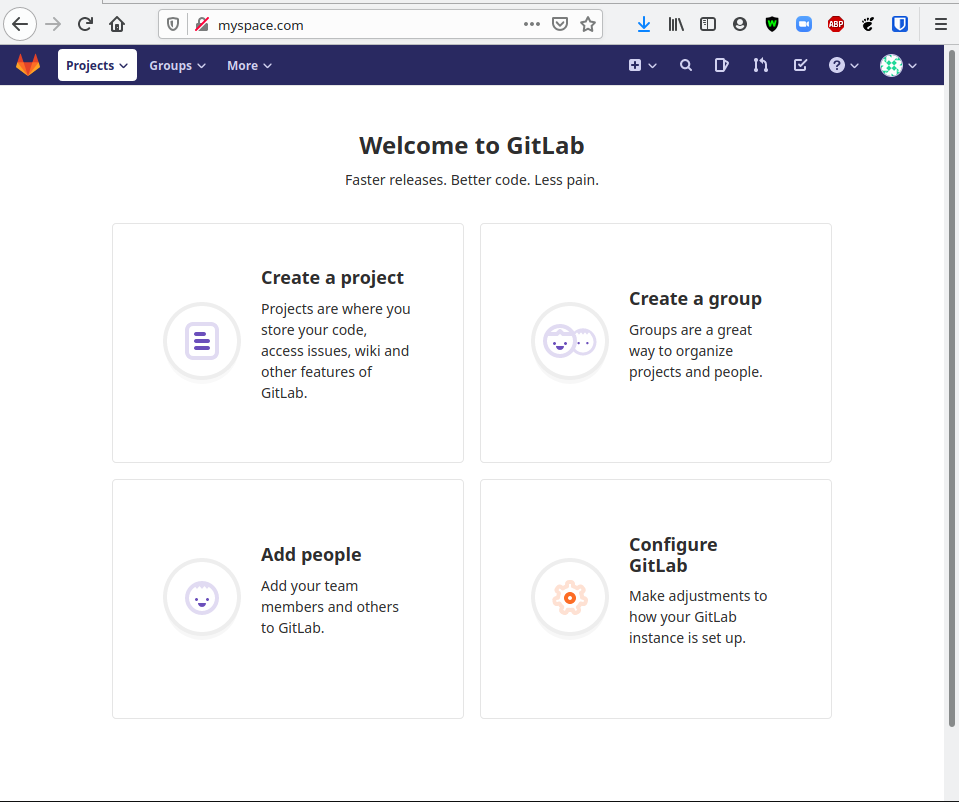
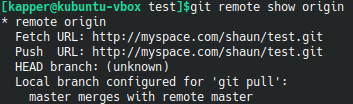
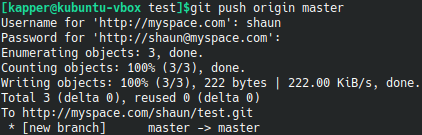
A normal user account can be created through the normal registration process on the home page of your instance. At this point we can already register a guest user, create a public repository, clone it, then push new content.
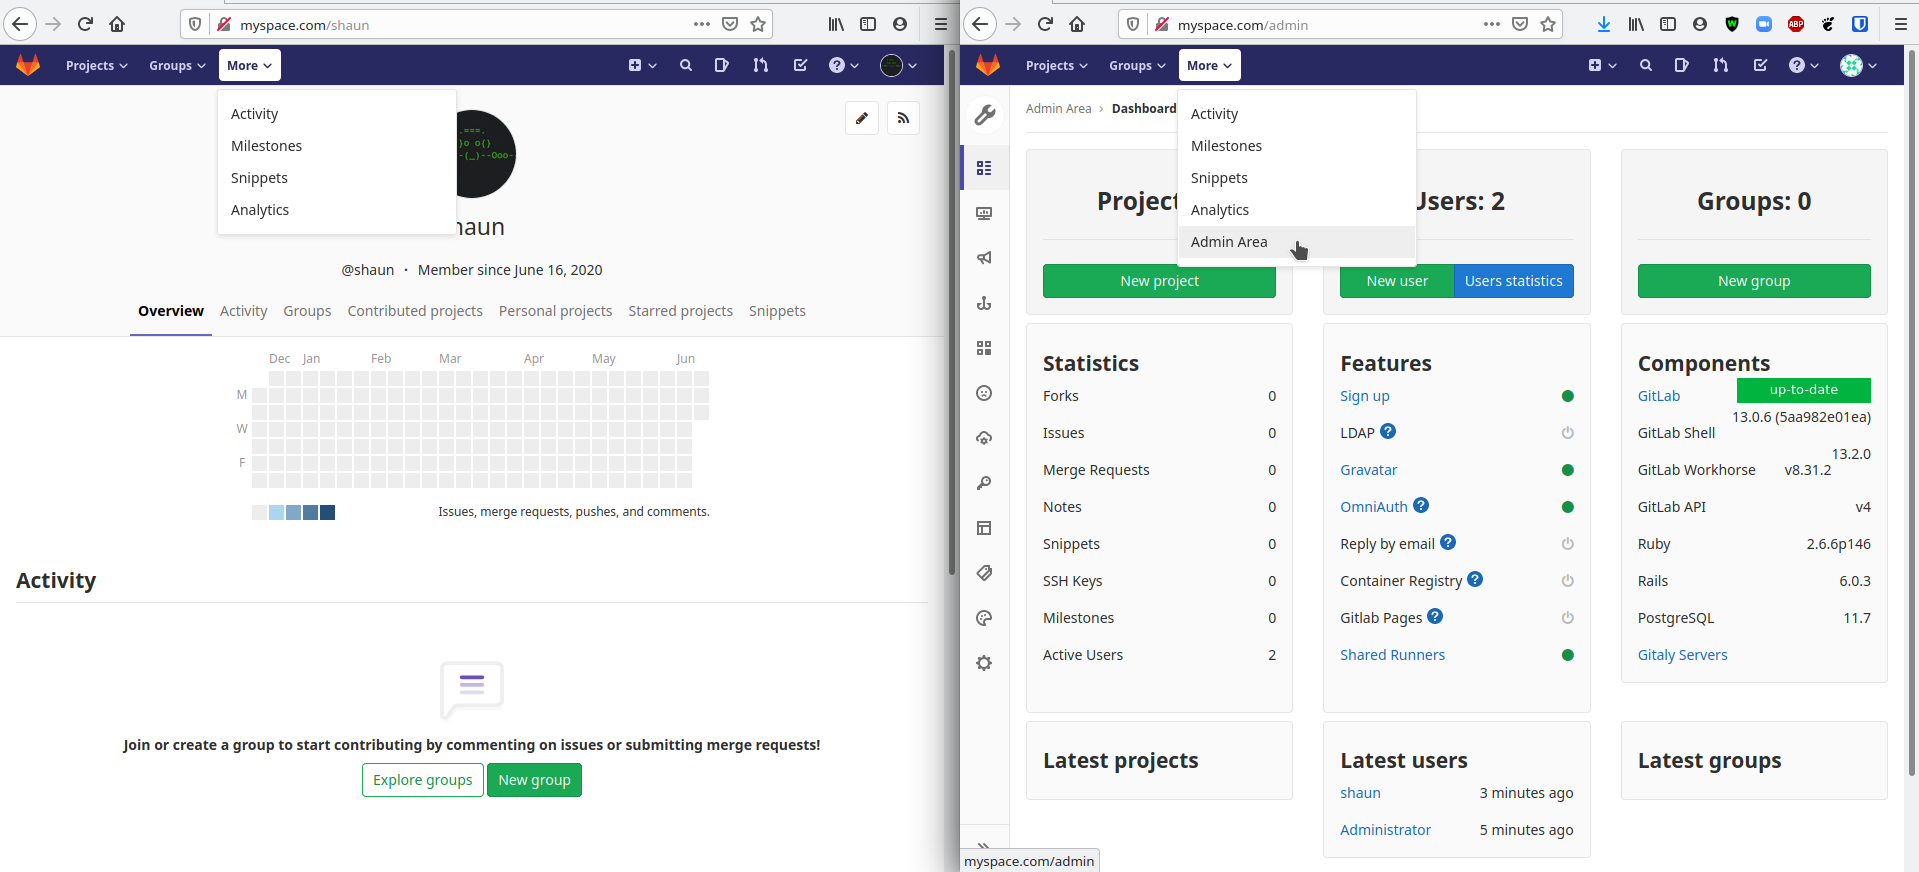
Below, I'm logged in as a user in one window and root in the other. The Admin Area is a nice landing page if you are looking to configure a new feature that your instance does not have yet, as clicking on the ? next to any label will take you directly to the documentation to setup or modify that feature.
Resource Usage
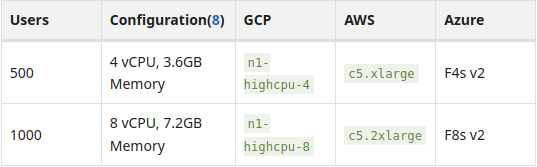
General hardware requirements can be found on the Official Hardware Requirements Documentation which gives detailed specifications on resources needed for various configurations.
If you plan to configure your instance to support greater than 1,000 users, you'll want to refer to the Official Reference Architectures Documentation.
Here, specifications are outlined for each component and service within the GitLab Omnibus that needs hardware adjusted or expanded based on the number of users expected to be using your instance.
For example, if you plan to use 10,000 users it would be much more expensive to support the hardware versus running an instance with 500 users
Memory
Below, we can see the actual difference in memory usage on our host by running free -ht while the container is running and after the container is stopped. This instance is running GitLab locally with no NGINX proxy running on the host itself. At the time of this test, there were only two users signed into the instance.
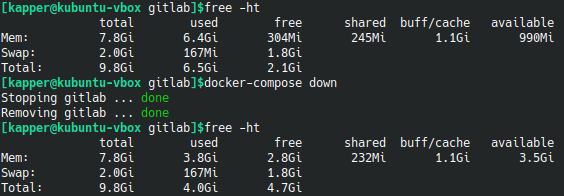
We should note that though the actual usage seen here is only 2.6GB, the basic requirement of 3.6GB for up to 500 users is still valid.
CPU
Below, we can see the difference in CPU load seen within htop. This instance is running GitLab locally with no NGINX proxy running on the host itself. At the time of this test, there were only two users signed into the instance.
GitLab Running

GitLab Down

Notable Features
Some notable differences seen on a self hosted instance of GitLab
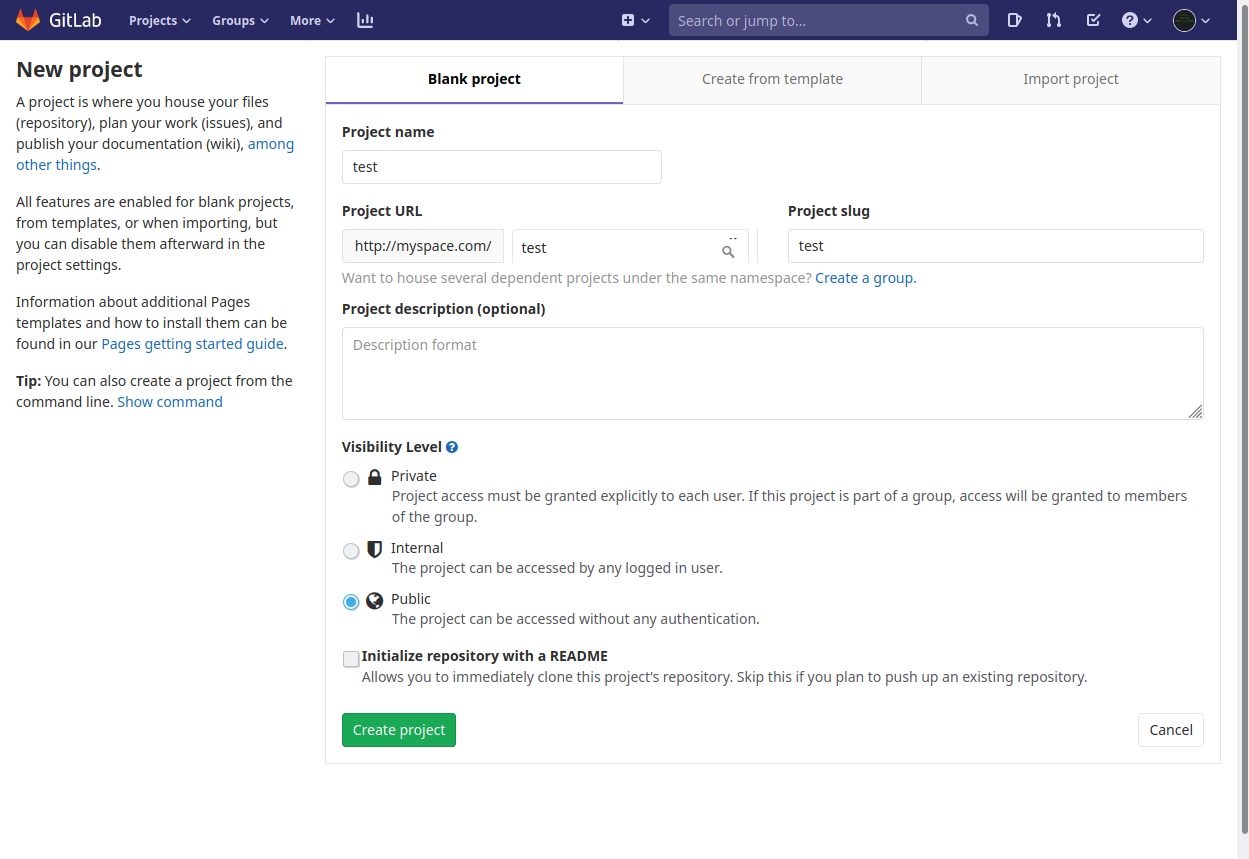
Repository Creation
When hosting your own GitLab instance, you are granted an extra option when creating a repository. This allows you to create repositories which are only available to users which are logged in.
GitLab Settings
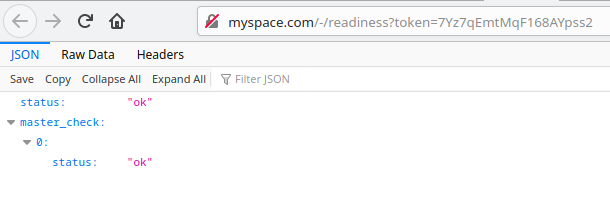
Health Check Endpoints
GitLab provides some default endpoints to gather general status information from your instance. To see these, navigate to the Admin Area as an administrator and see the section below

Readiness example -
Liveness example -

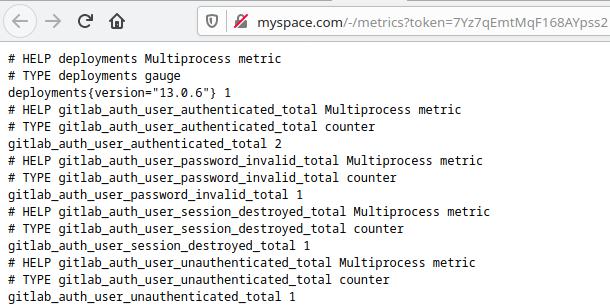
Metrics example -
The output here is huge, and this screenshot is only a very small amount of the information available. See this pastebin for the full output, which is nearly 3,000 lines long.
Self Monitoring
Go here and enable self monitoring to automatically create a production environment which can be monitored by Prometheus and then passed to Grafana through extra configuration later on.

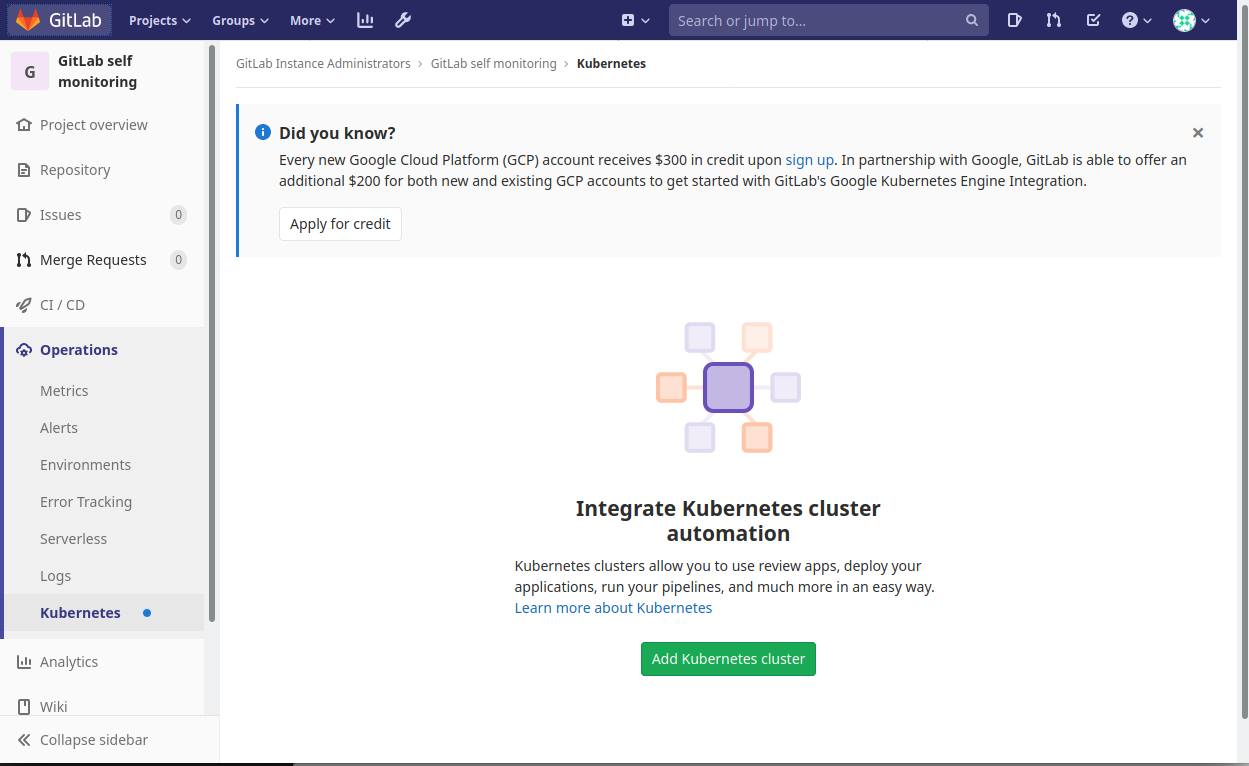
Doing this prompts a notification with a campaign offer for free credit on the Google Cloud platform and an additional credit from GitLab for getting started with a self hosted instance.
GitLab Applications
WIP
Grafana
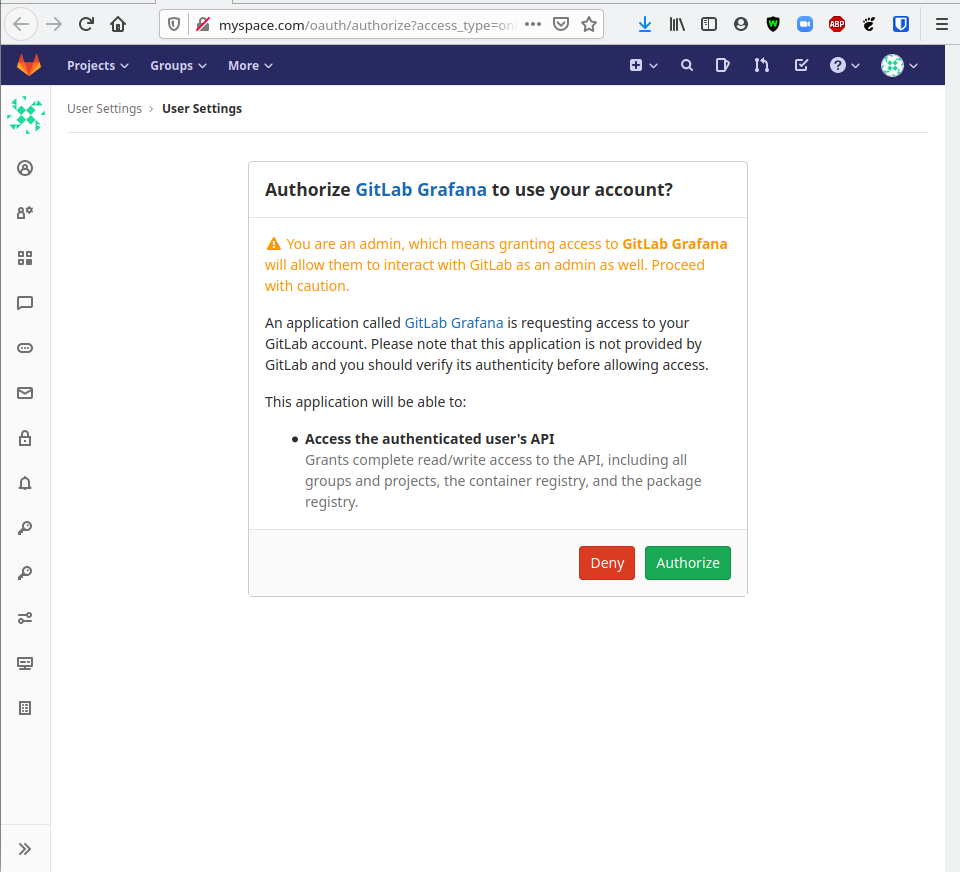
GitLab's Omnibus includes a Grafana that is configured with GitLab's builtin OAuth right out of the box if you are using any GitLab version beyond 12.0. If you do face any issues, see the Official Grafana OAuth Documentation for more detailed information on configuring this manually.
Visit http://yourdomain.com/-/grafana/login/gitlab to automatically link your GitLab account to a new Grafana user.
You must link the root user account to this Grafana in order to see various pages and settings not available to normal users.
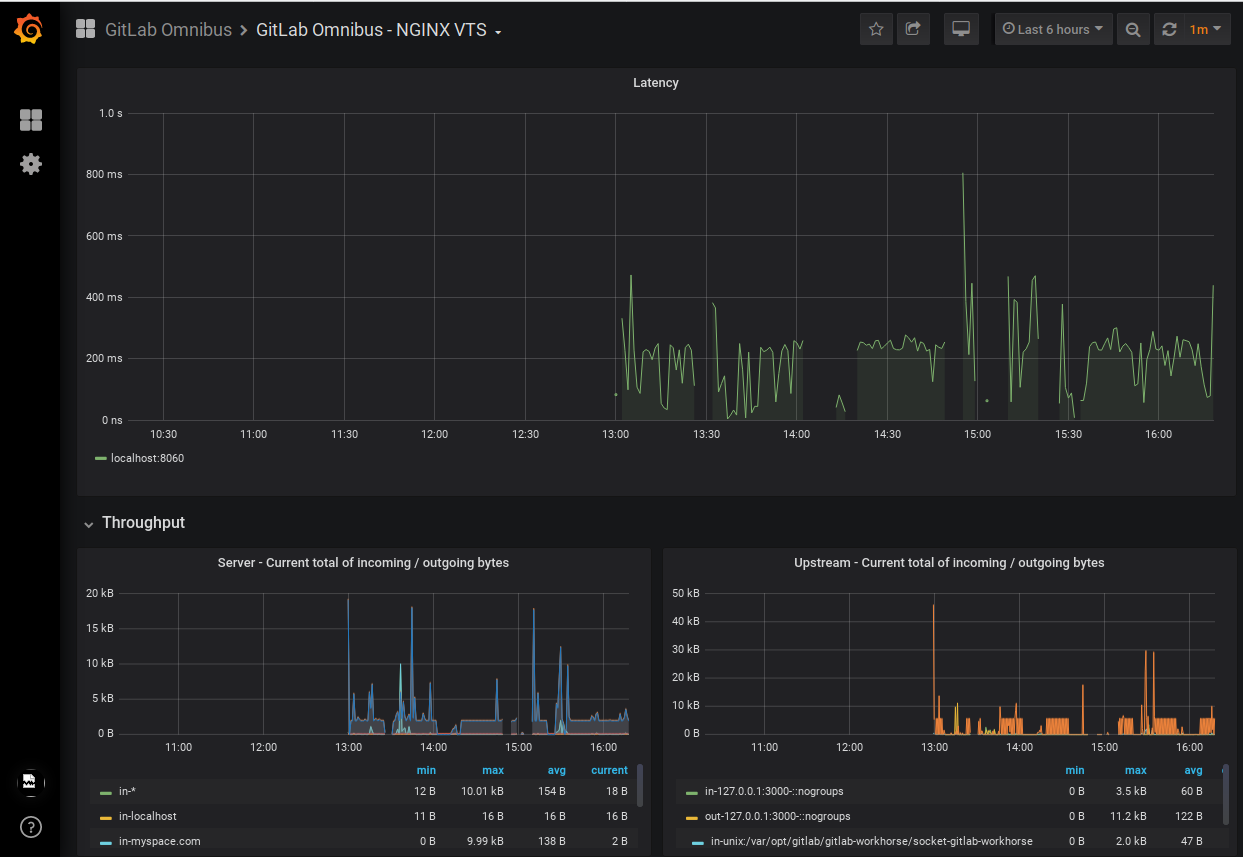
By default, the GitLab Omnibus ships with the following Grafana dashboards configured
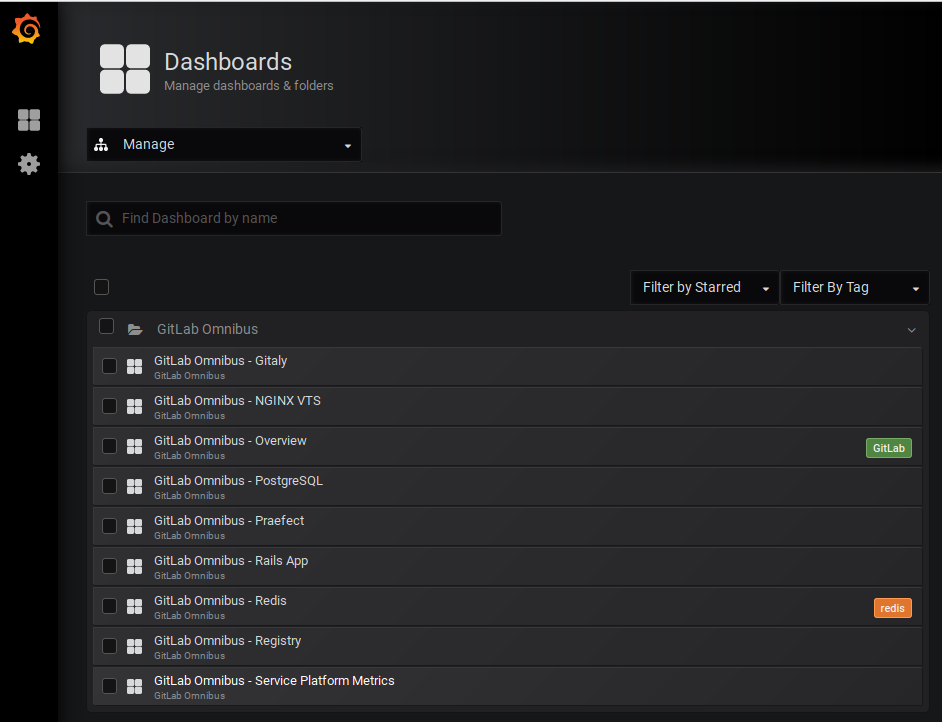
A partial example of the NGINX dashboard
GitLab Server Advanced Configurations
To modify these files, which configure several back-end options for our GitLab instance, we need to have started our services so Docker can mount the container volumes with the files we need to edit. Run docker-compose up -d and check the directory you input for $GITLAB_HOME in your docker-compose.yml. After a few seconds, we should notice this directory contains some new configurations.
gitlab.rb
To regenerate the default configuration, remove or rename the $GITLAB_HOME/config/gitlab.rb and restart the container
Mail Settings
GitLab sends mail using Sendmail by default. General email configurations can be found in the Email Settings section of the $GITLAB_HOME/config/gitlab.rb configuration file.
### Email Settings
# gitlab_rails['gitlab_email_enabled'] = true
# gitlab_rails['gitlab_email_from'] = 'example@example.com'
# gitlab_rails['gitlab_email_display_name'] = 'Example'
# gitlab_rails['gitlab_email_reply_to'] = 'noreply@example.com'
# gitlab_rails['gitlab_email_subject_suffix'] = ''
# gitlab_rails['gitlab_email_smime_enabled'] = false
# gitlab_rails['gitlab_email_smime_key_file'] = '/etc/gitlab/ssl/gitlab_smime.key'
# gitlab_rails['gitlab_email_smime_cert_file'] = '/etc/gitlab/ssl/gitlab_smime.crt'
# gitlab_rails['gitlab_email_smime_ca_certs_file'] = '/etc/gitlab/ssl/gitlab_smime_cas.crt'
SMTP
If you want to use a SMTP server instead, you can configure this in the GitLab email server settings section of the $GITLAB_HOME/config/gitlab.rb configuration file.
### GitLab email server settings
###! Docs: https://docs.gitlab.com/omnibus/settings/smtp.html
###! **Use smtp instead of sendmail/postfix.**

# gitlab_rails['smtp_enable'] = true
# gitlab_rails['smtp_address'] = "smtp.server"
# gitlab_rails['smtp_port'] = 465
# gitlab_rails['smtp_user_name'] = "smtp user"
# gitlab_rails['smtp_password'] = "smtp password"
# gitlab_rails['smtp_domain'] = "example.com"
# gitlab_rails['smtp_authentication'] = "login"
# gitlab_rails['smtp_enable_starttls_auto'] = true
# gitlab_rails['smtp_tls'] = false

###! **Can be: 'none', 'peer', 'client_once', 'fail_if_no_peer_cert'**
###! Docs: http://api.rubyonrails.org/classes/ActionMailer/Base.html
# gitlab_rails['smtp_openssl_verify_mode'] = 'none'

# gitlab_rails['smtp_ca_path'] = "/etc/ssl/certs"
# gitlab_rails['smtp_ca_file'] = "/etc/ssl/certs/ca-certificates.crt"
Incoming
GitLab can handle incoming email based on various configurations. Official Incoming Mail Documentation. This could enable features like responding to issue and merge requests via email.
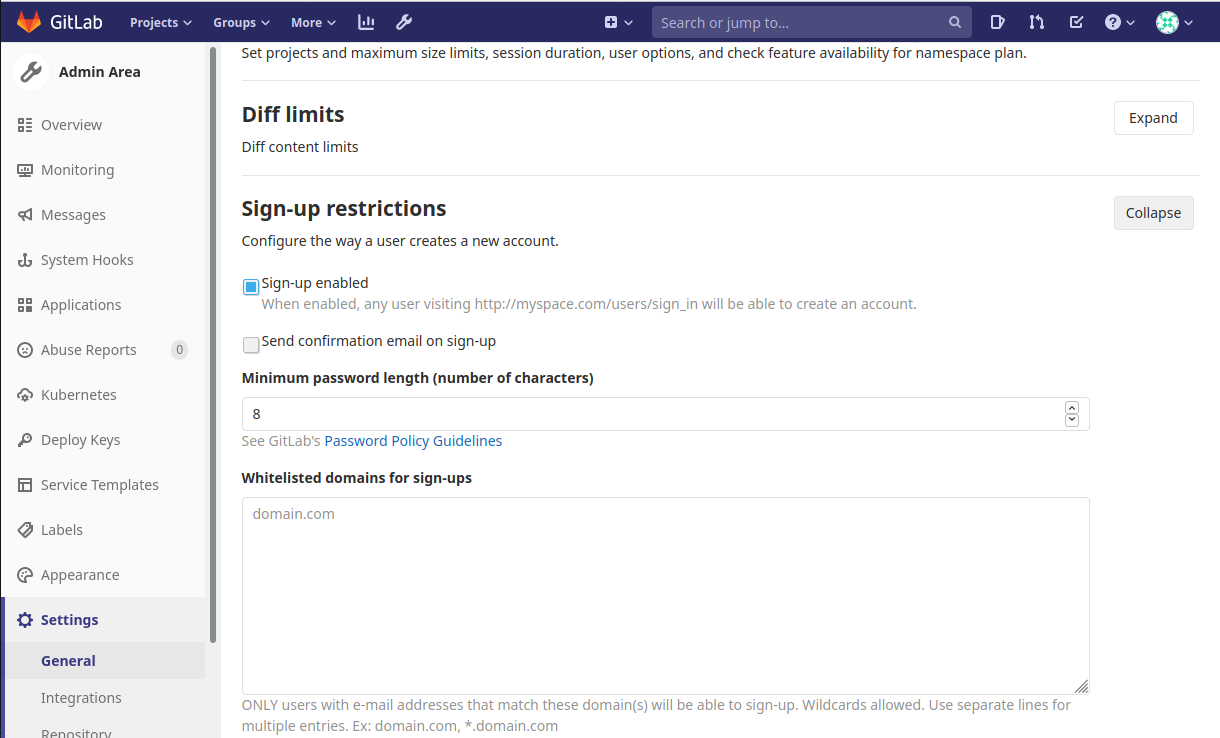
Outgoing
By default, GitLab sends no email to users upon registration. To enable this feature, sign into your instance as an adminsistrator and navigate to the Admin Area. Once there, go to the General Settings of your instance and scroll down to expand the section below
HomeAssistant
Installation
There are two methods below. The recommeneded method IMO is KVM. You could use VirtualBox and maybe that would be simpler if you are already familiar. I wanted to learn about KVMs.
Docker Compose
This method of installation does not support add-ons. To use add-ons in home assistant see the KVM installation method.
https://www.home-assistant.io/installation/linux#docker-compose
services:
  homeassistant:
    container_name: homeassistant
    image: "ghcr.io/home-assistant/home-assistant:stable"
    volumes:
      - /home/shaun/home-assistant/config:/config
      - /etc/localtime:/etc/localtime:ro
      - /run/dbus:/run/dbus:ro
    restart: unless-stopped
    privileged: true
    network_mode: host
Nothing too fancy here. Slap this configuration into a docker-compose.yaml and docker compose up -d in the same directory. If you don't want add-ons, this will work just fine.
The KVM method looks long and painful, I assure you it's not that bad.
Kernel-based Virtual Machine
To summarize this method of installation before we get started -
I'll create a homeassistant KVM running HaOS that is made avaialble on my local network via a network bridge. Next, I'll use my router's configuration panel to create a static lease for the new homeassistant device that appears on my network. Finally, I'll use an nginx server of mine to route requests to home.shaunreed.com to the local IP address I designated in the static lease. That way even though the IP is dead-simple to remember, I can just access home.shaunreed.com while connected to my local network.
Obviously accessing this URL from outside of my network is.. a waste of time. You might get lucky and get some response from a device on your network, but probably not.
These instructions don't offer much to the KVM newcomer, but here are the official instructions to install HAOS on a KVM -
Official Linux HomeAssistant OS Installation Instructions Using KVM
KVM Host Setup
The bash commands below are really just a way to make these instructions portable, you could also just browse the HaOS releases on github to fetch the file we need.
First we need to find the latest release tag for HaOS.
export TAG=$(curl https://api.github.com/repos/home-assistant/operating-system/releases/latest -s | jq .tag_name -r)

# Download qcow2 KVM file and unzip it.
wget https://github.com/home-assistant/operating-system/releases/download/$TAG/haos_ova-$TAG.qcow2.xz

unxz haos_ova-$TAG.qcow2.xz
Now we install the tools needed to manage KVMs. You must reboot after installing this package. It's possible that your system came with these tools installed, and there will be no need to install them or reboot.
sudo apt install virtinst
# This is the next command in the official documentation.
# I ran into some errors and work through each of them in the next code block.
virt-install --name haos --description "Home Assistant OS" --os-variant=generic --ram=4096 --vcpus=2 --disk $PWD/haos_ova-$TAG.qcow2,bus=scsi --controller type=scsi,model=virtio-scsi --import --graphics none --boot uefi
If you see this error, you need to reboot after installing virtinst
virt-install --name haos --description "Home Assistant OS" --os-variant=generic --ram=4096 --vcpus=2 --disk $PWD/haos_ova-$TAG.qcow2,bus=scsi --controller type=scsi,model=virtio-scsi --import --graphics none --boot uefi
ERROR binary '/usr/sbin/libvirtd' does not exist in $PATH: No such file or directory
Install libvirt-daemon-system to fix this error.
virt-install --name haos --description "Home Assistant OS" --os-variant=generic --ram=4096 --vcpus=2 --disk /home/shaun/homelab/home-assistant/haos_ova-13.2.qcow2,bus=scsi --controller type=scsi,model=virtio-scsi --import --graphics none --boot uefi
ERROR    Failed to connect socket to '/var/run/libvirt/libvirt-sock': No such file or directory
Add your user to the libvirt group by running newgrp libvirt to fix this error.
virt-install --name haos --description "Home Assistant OS" --os-variant=generic --ram=4096 --vcpus=2 --disk /home/shaun/homelab/home-assistant/haos_ova-13.2.qcow2,bus=scsi --controller type=scsi,model=virtio-scsi --import --graphics none --boot uefi
ERROR    Failed to connect socket to '/var/run/libvirt/libvirt-sock': Permission denied
Almost there!
To fix this error, run sudo -E vim /etc/libvirt/qemu.conf and make the changes shown in the code block below.
virt-install --name haos --description "Home Assistant OS" --os-variant=generic --ram=4096 --vcpus=2 --disk /home/shaun/homelab/home-assistant/haos_ova-13.2.qcow2,bus=scsi --controller type=scsi,model=virtio-scsi --import --graphics none --boot uefi
WARNING  /home/shaun/homelab/home-assistant/haos_ova-13.2.qcow2.xz may not be accessible by the hypervisor. You will need to grant the 'libvirt-qemu' user search permissions for the following directories: ['/home/shaun']
WARNING  Using --osinfo generic, VM performance may suffer. Specify an accurate OS for optimal results.

Starting install...
ERROR    internal error: process exited while connecting to monitor: 2024-10-19T18:18:10.481547Z qemu-system-x86_64: -blockdev {"driver":"file","filename":"/home/shaun/homelab/home-assistant/haos_ova-13.2.qcow2.xz","node-name":"libvirt-1-storage","auto-read-only":true,"discard":"unmap"}: Could not open '/home/shaun/homelab/home-assistant/haos_ova-13.2.qcow2.xz': Permission denied
Domain installation does not appear to have been successful.
If it was, you can restart your domain by running:
  virsh --connect qemu:///system start haos
otherwise, please restart your installation.
These are the changes to fix the last error above. The changes set the user to shaun which allows access to /home/shaun and the group to the default libvirt. There is a lot in this file and these lines will be commented out. Uncomment them and set them accordingly (your username might be different) -
# Some examples of valid values are:
#
#       user = "qemu"   # A user named "qemu"
#       user = "+0"     # Super user (uid=0)
#       user = "100"    # A user named "100" or a user with uid=100
#
user = "shaun"

# The group for QEMU processes run by the system instance. It can be
# specified in a similar way to user.
group = "libvirt"
Restart libvirt service after making the changes above to apply them
sudo systemctl restart libvirtd.service
At this point the command works for me. See the next section for next steps on how to access the home assistant frontend.
virt-install --name haos --description "Home Assistant OS" --os-variant=generic --ram=4096 --vcpus=2 --disk $PWD/haos_ova-$TAG.qcow2,bus=scsi --controller type=scsi,model=virtio-scsi --import --graphics none --boot uefi
If you ever want to start over and try to install again with the same KVM guest name this is how
virt-install --name haos --description "Home Assistant OS" --os-variant=generic --ram=4096 --vcpus=2 --disk $PWD/haos_ova-$TAG.qcow2,bus=scsi --controller type=scsi,model=virtio-scsi --import --graphics none --boot uefi
WARNING  Using --osinfo generic, VM performance may suffer. Specify an accurate OS for optimal results.

Starting install...
ERROR    Guest name 'haos' is already in use.
Domain installation does not appear to have been successful.
If it was, you can restart your domain by running:
  virsh --connect qemu:///system start haos
otherwise, please restart your installation.
Run the following commands -
shaun@bee:~$ virsh list --all
 Id   Name   State
----------------------
 1    haos   running

shaun@bee:~$ virsh undefine haos --remove-all-storage --nvram
Domain 'haos' destroyed

shaun@bee:~$ virsh list --all
 Id   Name   State
-----------------------
Now the command works so we can reinstall HaOS
virt-install --name haos --description "Home Assistant OS" --os-variant=generic --ram=4096 --vcpus=2 --disk $PWD/haos_ova-$TAG.qcow2,bus=scsi --controller type=scsi,model=virtio-scsi --import --graphics none --boot uefi
# Lots of output...
[    2.167746] systemd[1]: Finished Load Kernel Module efi_pstore.
[    2.169682] systemd[1]: modprobe@fuse.service: Deactivated successfully.
[    2.171076] systemd[1]: Finished Load Kernel Module fuse.
[    2.173527] systemd[1]: Finished Generate network units from Kernel command line.
[    2.177128] zram2: detected capacity change from 0 to 32768
[    2.178697] systemd[1]: Finished Remount Root and Kernel File Systems.
[    2.180025] systemd[1]: Reached target Preparation for Network.
[    2.184575] zram1: detected capacity change from 0 to 65536
[    2.186413] systemd[1]: Mounting FUSE Control File System...
[    2.187304] systemd[1]: Kernel Configuration File System was skipped because of an unmet condition check (ConditionPathExists=/sys/kernel/config).
[    2.190522] systemd[1]: Starting Create Static Device Nodes in /dev gracefully...
[    2.192376] systemd[1]: Started Journal Service.
[    2.237290] audit: type=1334 audit(1729364732.280:2): prog-id=6 op=LOAD
[    2.238125] audit: type=1334 audit(1729364732.280:3): prog-id=7 op=LOAD
[    2.306989] e1000 0000:00:02.0 enp0s2: renamed from eth0
[    2.563354] EXT4-fs (sda7): mounted filesystem 276bcccc-2827-4ba2-95cc-28ae4d61cfcd r/w with ordered data mode. Quota mode: none.

Welcome to Home Assistant
homeassistant login:
You do not need to login to this prompt. In the next section we will create a network bridge which exposes this KVM to your local network. Once this is done we can visit the frontend in a web browser and start the home assistant onboarding process. On startup, an admin user and password are generated and printed in the logs. It is recommended to set a new password for the admin account after logging in for the first time under Settings > Users.
Network Bridge
Now we need to setup a bridge for our network so our virtual machine will show up on our local network. Once this is done homeassistant will show up on your wifi router's list of devices with it's own local IP address. You can visit this local address 192.168.143.123:8123 to see the home assistant application from any device while connected to your network.
Note that any IP address found in this post is fake, and yours will be different.
Here are two good resources that helped me here
Before we make any changes, let's check the current connects and devices using nmcli
Show current connections
nmcli con show
NAME                UUID                                  TYPE      DEVICE
Wired connection 1  32ad924c-de8c-3d5f-8574-0350b5013a33  ethernet  enp1s0
lo                  1f94cfef-9a19-4a35-8a69-034b88a92162  loopback  lo
docker0             ed8b0fe6-ee1c-4eda-908a-796e1253599a  bridge    docker0
virbr0              db82dd0c-9afc-41c1-8ba9-25c172b8a725  bridge    virbr0
wifi                a1c5be8a-50da-4bcc-846e-0b8b15f1da8d  wifi      --
Wired connection 2  77b2cb41-bfca-3c15-90bf-6984f6c16a10  ethernet  --
Show devices and their status
nmcli device
DEVICE           TYPE      STATE                                  CONNECTION
enp1s0           ethernet  connected                              Wired connection 1
lo               loopback  connected (externally)                 lo
docker0          bridge    connected (externally)                 docker0
virbr0           bridge    connected (externally)                 virbr0
wlo1             wifi      disconnected                           --
p2p-dev-wlo1     wifi-p2p  disconnected                           --
enp2s0           ethernet  unavailable                            --
vethc3db6aa      ethernet  unmanaged                              --
Now, we need to create a bridge that will connect to our current ethernet connection enp1s0 from the list above -
nmcli con add type bridge ifname br0
Connection 'bridge-br0' (a426ed13-efe4-4102-9f5d-8d300ebb563c) successfully added.
The bridge is now in the list of connections but it is not yet active
nmcli con show
NAME                UUID                                  TYPE      DEVICE
Wired connection 1  32ad924c-de8c-3d5f-8574-0350b5013a33  ethernet  enp1s0
lo                  1f94cfef-9a19-4a35-8a69-034b88a92162  loopback  lo
docker0             ed8b0fe6-ee1c-4eda-908a-796e1253599a  bridge    docker0
virbr0              db82dd0c-9afc-41c1-8ba9-25c172b8a725  bridge    virbr0
wifi                a1c5be8a-50da-4bcc-846e-0b8b15f1da8d  wifi      --
bridge-br0          a426ed13-efe4-4102-9f5d-8d300ebb563c  bridge    br0
Wired connection 2  77b2cb41-bfca-3c15-90bf-6984f6c16a10  ethernet  --
Now make the connection from our ethernet device enp1s0 to the br0 bridge so that the KVM we host using the bridge network will appear on our local network. This is a slave connection that will always start with the bridge connection so that we are always tied to our ethernet.
nmcli con add type bridge-slave ifname enp1s0 master br0
Connection 'bridge-slave-enp1s0' (3065e93d-aa12-41f0-9f81-a7f215cc224b) successfully added.
Now bring up the bridge and the slave connection
nmcli con up bridge-br0
Connection successfully activated (master waiting for slaves) (D-Bus active path: /org/freedesktop/NetworkManager/ActiveConnection/32)

nmcli con up bridge-slave-enp1s0
Connection successfully activated (D-Bus active path: /org/freedesktop/NetworkManager/ActiveConnection/11)
Both should be assigned a device in the output below
nmcli con show
NAME                 UUID                                  TYPE      DEVICE
bridge-slave-enp1s0  36b4f332-4e17-44f6-b6e1-46c3a9e50ab1  ethernet  enp1s0
bridge-br0           55112f91-d19f-4544-b598-a23d4f6719b3  bridge    br0
lo                   13eec32a-6ecb-4f96-9826-42451ad97515  loopback  lo
virbr0               b39355aa-337f-4b2c-956b-707aa0a25c10  bridge    virbr0
vnet0                a2f06339-5832-4834-bcea-8e23ef495a9b  tun       vnet0
Wired connection 1   01bef55a-ef0c-3116-b621-582614d731b0  ethernet  --
Wired connection 2   1ff0150b-f0db-31c5-a99d-be6d93f45f0c  ethernet  --
Check device to see the status of the bridge connection is good. Here, we are waiting to connect. This can take some time so give it a few minutes.
nmcli device
DEVICE           TYPE      STATE                                  CONNECTION
enp1s0           ethernet  connected                              Wired connection 1
br0              bridge    connecting (getting IP configuration)  bridge-br0
br-5d311c779ca4  bridge    connected (externally)                 br-5d311c779ca4
lo               loopback  connected (externally)                 lo
br-f46f9264b01d  bridge    connected (externally)                 br-f46f9264b01d
docker0          bridge    connected (externally)                 docker0
virbr0           bridge    connected (externally)                 virbr0
wlo1             wifi      disconnected                           --
p2p-dev-wlo1     wifi-p2p  disconnected                           --
enp2s0           ethernet  unavailable                            --
vethc3db6aa      ethernet  unmanaged                              --
Check device status again and see that the connection is good. Note enp1s0 is now connected to bridge-slave-enp1s0 under CONNECTION column.
nmcli device
DEVICE           TYPE      STATE                   CONNECTION
br0              bridge    connected               bridge-br0
enp1s0           ethernet  connected               bridge-slave-enp1s0
br-5d311c779ca4  bridge    connected (externally)  br-5d311c779ca4
lo               loopback  connected (externally)  lo
br-f46f9264b01d  bridge    connected (externally)  br-f46f9264b01d
docker0          bridge    connected (externally)  docker0
virbr0           bridge    connected (externally)  virbr0
wlo1             wifi      disconnected            --
p2p-dev-wlo1     wifi-p2p  disconnected            --
enp2s0           ethernet  unavailable             --
vethc3db6aa      ethernet  unmanaged               --
Sometimes it can take a couple of minutes to connect if you have been toying around a lot, so give it a bit and check devices again if it says it's still trying to connect or something to that effect.
If you want this to be the default connection from now on you should enable autoconnect -
nmcli device set br0 autoconnect yes
KVM Host Configuration
Now we just need to tell our KVM host to use thet bridge network we just created. To do this we first need to define the network in virt-manager so if you haven't already..
sudo apt install virt-manager
List networks currently available to virt-manager -
virsh net-list --all
 Name      State    Autostart   Persistent
--------------------------------------------
 default   active   yes         yes
Define the bridge using a new XML file in any directory as temporary input to virsh net-define -
vim br0.xml
# The file should look like this...
<network>
  <name>br0</name>
  <forward mode="bridge"/>
  <bridge name="br0" />
</network>
Define the network using the temporary XML file we just created
virsh net-define br0.xml
Start the network, and then set it to automatically start on reboot
virsh net-start br0

virsh net-autostart br0
Network br0 marked as autostarted
We should now see the bridge in the list of networks
virsh net-list --all
 Name      State    Autostart   Persistent
--------------------------------------------
 br0       active   yes         yes
 default   active   yes         yes
Now open virt-manager, if you see a permisssions denied error connecting to libvirt socket then just reboot after installing virt-manager.
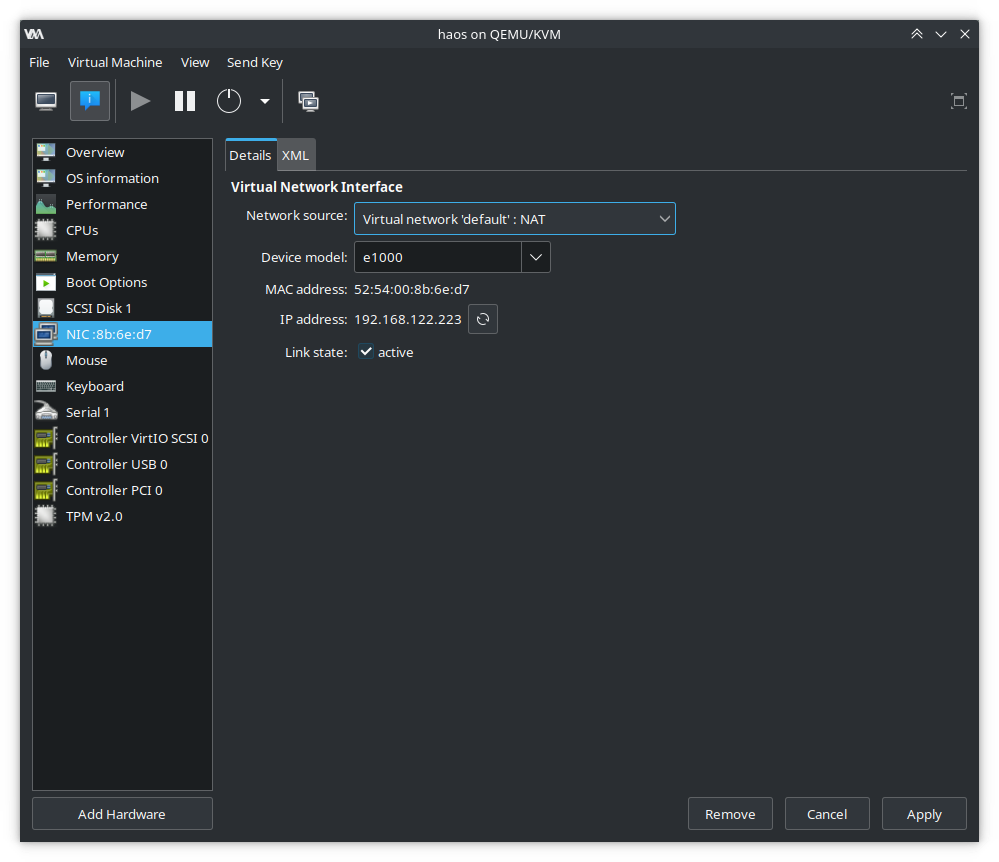
Change the Network source to use br0, note that the IP address may now appear as Unknown -
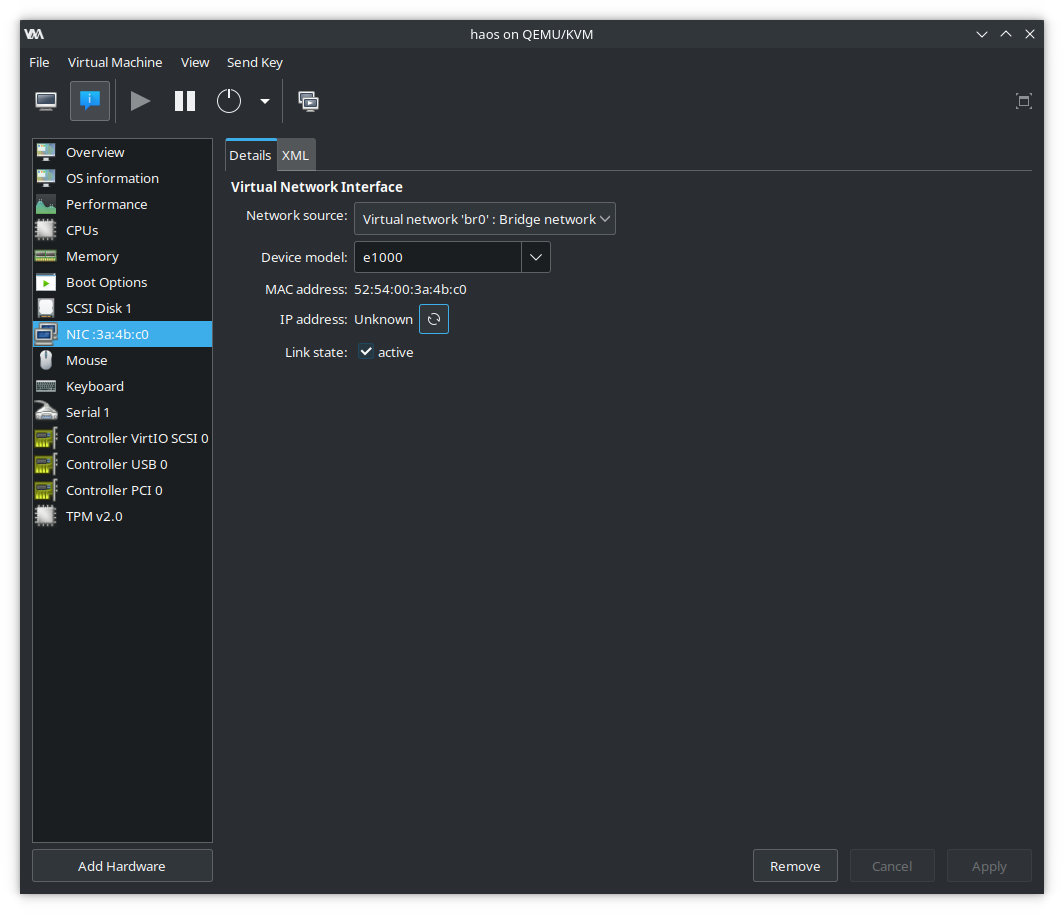
Restart the KVM and you should now see the virtual machine listed in your router's devices.

Using the IP in the screenshot above from my router's configuration panel, I can now visit 192.168.143.104:8123 in a web browser to start Home Assistant OS on boarding.
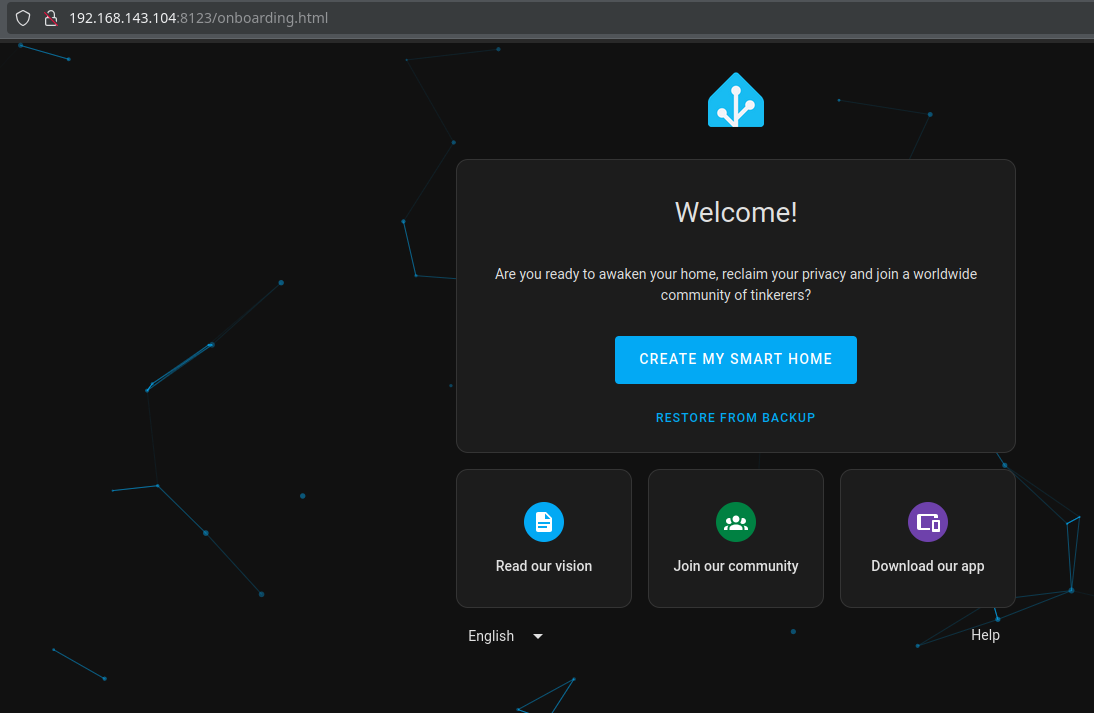
For me this means I can assign a static lease so that I know home assistant's local IP address at all times and it will never change. You can usually do this in your router's configuration panel.
Once this is done, I implement an nginx hack on one of my cloud servers to redirect requests to the local IP address assigned in the static lease -
# This exact configuration is not actually in use anywhere on the cloud.
user www-data;
worker_processes auto;
pid /run/nginx.pid;
include /etc/nginx/modules-enabled/*.conf;

events { }

http {
  include mime.types;

  server {
    listen 80;
    server_name home.shaunreed.com;
    rewrite ^ http://192.168.143.123:8123 permanent;
  }

  # Forward http requests to https
  server {
    listen 80;
    server_name shaunreed.com www.shaunreed.com;
    return 301 https://www.shaunreed.com$request_uri;
  }

  # Normal SSL for a secure web server.
  # This has nothing to do with home assistant, but serves as an example
  #   of using an existing web server to access your HAOS frontend.
  server {
    server_name shaunreed.com  www.shaunreed.com;
    server_tokens off;
    listen 443 ssl;
    ssl_certificate /some/path/to/fullchain.pem;
    ssl_certificate_key /some/path/to/privkey.pem;

    access_log /some/path/to/nginx/access.log;
    error_log /some/path/to/nginx/error.log;

    location / {
      include proxy_params;
      proxy_pass http://1.2.3.4:1234/;
    }
  }
}
HACS Installation
Enable Advanced mode in your user panel -

Settings->Add-ons->Add-on-Store then click the ... at the top right to open a drop-down menu and select repositories.
Add the HACS repo to the list https://github.com/hacs/addons

Install Get HACS in the Add-on store -
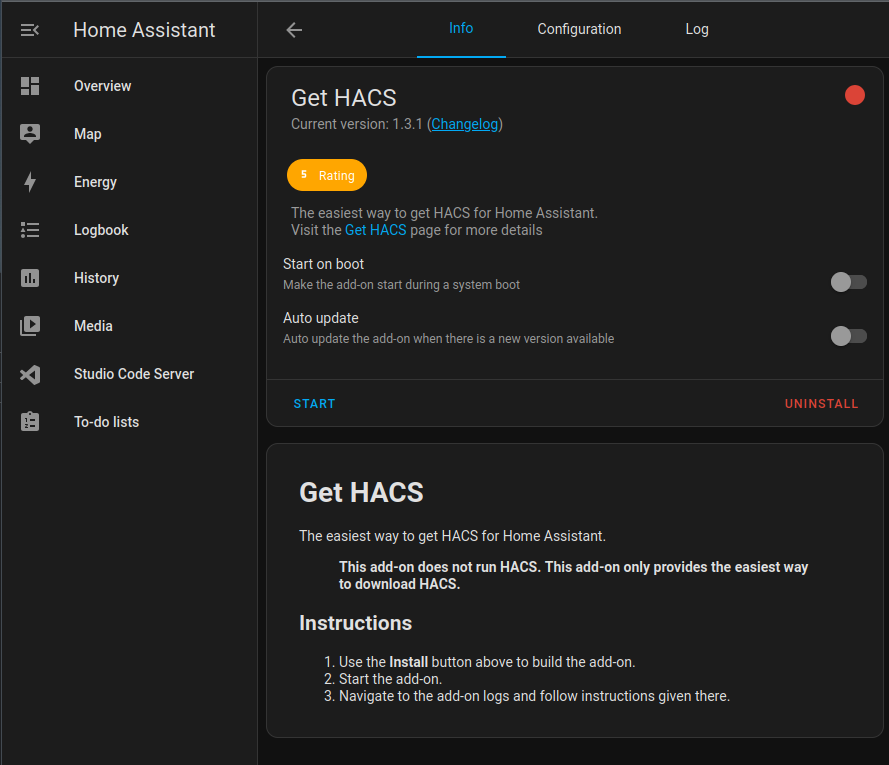
Run the add-on and view the logs to see the details.

So restart home by going to Settings->System and clicking the power button at the top-right.

Once the reboot is finished go to Settings->Devices and click Add Intergration at the bottom-right of the screen

Follow the steps and HACS will appear in the side-bar
Share Host Bluetooth Device
To enable Bluettoth connections in home assistant, you need a bluetooth dongle attached to your host machine. My host has an internal bluetooth adapter and I found it, but was not successful in sharing it with the KVM. A cheap USB bluetooth dongle worked perfectly though, first try using the steps below.
# List USB devices to find the bluetooth dongle use for bluetooth. Look for mention of hci, the kernel module for bluetooth.
sudo lsusb
Bus 001 Device 001: ID 1d6b:0002 Linux Foundation 2.0 root hub
Bus 002 Device 001: ID 1d6b:0003 Linux Foundation 3.0 root hub
Bus 003 Device 001: ID 1d6b:0002 Linux Foundation 2.0 root hub
Bus 003 Device 002: ID 25a7:fa67 Areson Technology Corp 2.4G Receiver
Bus 003 Device 004: ID 8087:0026 Intel Corp. AX201 Bluetooth
Bus 003 Device 013: ID 0a12:0001 Cambridge Silicon Radio, Ltd Bluetooth Dongle (HCI mode)
Bus 004 Device 001: ID 1d6b:0003 Linux Foundation 3.0 root hub
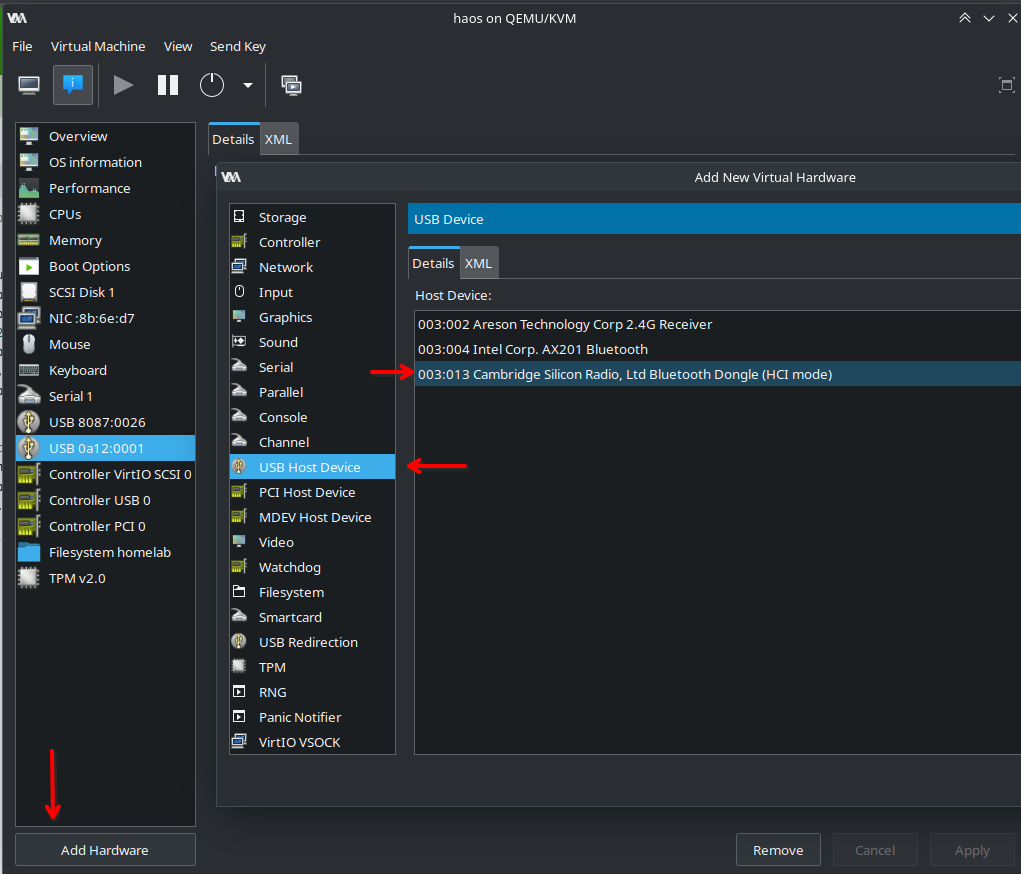
In the above output my cheap USB dongle is Bus 003 Device 013: ID 0a12:0001 Cambridge Silicon Radio, Ltd Bluetooth Dongle (HCI mode), and my system's internal bluetooth device that I could not get working is Bus 003 Device 004: ID 8087:0026 Intel Corp. AX201 Bluetooth. For the sake of sanity below I will not bother showing the attempt to use the system device, I will only show using the USB device that worked for me.
In virt-manager, open the KVM details panel and click Add Hardware, then select USB Host Device and find the device in the list.
Add the device and reboot HAOS. You can now go to Settings->Devices->Add-Intergration->Bluetooth and a bluetooth receiver will be detected.