Unity
Project Settings
At first when opening the Unity editor I was a bit overwhelmed by the many options available, and it can be hard to get going without at least knowing how to configure the most basic of settings for a Unity project. In the sections below, I'll cover some simple settings that are worthwhile to consider when creating a new project in Unity.
Playmode Tint
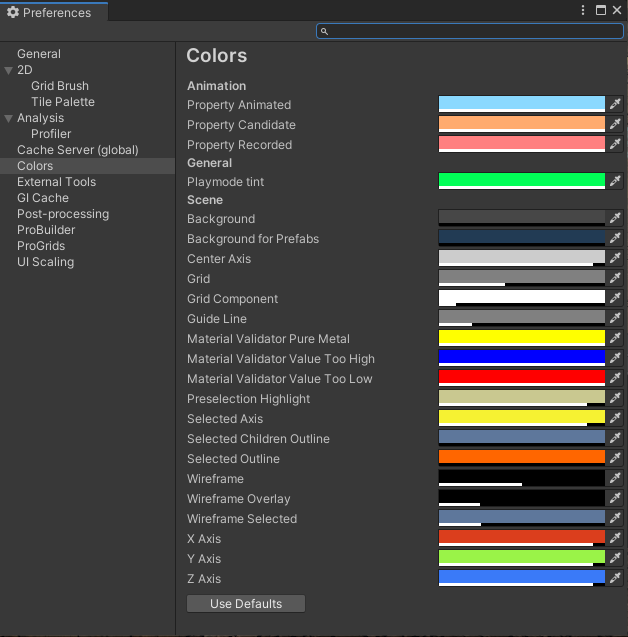
This option is not found in Project Settings, but I think it is something everyone entering into Unity for the first time should consider. Navigate to the menu bar at the top of your editor and select Edit->Preferences->Colors and adjust the Playmode Tint to something very noticable. This will avoid forgetting you are in play mode and making some changes, only to be forced to revert them all once exiting play mode.
For the rest of these sections, we will be working in the Project Settings panel opened with Edit->Project Settings... in the menu bar of the Unity editor.
Official Unity Project Settings Documentation
Project Name
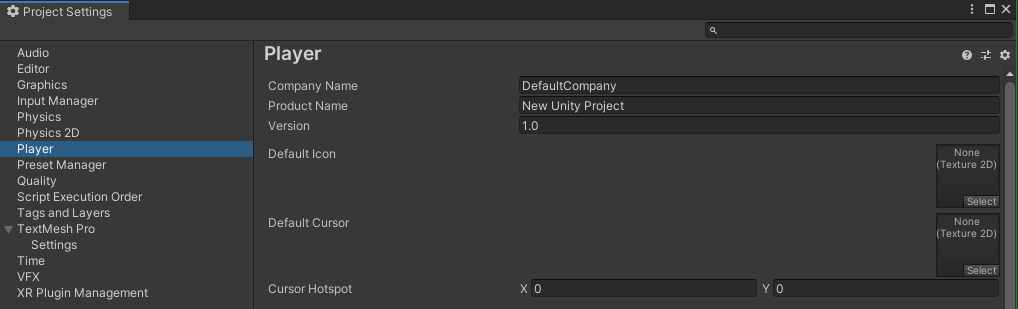
It is not to be assumed that Unity will distribute builds of your game with your local Unity project name as you defined it when creating your project initially. In fact, Unity requires us to specify these details within the Player section of Project Settings. See the section below is adjusted to suit the needs of your project.
Game / Application Icons
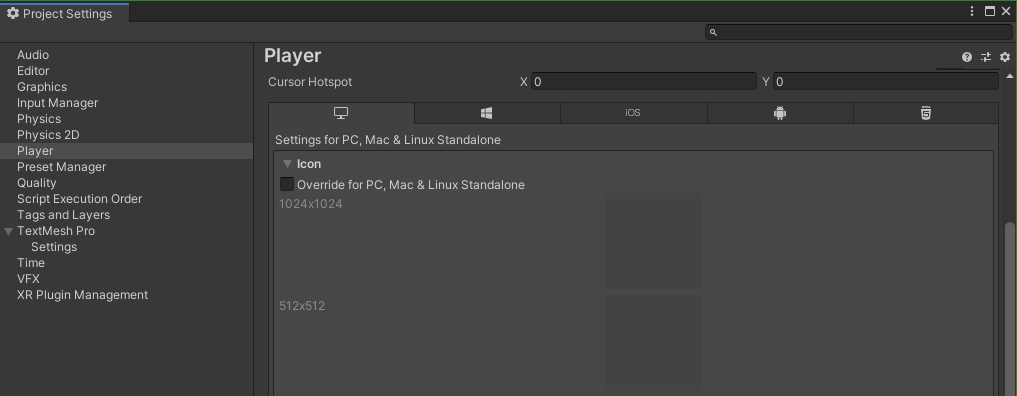
It's important to change things like this from the default settings, otherwise even a finished project can end up looking incomplete. Navigate to the Player section and scroll down to adjust icon settings. It's important to be consistent across all platforms, and this can easily be done by checking the Override for PC, Max & Linux Standalone tick box at the top of the panel. This will apply your Icon settings on all platforms.
Splash Screen
This is for Unity Professional Licenses only
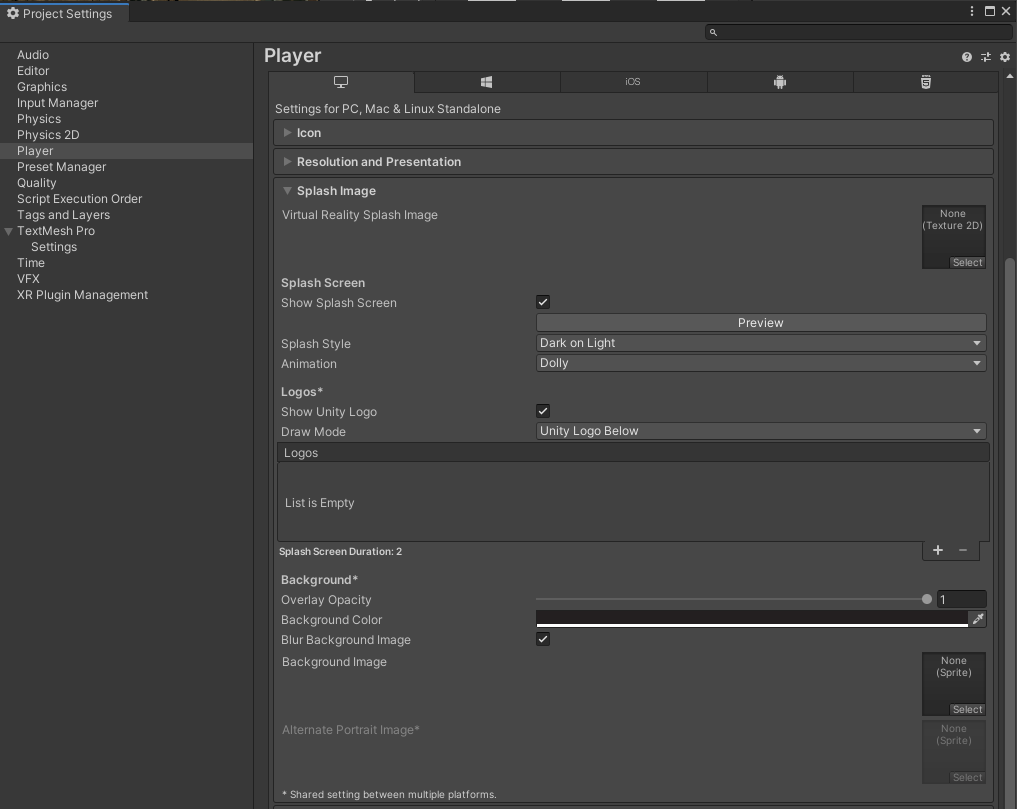
Within the Player panel we can find the below settings for modifying the splash screen of a game or application created with Unity.
Quality Settings
It's important to adjust quality settings to suit your development environment so you aren't running your game within the Unity editor in max settings.
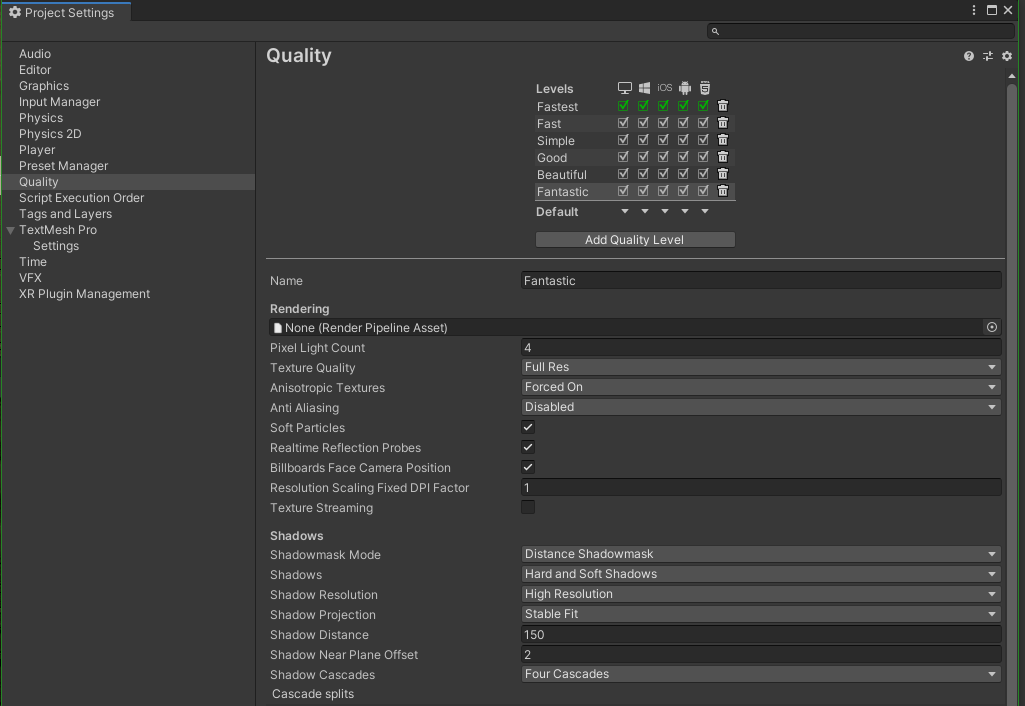
You can rename quality levels, add new, and adjust platform-specific modes as well. It's important to note that clicking the name of the quality setting in this table (just left of the check-marks) will apply the settings within your editor for testing. The Default drop-down arrors correspond with each platform at the top level of the table.
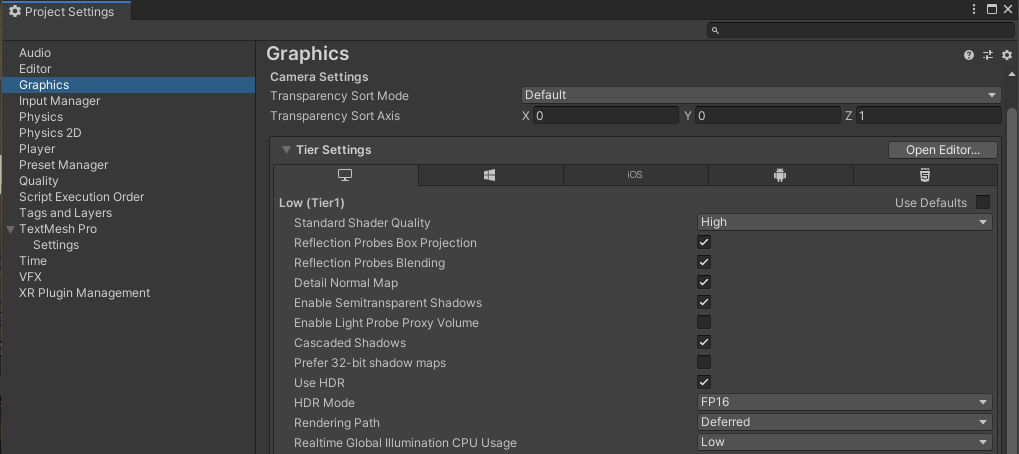
Graphics Settings
This is where you'll define the preconfigured graphics settings available to the player. Its important to adjust these to suit the platform the build will be running on. As an example, this feature could be useful when trying to distribute a test build of a Unity game with WebGL. We could reduce the settings to improve performance within the browser to make the game much less demanding. This allows us to build more efficiently to WebGL and not create an unecessarily demanding or slow performing game given this basic platform of WebGL.
Curious what WebGL is or looks like in use? I host some archived examples on my website, click here to check out some Unity WebGL games that I've already built and hosted online for playing.
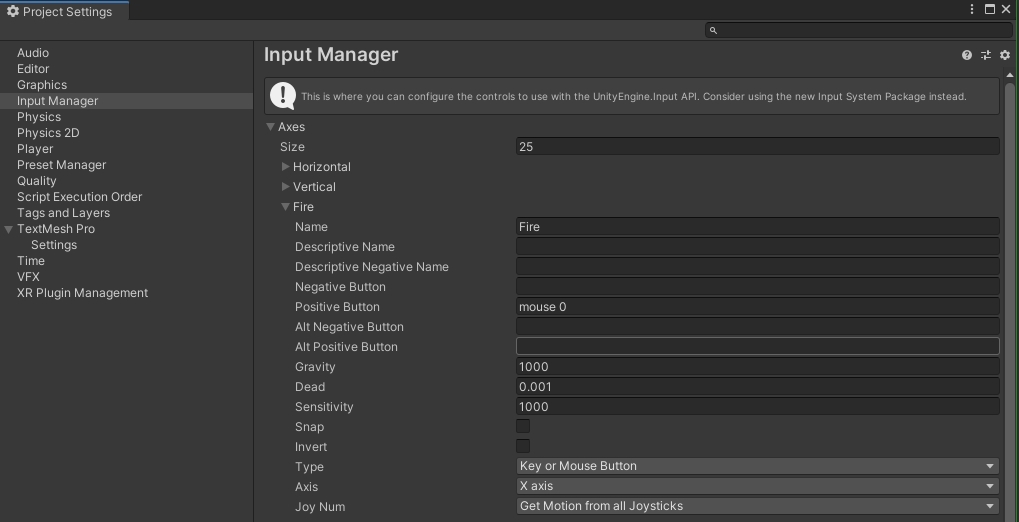
Input Manager
This section is very useful in configuring controls for your game that can then be used for scripting. For example, the section below I have defined a button for Fire, which is triggered when the player clicks the left mouse button
By using a custom script that defines global constants, we can reduce the task of changing these values later on. Below, I'll cover an example of using the Input Manager paired with a few C# scripts to define controls in global variables which can be easily modified in a central location. This avoids a scenario where we have built a complex game and want to change controls later in development, requiring us to change static values across numerous scripts. This is not only tedious but also makes the project more prone to errors.
using System.Collections;
using System.Collections.Generic;
using UnityEngine;

public class Controls : MonoBehaviour
{
    // Constants used within the game to handle passing control settings to builtin unity functions with string parameters
    // Unity parses these strings against settings in Edit->ProjectSettings->InputSettings

    // Character walking controls for joystick / keyboard
    // Keyboard has boolean movement, joystick has variable 0.0f - 1.0f
    public const string c_MoveStrafe = "Horizontal";
    public const string c_MoveWalk = "Vertical";

    // Character look controls for mouse / joystick
    public const string c_LookMouseVertical = "Mouse Y";
    public const string c_LookMouseHorizontal = "Mouse X";
    public const string c_LookGamePadVertical = "Look Y";
    public const string c_LookGamePadHorizontal = "Look X";

    // Character movement modifiers
    public const string c_ModJump                    = "Jump";
    public const string c_ModSprint                  = "Sprint";
    public const string c_ModCrouch                  = "Crouch";

    // Character weapon controls
    public const string c_PrimaryAim                     = "Aim";
    public const string c_PrimaryGamepadAim              = "Gamepad Aim";
    public const string c_PrimaryFire                    = "Fire";
    public const string c_PrimaryGamepadFire             = "Gamepad Fire";
    public const string c_PrimarySwitchWeapon            = "Mouse ScrollWheel";
    public const string c_PrimaryGamepadSwitchWeapon     = "Gamepad Switch";
    public const string c_PrimaryHide              = "Primary Hide";
    public const string c_PrimaryNextWeapon              = "NextWeapon";

    // UI controls
    public const string c_UIPauseMenu               = "Pause Menu";
    public const string c_UISubmit                  = "Submit";
    public const string c_UICancel                  = "Cancel";
}
These constants can then be used in a relative PlayerInput class, which can handle recieving input from the player at a higher level so we won't need to refactor all of our scripts in the scenario that we want to modify our controls.
using System.Collections;
using System.Collections.Generic;
using UnityEngine;
// A script to pass player input to a relative GameObject's Controller script

public class PlayerInput : MonoBehaviour
{

    PlayerController playerController;

    // Start is called before the first frame update
    void Start()
    {
        playerController = GetComponent<PlayerController>();
        Cursor.lockState = CursorLockMode.Locked;
        Cursor.visible = false;
    }

    // Update is called once per frame
    void Update()
    {
        // Always check if the player wants to unbind their cursor lock state
        UpdateLockState();
    }

    public bool CanProcessInput()
    {
        // If the cursor is locked within the game, return true
        return Cursor.lockState == CursorLockMode.Locked;
    }

    public Vector3 GetMovement()
    {
        // If the cursor is not locked within the game, do nothing
        if (!CanProcessInput()) return Vector3.zero;

        // Create a file / class (Controls.cs) to hold strings which can be passed to functions in all scripts
        // Allows for easy control customization without reefactoring a lot of code
        // GetAxis returns 0.0f-1.0f strength of movement (allows joystick variable movement, keyboard movement is 1.0f if key pressed)
        // Horizontal = a,d     Vertical = w,s
        Vector3 move;
        switch(playerController.targetPov)
        {
            case Kamera.pov.Mounted:
            move = transform.forward * Input.GetAxis(Controls.c_MoveStrafe) * -1.0f  + transform.right * Input.GetAxis(Controls.c_MoveWalk) * 1.0f ;
            break;

            default:
            move = transform.right * Input.GetAxis(Controls.c_MoveStrafe) + transform.forward * Input.GetAxis(Controls.c_MoveWalk);
            break;
        }
        // Return the clamped amnount of movement to apply to a GameObject within some relative Controller script
        return move;
    }

    public float GetLookHorizontal()
    {
        return GetLookAxis(Controls.c_LookMouseHorizontal, Controls.c_LookGamePadHorizontal);
    }

    public float GetLookVertical()
    {
        return GetLookAxis(Controls.c_LookMouseVertical, Controls.c_LookGamePadVertical);
    }

    // If the player presses the UICancel key, the cursor is unlocked.
    void UpdateLockState()
    {
        if (Input.GetButton(Controls.c_UICancel)) Cursor.lockState = CursorLockMode.None;
        else if (Input.GetMouseButton(0)) Cursor.lockState = CursorLockMode.Locked;
    }

    // Checks whether the look input is via mouse or gamepad and returns a float 0.0f-1.0f of the strength
    float GetLookAxis(string mouseLook, string stickLook)
    {
        if (CanProcessInput())
        {

            // Check if there is any input from a gamepad controller on the given axis
            bool isGamePad = Input.GetAxis(stickLook) != 0.0f;
            // If we are using a gamepad use stickLook's strength, otherwise use mouse input
            float str = isGamePad ? Input.GetAxis(stickLook) : Input.GetAxis(mouseLook);

            if (isGamePad)
            {
                // since mouse input is already deltaTime-dependant, only scale input with frame time if it's coming from sticks
                str *= Time.deltaTime;
            }
            else
            {
                // reduce mouse input amount to be equivalent to stick movement
                str *= 0.01f;
    #if UNITY_WEBGL
    // Mouse tends to be even more sensitive in WebGL due to mouse acceleration, so reduce it even more
                // str *= webglLookSensitivityMultiplier;
    #endif
            }

            return str;
        }
        else return 0.0f;

    }

    public bool GetCrouchDown()
    {
        return Input.GetButtonDown(Controls.c_ModCrouch);
    }
    public bool GetCrouchUp()
    {
        return Input.GetButtonUp(Controls.c_ModCrouch);
    }

    public bool GetSprintHeld()
    {
        return Input.GetButton(Controls.c_ModSprint);
    }

    public bool GetJumpPress()
    {
        return Input.GetButtonDown(Controls.c_ModJump);
    }

    public bool GetMouseFire()
    {
        return Input.GetButtonDown(Controls.c_PrimaryFire) || Input.GetButtonDown(Controls.c_PrimaryGamepadFire);
    }

    public bool GetMouseAlt()
    {
        return Input.GetButtonDown(Controls.c_PrimaryAim) || Input.GetButtonDown(Controls.c_PrimaryGamepadAim);
    }

    public bool GetLowerPrimary()
    {
        return Input.GetButtonDown(Controls.c_PrimaryHide);
    }


    public int GetNumberPress()
    {
        if(Input.GetKeyDown(KeyCode.Alpha0)) return 9;
        else if(Input.GetKeyDown(KeyCode.Alpha1)) return 0;
        else if(Input.GetKeyDown(KeyCode.Alpha2)) return 1;
        else if(Input.GetKeyDown(KeyCode.Alpha3)) return 2;
        else if(Input.GetKeyDown(KeyCode.Alpha4)) return 3;
        else if(Input.GetKeyDown(KeyCode.Alpha5)) return 4;
        else if(Input.GetKeyDown(KeyCode.Alpha6)) return 5;
        else if(Input.GetKeyDown(KeyCode.Alpha7)) return 6;
        else if(Input.GetKeyDown(KeyCode.Alpha8)) return 7;
        else if(Input.GetKeyDown(KeyCode.Alpha9)) return 8;
        else return -1;
    }

}
If you want to actually be able to apply damage, we need a Target script. See the simple example below for a script which enables this to occur. Later, within WeaponControl.cs, we will check if the object we hit has this script attached, and if it does we can deal damage to the set HP amount given to the Target
using System.Collections;
using System.Collections.Generic;
using UnityEngine;

public class Target : MonoBehaviour
{

    [SerializeField]
    private float health;

    [SerializeField]
    [Tooltip("If this is true we spawn the broken GameObject on destruction")]
    public bool isDestructable = false;

    [SerializeField]
    [Tooltip("The GameObject to spawn when this object is broken")]
    public GameObject broken;

    // Start is called before the first frame update
    void Start()
    {

    }

    // Update is called once per frame
    void Update()
    {

    }

    public void TakeDamage(float amount)
    {
        health -= amount;
        if (health <= 0)
        {
            if(isDestructable) Instantiate(broken, gameObject.transform, false);
            Destroy(gameObject);
        }
    }

}
We could then use this PlayerInput.cs script within a WeaponControl.cs script check if the player presses this button in Update called once per frame. If they have tried to shoot and have a weapon equipped, we can call the relative weapon's ShootWeapon() function. Note that you will have to attach the playerInput and playerWeapons variables to relative scripts within your editor.
public class WeaponControl : MonoBehaviour
{
    [SerializeField]
    PlayerInput playerInput;
    [SerializeField]
    PlayerWeapons playerWeapons;
    [SerializeField]
    public Transform muzzle;
    [SerializeField]
    public GameObject projectile;
    [SerializeField]
    Camera mainCamera;
    [SerializeField]
    ParticleSystem muzzleFlash;
    [SerializeField]
    GameObject hitEffect;
    private float range = 500.0f;
    private float damage = 10.0f;


    void Update()
    {
        if (playerInput.GetMouseFire() && playerWeapons.hasWeapon) ShootWeapon();
    }

	    void ShootWeapon()
    {
        fireSFX.Play();
        GameObject projectileObj = Instantiate(projectile, muzzle.transform.position + mainCamera.transform.forward, mainCamera.transform.rotation);
        projectileObj.GetComponent<Rigidbody>().AddForce(transform.forward * 100);


        RaycastHit hit;
        if (Physics.Raycast(muzzle.transform.position, mainCamera.transform.forward, out hit, range))
        {
            Target temp = hit.transform.GetComponent<Target>();
            if (temp != null) temp.TakeDamage(damage);


            Debug.Log(hit.transform.name);
            muzzleFlash.Play();
            GameObject hitObject = Instantiate(hitEffect, hit.point, Quaternion.LookRotation(hit.normal));
            Destroy(hitObject, 1f);

            if (hit.rigidbody != null) hit.rigidbody.AddForce(-hit.normal * hitForce);

        }
    }

}
Scripting
Scripting in Unity uses C# and is very well documented. In the sections below, I'll Provide examples and edge cases where possible, and link to the relative documentation for quick reference.
For a collection of classes and structs that are required for Unity to function, which means they will always be available to you when scripting in Unity, head over to UnityEngine.CoreModule Documentation
Transform
This class controls and tracks object position, rotation, scale.
Official Transform Class Documentation
Local Space
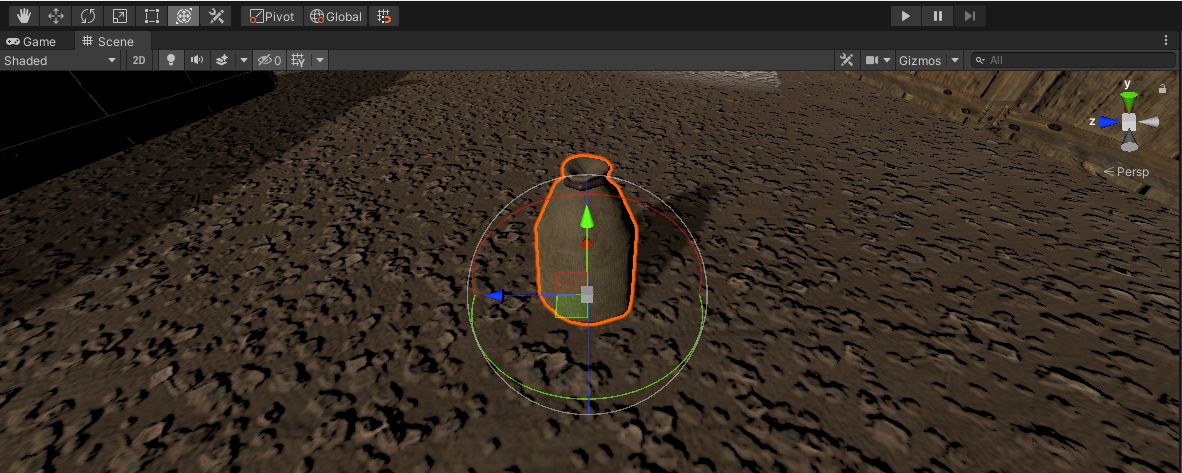
Local space is the transform relative to the object's parent. An example of this can be seen below where I have selected an object and the transform controls are centralized on the exact transform of that object relative to its local position.
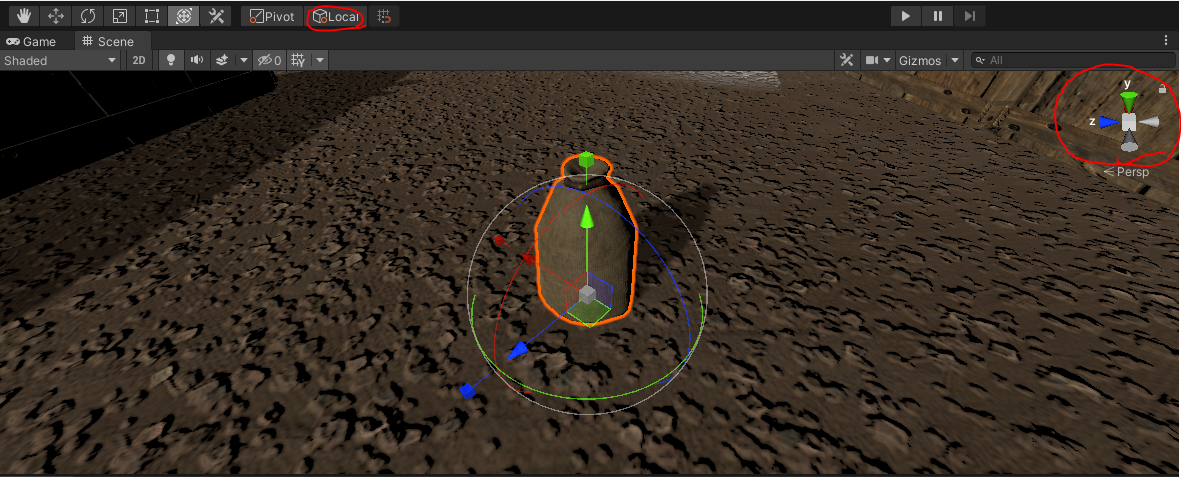
Take notice of three things in the above screenshot. First, we have selected Local position in the top-left near our transform controls. Clicking this button again will toggle between Local and World space. Second, take note of the World Space axis shown at the top-right of the scene view. Third, in contrast to the World space axis, notice the GameObject's axis shown in the scene view are different in orientation. The transform axis shown on the GameObject are modifying and referring to the GameObject's transform within Local space.
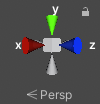
World Space
World space is the position of the GameObject rooted within the scene. An example of this is seen in selecting the exact same object in the editor and toggling world space transform view. This makes sure the transform controls are the same as the World Space axis, instead of referring directly to the transform of a local object.
Again, take notice of three things in the above screenshot. First, we have selected Global position in the top-left near our transform controls. Clicking this button again will toggle between Local and World space. Second, take note of the World Space axis shown at the top-right of the scene view. Third, in contrast to the World space axis, notice the GameObject's axis shown in the scene view are different in orientation. The transform axis shown on the GameObject are modifying and referring to the GameObject's transform within World space.
Vector3
Official Vector3 Struct Documentation
Axis
In Unity 3D you will use the X, Y, and Z axis frequently both in positioning within the editor and scripting. It helps to have a clear understanding of the names these axis can be referred to with, as it will greatly improve your ability to access and modify these values without over complicating things.
The X axis can be accessed with the right keyword when accessing any class which stores axis information
The Y axis can be accessed with the Up keyword when accessing any class which stores axis information
The Z axis can be accessed with the forward keyword when accessing any class which stores axis information
Similarly, when modifying a Vector, we can easily flip these axis by accessing the opposite of these keywords -
The X negative axis can be accessed with the left keyword when accessing any class which stores axis information
The Y negative axis can be accessed with the down keyword when accessing any class which stores axis information
The Z negative axis can be accessed with the back keyword when accessing any class which stores axis information
So, the Vector3 equivalents to these would be
X axis, Vector3(1.0f, 0.0f, 0.0f), is equivalent to right
Y axis, Vector3(0.0f, 1.0f, 0.0f), is equivalent to up
Z axis, Vector3(0.0f, 0.0f, 1.0f), is equivalent to forward
X negative axis, Vector3(-1.0f, 0.0f, 0.0f), is equivalent to left
Y negative axis, Vector3(0.0f, -1.0f, 0.0f), is equivalent to down
Z negative axis, Vector3(0.0f, 0.0f, -1.0f), is equivalent to back
Quaternion
Official Quaternion Struct Documentation
Shortcuts
Since Unity has many features and shortcuts available that will widen the gap between an experienced developer and a beginner, I'll list some of my most frequently used shortcuts and tricks here. Though these can all be viewed and modified by opening the panel below in Edit->Shortcuts..., there is a huge amount of shortcuts and this can be a lot to look at.

Transform Controls
Official Positioning Documentation
At the top-left of your Unity editor, you'll notice the transform control buttons where you can switch between Hand, Move, Rotate, Scale, Rect, and Universal controls. Each of these can also be toggled by pressing Q, W, E, R, T, and Y, respectively.

Snapping to Collision
There will be many cases where you want to place an object on a table or ground within your scene. You should not need to manually fumble with axis to do this, but instead given that both objects have collision of some kind you can simply hold Shift+Ctrl while using the Move tool and dragging the grey box that appears in the center of the object, NOT the axis themselves. This will immediately snap the object to the collision nearest to your cursor as you drag it around the scene. There may be minor adjustments needed, but overall this should do the trick for most basic items.
Object to Scene View Transform
You will frequently want to move an object to the position and rotation of your current scene view in World space. You could manually drag the object across the scene in unity, adjusting each axis as needed. Alternatively, you can fly to a position near your desired location for the object, select the object, then press Shift-Ctrl-F to move the object to your exact position and rotation. This is very useful when setting up cameras, as you can just fly to the view you want the camera to display, select the camera, and press Shift-Ctrl-F to set it to that exact position with a lot less fumbling around.
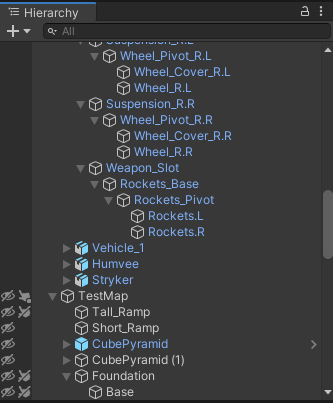
Unclickable Objects
Tired of clicking in the scene view and selecting the terrain or some other GameObject? Within the scene hierarchy you can toggle whether or not an object should be clickable. Simply click the small hand next to the object's name in the hierarchy.
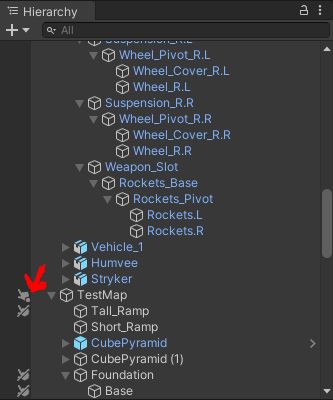
You can also toggle hiding and showing objects by clicking the eye icon just to the left of this setting
Prefabs
Since the Unity workflow is built around prefabs, I figured I'd document some specific use cases for the many features introduced in the Unity LTS 2019 release which added support for prefab variants and nested prefabs. On this page, I'll cover some good practices and features these prefab features provide.
I'd highly recommend heading over to devassets.com to grab some of the assets you see featured across the Unity pages on Knoats. They are entirely free and give you a lot to work with when learning. If you can afford it, I would recommend donating to the developers. Not only does this unlock more assets you can get with the package you donated to, but it shows support to the developer that organized all of these great assets in one place for you to learn with.
Positioning Prefabs
Being relatively new to Unity, I began by grabbing some assets off the Unity Store. Like most free assets on the store, these did not come entirely assembled for me and required me to work a bit to get things in a state that is usable for even the most basic games. This has been a good learning experience, and required no scripting, so if you are new to Unity and not quite ready to script, doing this will give you experience creating prefabs, working with materials, shaders, lighting, textures, and much more.
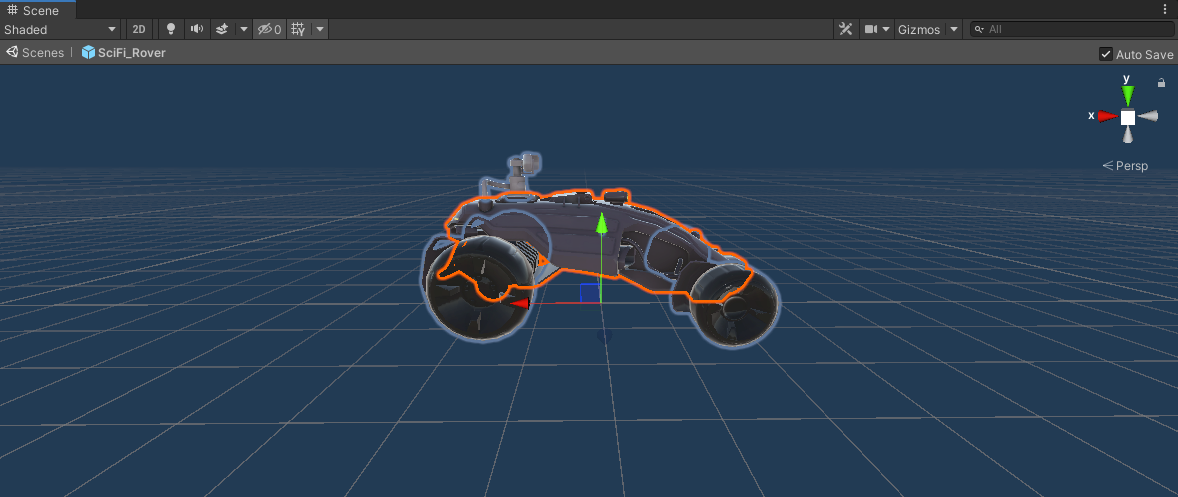
At first when creating a prefab of an object that exists within your scene, you may see something like the below when opening the prefab to edit
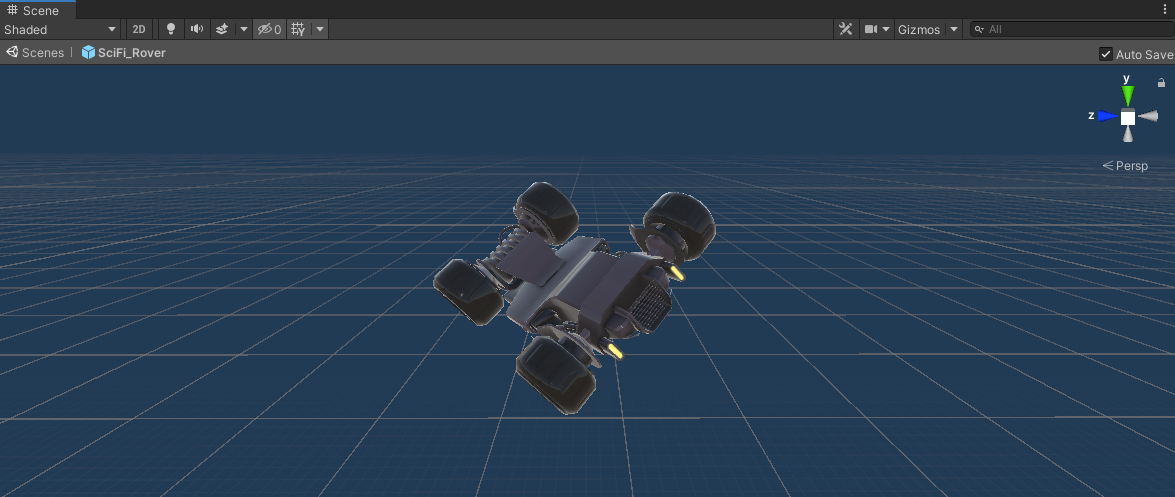
This is clearly not the orientation that we expect this SciFi_Rover vehicle to have when initially placed in our scene. To fix this, be sure you are editing the prefab in the prefab editor and NOT directly within your scene. Then adjust the transform to be in the orientation desired.
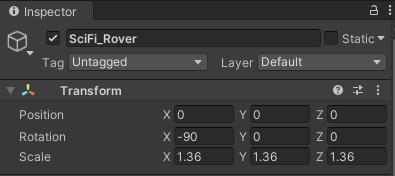
Below, we see the initial transform settings
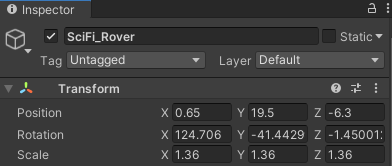
First, set all but the Scale of your object to 0. Shown in the screenshot below, there will be many cases that this does not produce the desired results, so we still need to modify the transform further
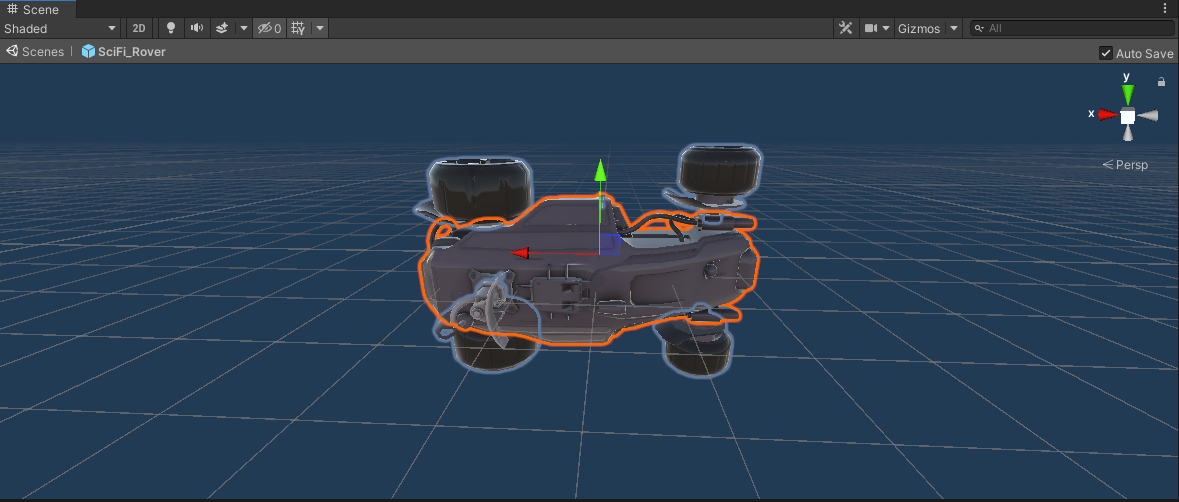
After making some adjustments, the object's final orientation within the prefab editor is seen below
And the final transform properties of the root GameObject are now much cleaner -
Post Processing
Good graphics are good. That's why I was excited to find adding Post Processing to my Unity 3D project was not only easy to do, but a huge improvement to the visuals within my scene. This enables common modern graphics features like Motion Blur, Ambient Occlusion, Depth of Field, and more.
Add Post Processing
Post Processing is added to each scene individually, and not a project as a whole. To add this to a Unity 3D project, we first need to add the Post-process Layer component to our scene's main camera. Next we'll add a Post Processing Volume that globally effects our entire scene. Then we can add a PostProcessing_Profile for our scene and add new visual effects accordingly.
Configuring the Camera
Its important that the camera the player views the game from contains this component. Otherwise, if the player can toggle between a camera which has the Post-process Layer and one that does not, they effects gained by post processing will only be rendered in one view and not the other.

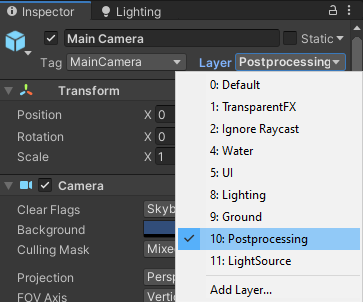
Once we've added the above component to the scene's main camera, we need to adjust the layer of both this component and our main camera to reflect this. Change to the Postprocessing Layer in the Post-process Layer component.
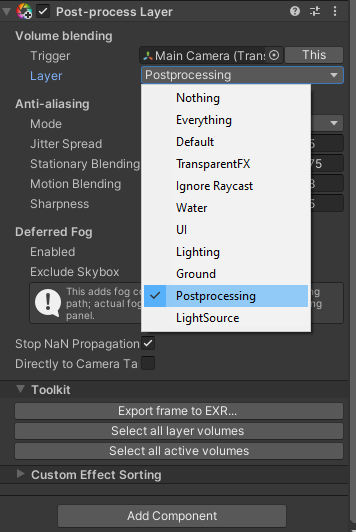
Now change the layer of the camera itself to the Postprocessing Layer as well
Creating the Volume
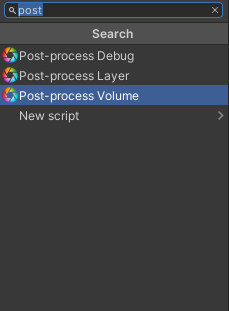
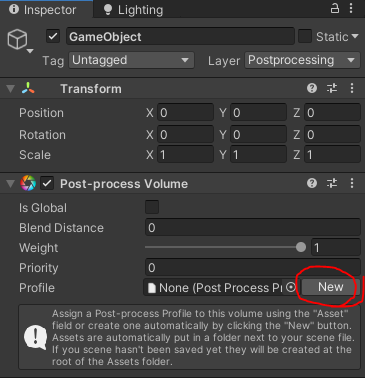
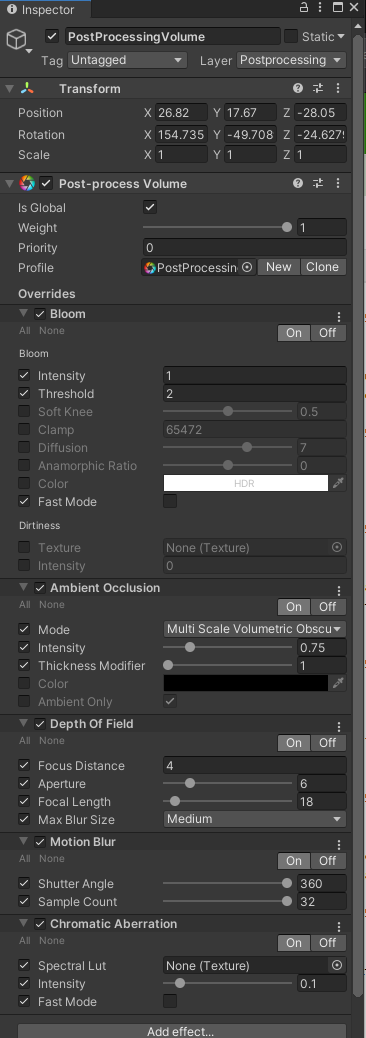
Now anywhere within your current scene hierarchy, add an empty GameObject and name it PostProcessingVolume or otherwise something relative to your specific scenario. Set this GameObject's layer to Post Processing. Select this new GameObject and within the inspector Add Component->Post-processing Volume as seen below
At a glance, there is not much here. But once we add a Post Process Profile and finish configuring our scene we will use this component to adjust some pretty neat looking visuals.
Be sure to apply the Post Processing layer to the Camera and Volume GameObjects within your scene before continuing or the effects will not be applied
Creating the Profile
Within the GameObject created for our Volume click New to the right of the Profile field in the new Post-processing Volume component.
Unity will automatically create a Post Processing Profile and place it in a directory relative to your scene. Now we can check the Global tick box to apply this volume to our entire scene and start adding new effects to our scene!
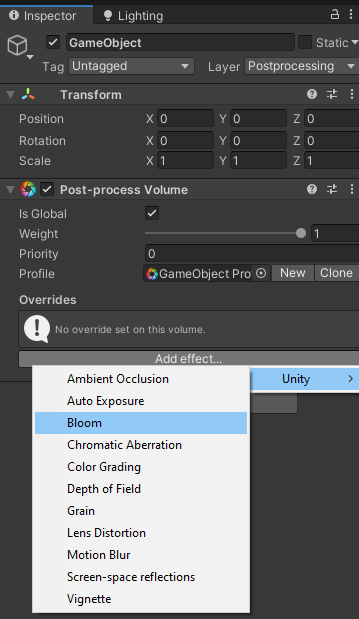
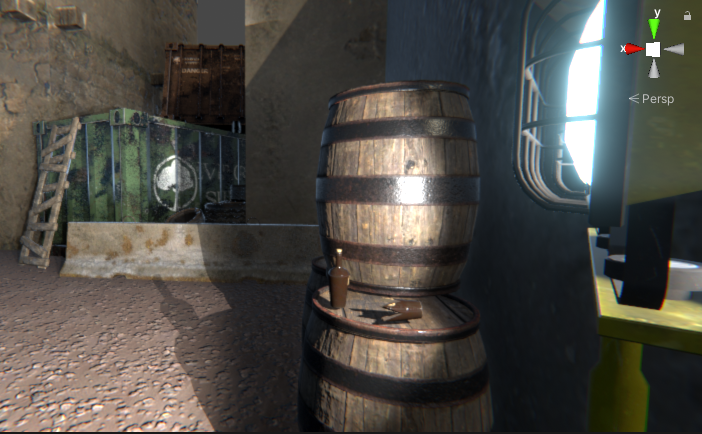
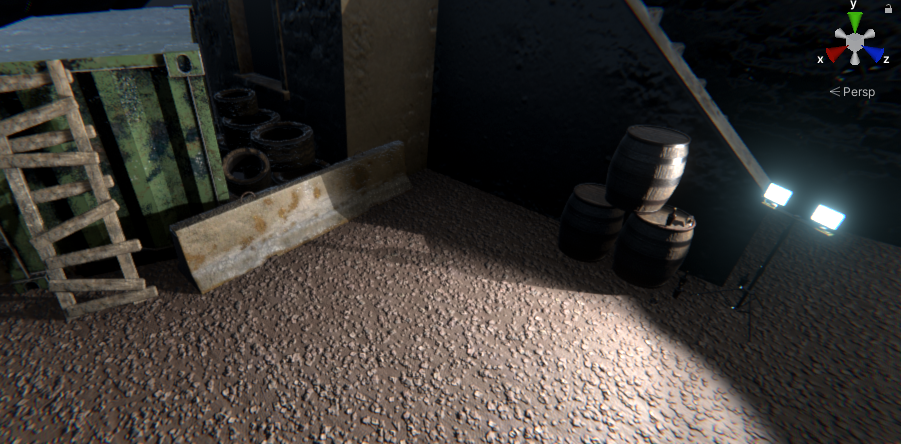
An example of some effects that I added to my scene to achieve the screenshot at the top of this page
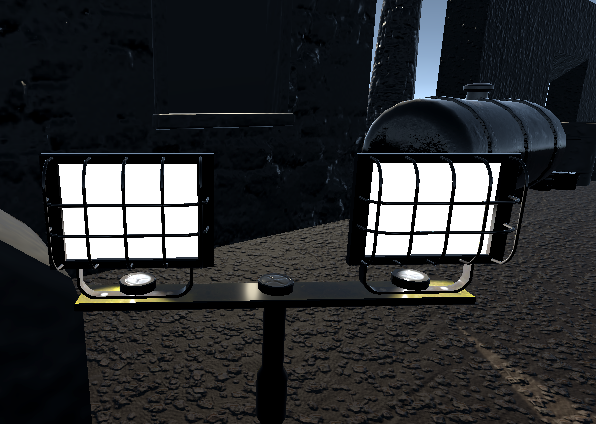
That's it! See the glow coming from the lights in the pictures below for an example of how this can be used to add the Bloom effect to an emissive light source.
Post Processing on

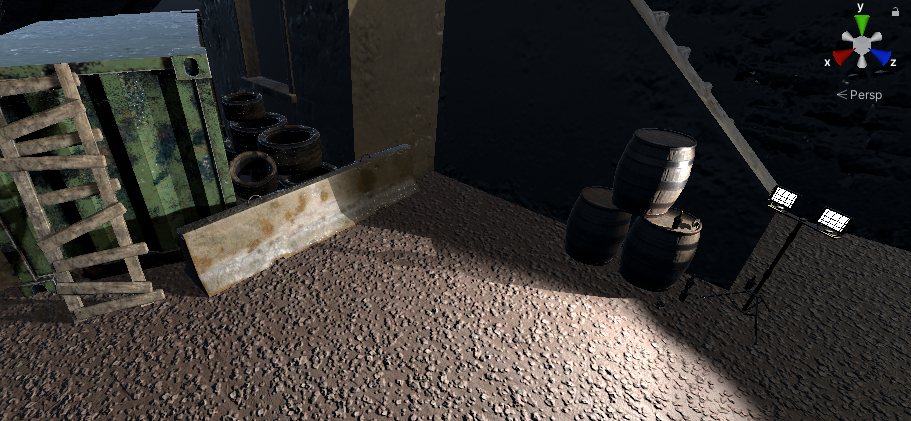
Post Processing off
New Input System
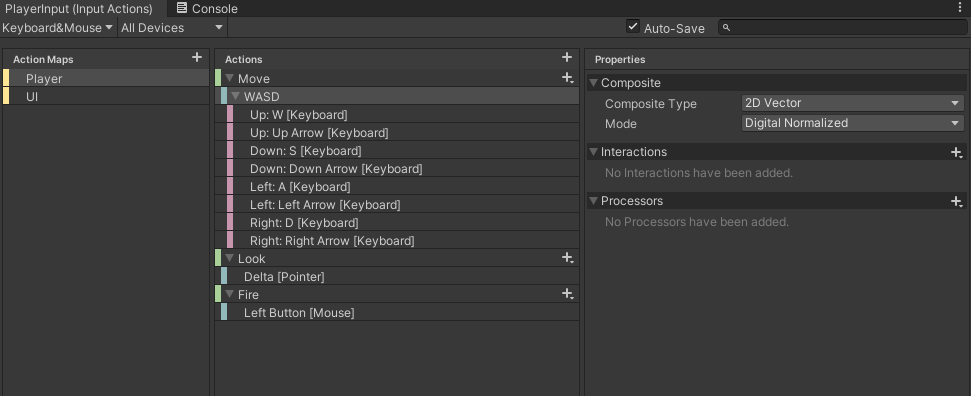
Setup
Using the default configuration for a keyboard&mouse / Gamepad Input Actions asset in unity, we can implement universal controls given various input devices.
Issues getting an input device to work? Click Window->Analysis->Input Debugger and at the top-left of the new window select Options->Add Devices Not Listed in 'Supported Devices' and any input device that was not previously working should now be passing input to unity.
This was a weird bug for me to figure out, so I thought it was worth a mention. For me, I had to do this in order to get Unity to accept input from my Corsair gaming mouse. I searched up a lot of information on this new input system thinking I was using it wrong, and later found that my mouse was not passing input to unity and my code was correct.

Use
We can call a specific function from a specific component
Using PlayerInput component->Behavior->Invoke Unity Events -
  Rigidbody playerRigidbody;
  public PlayerControls controls;
  Vector2 playerVelocity;
  public float playerSpeed = 5.0f;

  void Awake() {
    playerRigidbody = GetComponent<Rigidbody>();
    controls = new PlayerControls();
  }

  void OnEnable() {
    controls.Player.Enable();
  }

  void OnDisable() {
    controls.Player.Disable();
  }

  public void OnMove(InputAction.CallbackContext context) {
    print("Moving: " + context.ReadValue<Vector2>());
    playerVelocity = context.ReadValue<Vector2>();
  }

  public void OnLook(InputAction.CallbackContext context) {
    print("Look: " + context.ReadValue<Vector2>());
  }

  public void OnFire(InputAction.CallbackContext context) {
    print("Bang");
  }

  void Update()
  {
    playerRigidbody.position += new Vector3(playerVelocity.x * Time.deltaTime * playerSpeed,
      0,
      playerVelocity.y * Time.deltaTime * playerSpeed);
  }
Or we can let Unity call functions defined using the naming convention void On\[ActionName\](InputValue value)
Using PlayerInput component->Behavior->Send Messages -
  Rigidbody playerRigidbody;
  public PlayerControls controls;
  Vector2 playerVelocity;
  public float playerSpeed = 5.0f;


  void Awake() {
    playerRigidbody = GetComponent<Rigidbody>();
    controls = new PlayerControls();
  }

  void OnEnable() {
    controls.Player.Enable();
  }

  void OnDisable() {
    controls.Player.Disable();
  }

  public void OnMove(InputValue value) {
    playerVelocity = value.Get<Vector2>();
    print("Moving: " + value.Get<Vector2>());
  }


  public void OnMove(InputValue value) {
    playerVelocity = value.Get<Vector2>();
    print("Moving: " + value.Get<Vector2>());
  }


  void Update()
  {
    playerRigidbody.position += new Vector3(playerVelocity.x * Time.deltaTime * playerSpeed,
      0,
      playerVelocity.y * Time.deltaTime * playerSpeed);
  }
Broadcast messages is the same as Send Messages, except broadcasting invokes the same methods on all child objects who have a component with function definitions that match this naming convention.