Game Development
Unity
Project Settings
At first when opening the Unity editor I was a bit overwhelmed by the many options available, and it can be hard to get going without at least knowing how to configure the most basic of settings for a Unity project. In the sections below, I'll cover some simple settings that are worthwhile to consider when creating a new project in Unity.
Playmode Tint
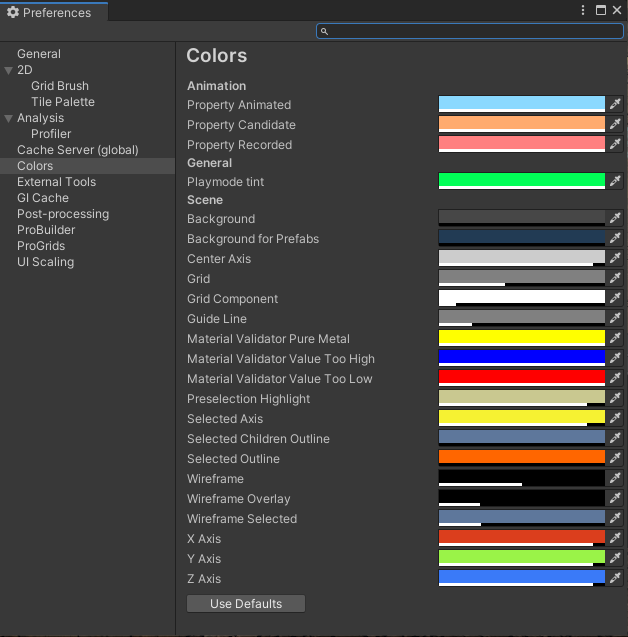
This option is not found in Project Settings, but I think it is something everyone entering into Unity for the first time should consider. Navigate to the menu bar at the top of your editor and select Edit->Preferences->Colors and adjust the Playmode Tint to something very noticable. This will avoid forgetting you are in play mode and making some changes, only to be forced to revert them all once exiting play mode.
For the rest of these sections, we will be working in the Project Settings panel opened with Edit->Project Settings... in the menu bar of the Unity editor.
Official Unity Project Settings Documentation
Project Name
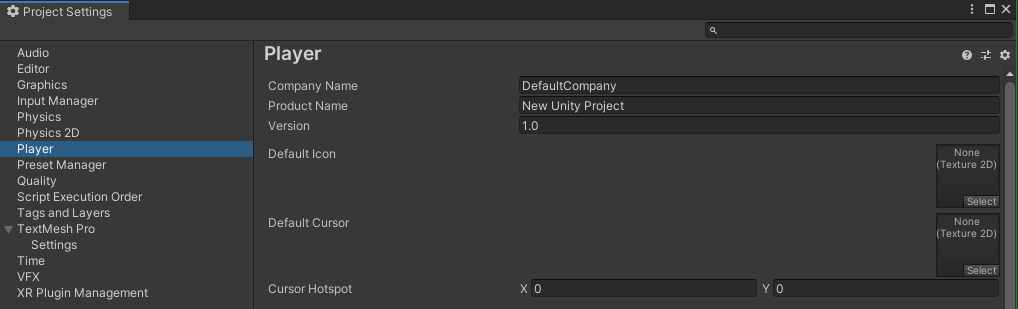
It is not to be assumed that Unity will distribute builds of your game with your local Unity project name as you defined it when creating your project initially. In fact, Unity requires us to specify these details within the Player section of Project Settings. See the section below is adjusted to suit the needs of your project.
Game / Application Icons
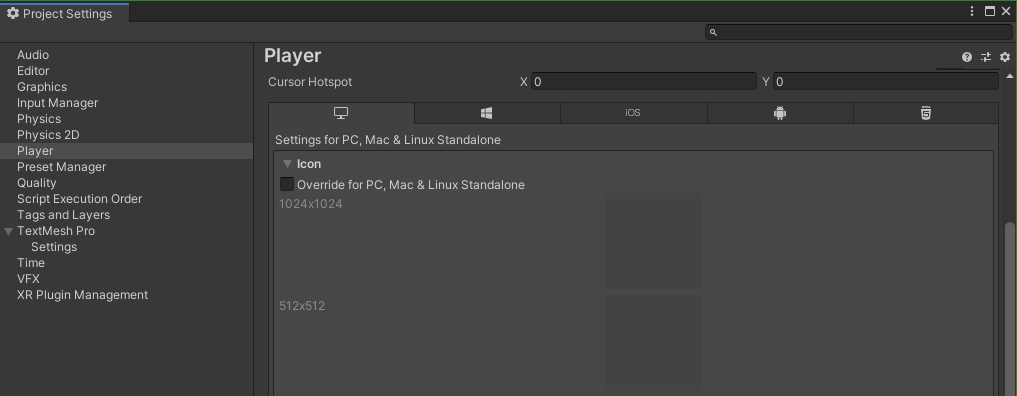
It's important to change things like this from the default settings, otherwise even a finished project can end up looking incomplete. Navigate to the Player section and scroll down to adjust icon settings. It's important to be consistent across all platforms, and this can easily be done by checking the Override for PC, Max & Linux Standalone tick box at the top of the panel. This will apply your Icon settings on all platforms.
Splash Screen
This is for Unity Professional Licenses only
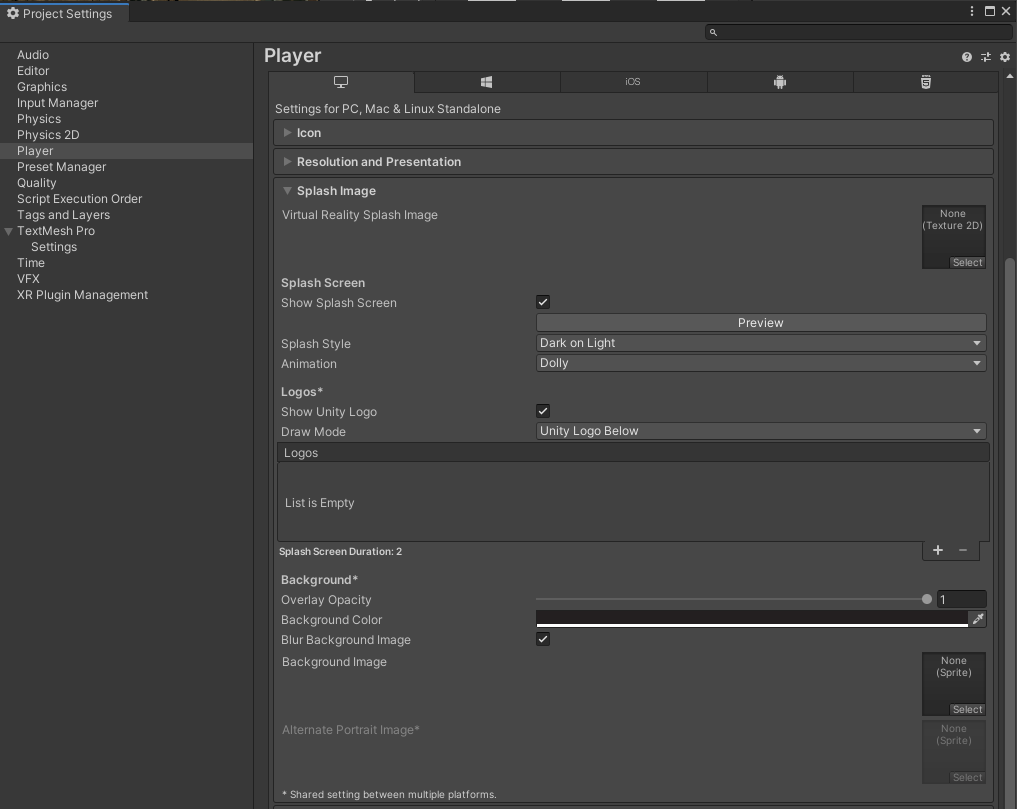
Within the Player panel we can find the below settings for modifying the splash screen of a game or application created with Unity.
Quality Settings
It's important to adjust quality settings to suit your development environment so you aren't running your game within the Unity editor in max settings.
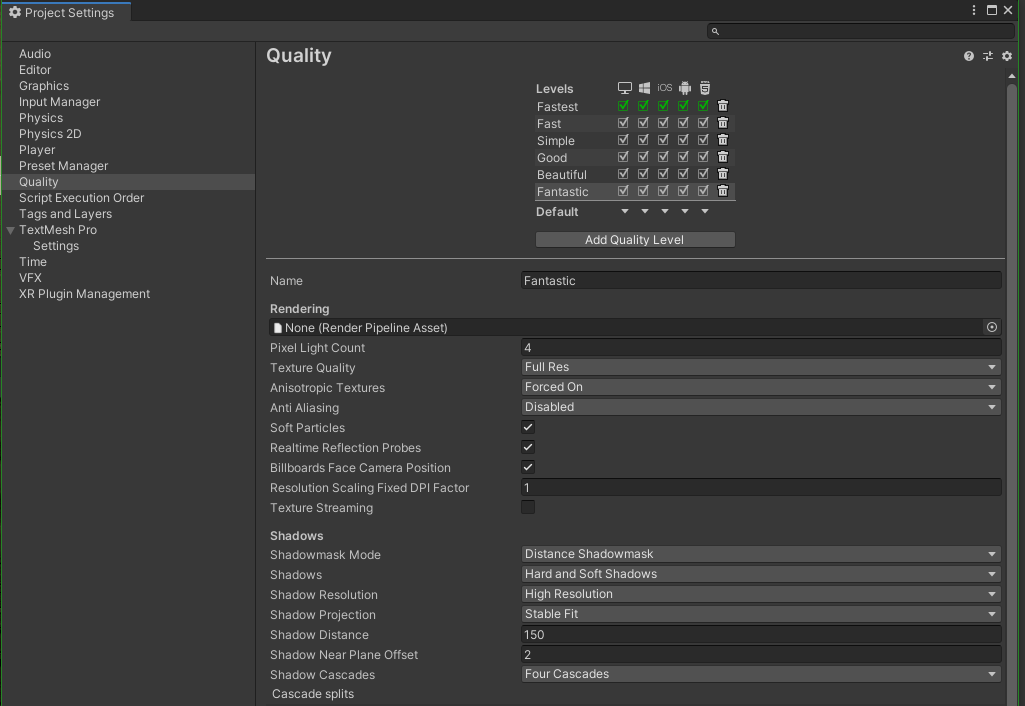
You can rename quality levels, add new, and adjust platform-specific modes as well. It's important to note that clicking the name of the quality setting in this table (just left of the check-marks) will apply the settings within your editor for testing. The Default drop-down arrors correspond with each platform at the top level of the table.
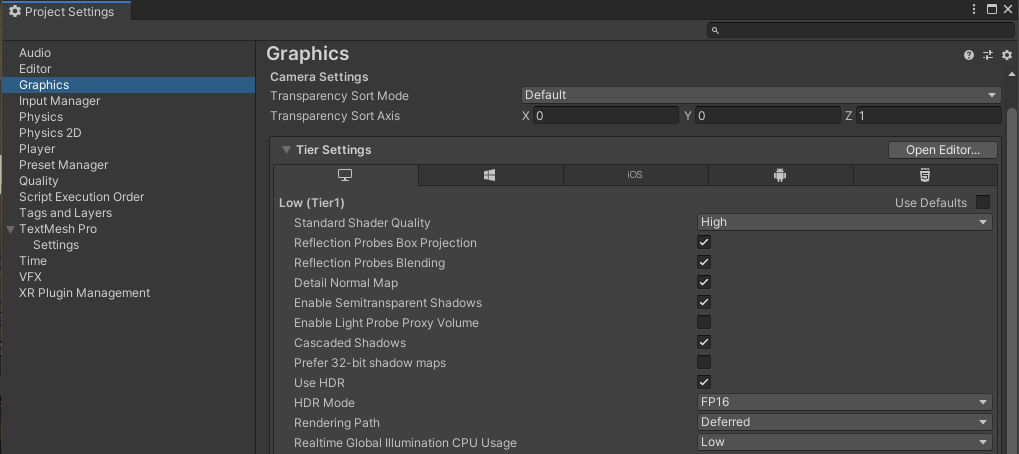
Graphics Settings
This is where you'll define the preconfigured graphics settings available to the player. Its important to adjust these to suit the platform the build will be running on. As an example, this feature could be useful when trying to distribute a test build of a Unity game with WebGL. We could reduce the settings to improve performance within the browser to make the game much less demanding. This allows us to build more efficiently to WebGL and not create an unecessarily demanding or slow performing game given this basic platform of WebGL.
Curious what WebGL is or looks like in use? I host some archived examples on my website, click here to check out some Unity WebGL games that I've already built and hosted online for playing.
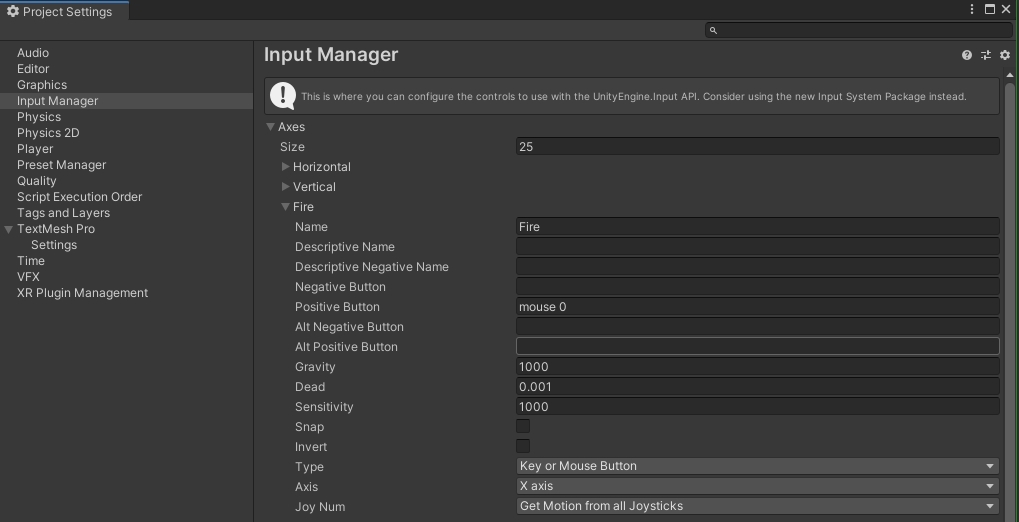
Input Manager
This section is very useful in configuring controls for your game that can then be used for scripting. For example, the section below I have defined a button for Fire, which is triggered when the player clicks the left mouse button
By using a custom script that defines global constants, we can reduce the task of changing these values later on. Below, I'll cover an example of using the Input Manager paired with a few C# scripts to define controls in global variables which can be easily modified in a central location. This avoids a scenario where we have built a complex game and want to change controls later in development, requiring us to change static values across numerous scripts. This is not only tedious but also makes the project more prone to errors.
using System.Collections;
using System.Collections.Generic;
using UnityEngine;

public class Controls : MonoBehaviour
{
    // Constants used within the game to handle passing control settings to builtin unity functions with string parameters
    // Unity parses these strings against settings in Edit->ProjectSettings->InputSettings

    // Character walking controls for joystick / keyboard
    // Keyboard has boolean movement, joystick has variable 0.0f - 1.0f
    public const string c_MoveStrafe = "Horizontal";
    public const string c_MoveWalk = "Vertical";

    // Character look controls for mouse / joystick
    public const string c_LookMouseVertical = "Mouse Y";
    public const string c_LookMouseHorizontal = "Mouse X";
    public const string c_LookGamePadVertical = "Look Y";
    public const string c_LookGamePadHorizontal = "Look X";

    // Character movement modifiers
    public const string c_ModJump                    = "Jump";
    public const string c_ModSprint                  = "Sprint";
    public const string c_ModCrouch                  = "Crouch";

    // Character weapon controls
    public const string c_PrimaryAim                     = "Aim";
    public const string c_PrimaryGamepadAim              = "Gamepad Aim";
    public const string c_PrimaryFire                    = "Fire";
    public const string c_PrimaryGamepadFire             = "Gamepad Fire";
    public const string c_PrimarySwitchWeapon            = "Mouse ScrollWheel";
    public const string c_PrimaryGamepadSwitchWeapon     = "Gamepad Switch";
    public const string c_PrimaryHide              = "Primary Hide";
    public const string c_PrimaryNextWeapon              = "NextWeapon";

    // UI controls
    public const string c_UIPauseMenu               = "Pause Menu";
    public const string c_UISubmit                  = "Submit";
    public const string c_UICancel                  = "Cancel";
}
These constants can then be used in a relative PlayerInput class, which can handle recieving input from the player at a higher level so we won't need to refactor all of our scripts in the scenario that we want to modify our controls.
using System.Collections;
using System.Collections.Generic;
using UnityEngine;
// A script to pass player input to a relative GameObject's Controller script

public class PlayerInput : MonoBehaviour
{

    PlayerController playerController;

    // Start is called before the first frame update
    void Start()
    {
        playerController = GetComponent<PlayerController>();
        Cursor.lockState = CursorLockMode.Locked;
        Cursor.visible = false;
    }

    // Update is called once per frame
    void Update()
    {
        // Always check if the player wants to unbind their cursor lock state
        UpdateLockState();
    }

    public bool CanProcessInput()
    {
        // If the cursor is locked within the game, return true
        return Cursor.lockState == CursorLockMode.Locked;
    }

    public Vector3 GetMovement()
    {
        // If the cursor is not locked within the game, do nothing
        if (!CanProcessInput()) return Vector3.zero;

        // Create a file / class (Controls.cs) to hold strings which can be passed to functions in all scripts
        // Allows for easy control customization without reefactoring a lot of code
        // GetAxis returns 0.0f-1.0f strength of movement (allows joystick variable movement, keyboard movement is 1.0f if key pressed)
        // Horizontal = a,d     Vertical = w,s
        Vector3 move;
        switch(playerController.targetPov)
        {
            case Kamera.pov.Mounted:
            move = transform.forward * Input.GetAxis(Controls.c_MoveStrafe) * -1.0f  + transform.right * Input.GetAxis(Controls.c_MoveWalk) * 1.0f ;
            break;

            default:
            move = transform.right * Input.GetAxis(Controls.c_MoveStrafe) + transform.forward * Input.GetAxis(Controls.c_MoveWalk);
            break;
        }
        // Return the clamped amnount of movement to apply to a GameObject within some relative Controller script
        return move;
    }

    public float GetLookHorizontal()
    {
        return GetLookAxis(Controls.c_LookMouseHorizontal, Controls.c_LookGamePadHorizontal);
    }

    public float GetLookVertical()
    {
        return GetLookAxis(Controls.c_LookMouseVertical, Controls.c_LookGamePadVertical);
    }

    // If the player presses the UICancel key, the cursor is unlocked.
    void UpdateLockState()
    {
        if (Input.GetButton(Controls.c_UICancel)) Cursor.lockState = CursorLockMode.None;
        else if (Input.GetMouseButton(0)) Cursor.lockState = CursorLockMode.Locked;
    }

    // Checks whether the look input is via mouse or gamepad and returns a float 0.0f-1.0f of the strength
    float GetLookAxis(string mouseLook, string stickLook)
    {
        if (CanProcessInput())
        {

            // Check if there is any input from a gamepad controller on the given axis
            bool isGamePad = Input.GetAxis(stickLook) != 0.0f;
            // If we are using a gamepad use stickLook's strength, otherwise use mouse input
            float str = isGamePad ? Input.GetAxis(stickLook) : Input.GetAxis(mouseLook);

            if (isGamePad)
            {
                // since mouse input is already deltaTime-dependant, only scale input with frame time if it's coming from sticks
                str *= Time.deltaTime;
            }
            else
            {
                // reduce mouse input amount to be equivalent to stick movement
                str *= 0.01f;
    #if UNITY_WEBGL
    // Mouse tends to be even more sensitive in WebGL due to mouse acceleration, so reduce it even more
                // str *= webglLookSensitivityMultiplier;
    #endif
            }

            return str;
        }
        else return 0.0f;

    }

    public bool GetCrouchDown()
    {
        return Input.GetButtonDown(Controls.c_ModCrouch);
    }
    public bool GetCrouchUp()
    {
        return Input.GetButtonUp(Controls.c_ModCrouch);
    }

    public bool GetSprintHeld()
    {
        return Input.GetButton(Controls.c_ModSprint);
    }

    public bool GetJumpPress()
    {
        return Input.GetButtonDown(Controls.c_ModJump);
    }

    public bool GetMouseFire()
    {
        return Input.GetButtonDown(Controls.c_PrimaryFire) || Input.GetButtonDown(Controls.c_PrimaryGamepadFire);
    }

    public bool GetMouseAlt()
    {
        return Input.GetButtonDown(Controls.c_PrimaryAim) || Input.GetButtonDown(Controls.c_PrimaryGamepadAim);
    }

    public bool GetLowerPrimary()
    {
        return Input.GetButtonDown(Controls.c_PrimaryHide);
    }


    public int GetNumberPress()
    {
        if(Input.GetKeyDown(KeyCode.Alpha0)) return 9;
        else if(Input.GetKeyDown(KeyCode.Alpha1)) return 0;
        else if(Input.GetKeyDown(KeyCode.Alpha2)) return 1;
        else if(Input.GetKeyDown(KeyCode.Alpha3)) return 2;
        else if(Input.GetKeyDown(KeyCode.Alpha4)) return 3;
        else if(Input.GetKeyDown(KeyCode.Alpha5)) return 4;
        else if(Input.GetKeyDown(KeyCode.Alpha6)) return 5;
        else if(Input.GetKeyDown(KeyCode.Alpha7)) return 6;
        else if(Input.GetKeyDown(KeyCode.Alpha8)) return 7;
        else if(Input.GetKeyDown(KeyCode.Alpha9)) return 8;
        else return -1;
    }

}
If you want to actually be able to apply damage, we need a Target script. See the simple example below for a script which enables this to occur. Later, within WeaponControl.cs, we will check if the object we hit has this script attached, and if it does we can deal damage to the set HP amount given to the Target
using System.Collections;
using System.Collections.Generic;
using UnityEngine;

public class Target : MonoBehaviour
{

    [SerializeField]
    private float health;

    [SerializeField]
    [Tooltip("If this is true we spawn the broken GameObject on destruction")]
    public bool isDestructable = false;

    [SerializeField]
    [Tooltip("The GameObject to spawn when this object is broken")]
    public GameObject broken;

    // Start is called before the first frame update
    void Start()
    {

    }

    // Update is called once per frame
    void Update()
    {

    }

    public void TakeDamage(float amount)
    {
        health -= amount;
        if (health <= 0)
        {
            if(isDestructable) Instantiate(broken, gameObject.transform, false);
            Destroy(gameObject);
        }
    }

}
We could then use this PlayerInput.cs script within a WeaponControl.cs script check if the player presses this button in Update called once per frame. If they have tried to shoot and have a weapon equipped, we can call the relative weapon's ShootWeapon() function. Note that you will have to attach the playerInput and playerWeapons variables to relative scripts within your editor.
public class WeaponControl : MonoBehaviour
{
    [SerializeField]
    PlayerInput playerInput;
    [SerializeField]
    PlayerWeapons playerWeapons;
    [SerializeField]
    public Transform muzzle;
    [SerializeField]
    public GameObject projectile;
    [SerializeField]
    Camera mainCamera;
    [SerializeField]
    ParticleSystem muzzleFlash;
    [SerializeField]
    GameObject hitEffect;
    private float range = 500.0f;
    private float damage = 10.0f;


    void Update()
    {
        if (playerInput.GetMouseFire() && playerWeapons.hasWeapon) ShootWeapon();
    }

	    void ShootWeapon()
    {
        fireSFX.Play();
        GameObject projectileObj = Instantiate(projectile, muzzle.transform.position + mainCamera.transform.forward, mainCamera.transform.rotation);
        projectileObj.GetComponent<Rigidbody>().AddForce(transform.forward * 100);


        RaycastHit hit;
        if (Physics.Raycast(muzzle.transform.position, mainCamera.transform.forward, out hit, range))
        {
            Target temp = hit.transform.GetComponent<Target>();
            if (temp != null) temp.TakeDamage(damage);


            Debug.Log(hit.transform.name);
            muzzleFlash.Play();
            GameObject hitObject = Instantiate(hitEffect, hit.point, Quaternion.LookRotation(hit.normal));
            Destroy(hitObject, 1f);

            if (hit.rigidbody != null) hit.rigidbody.AddForce(-hit.normal * hitForce);

        }
    }

}
Scripting
Scripting in Unity uses C# and is very well documented. In the sections below, I'll Provide examples and edge cases where possible, and link to the relative documentation for quick reference.
For a collection of classes and structs that are required for Unity to function, which means they will always be available to you when scripting in Unity, head over to UnityEngine.CoreModule Documentation
Transform
This class controls and tracks object position, rotation, scale.
Official Transform Class Documentation
Local Space
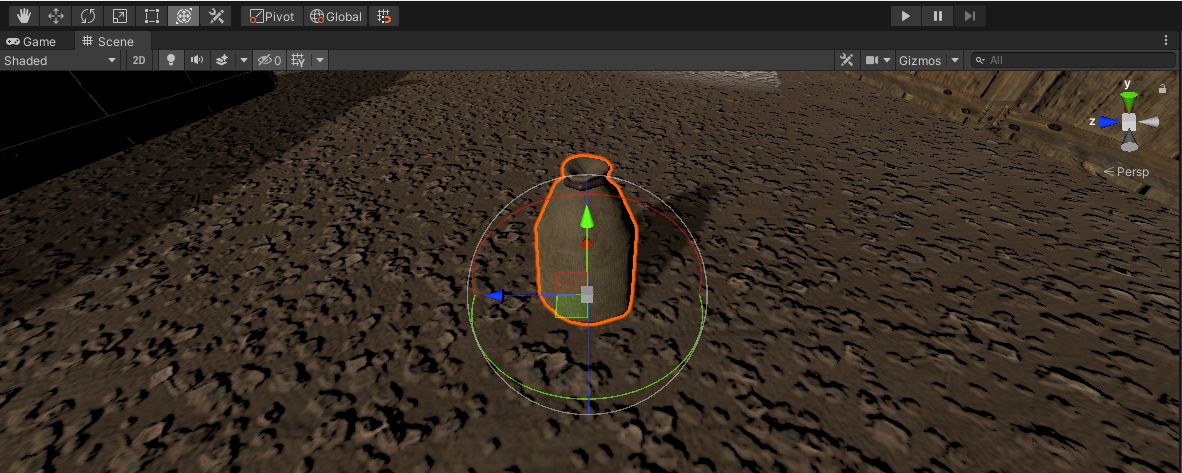
Local space is the transform relative to the object's parent. An example of this can be seen below where I have selected an object and the transform controls are centralized on the exact transform of that object relative to its local position.
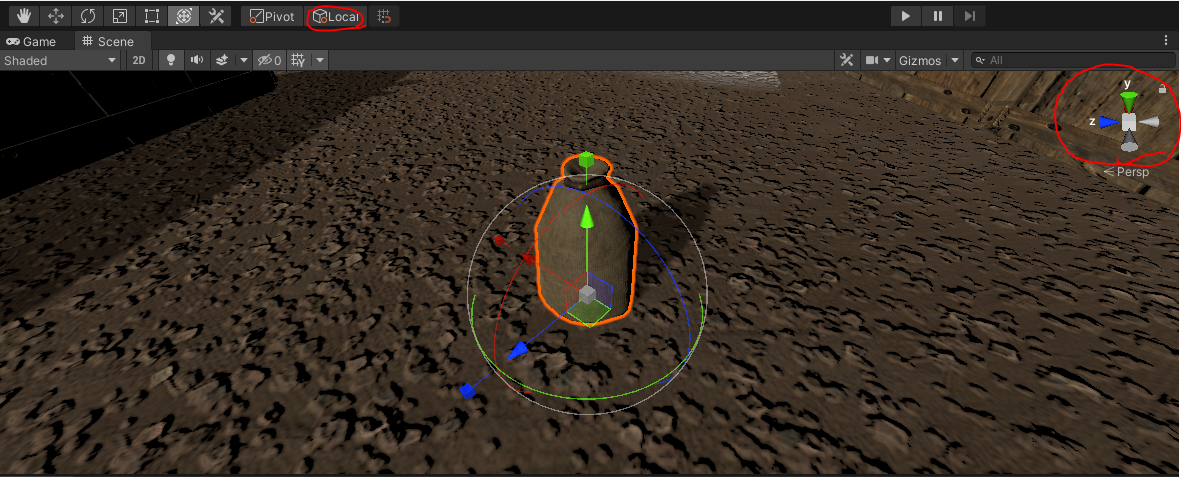
Take notice of three things in the above screenshot. First, we have selected Local position in the top-left near our transform controls. Clicking this button again will toggle between Local and World space. Second, take note of the World Space axis shown at the top-right of the scene view. Third, in contrast to the World space axis, notice the GameObject's axis shown in the scene view are different in orientation. The transform axis shown on the GameObject are modifying and referring to the GameObject's transform within Local space.
World Space
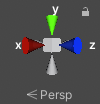
World space is the position of the GameObject rooted within the scene. An example of this is seen in selecting the exact same object in the editor and toggling world space transform view. This makes sure the transform controls are the same as the World Space axis, instead of referring directly to the transform of a local object.
Again, take notice of three things in the above screenshot. First, we have selected Global position in the top-left near our transform controls. Clicking this button again will toggle between Local and World space. Second, take note of the World Space axis shown at the top-right of the scene view. Third, in contrast to the World space axis, notice the GameObject's axis shown in the scene view are different in orientation. The transform axis shown on the GameObject are modifying and referring to the GameObject's transform within World space.
Vector3
Official Vector3 Struct Documentation
Axis
In Unity 3D you will use the X, Y, and Z axis frequently both in positioning within the editor and scripting. It helps to have a clear understanding of the names these axis can be referred to with, as it will greatly improve your ability to access and modify these values without over complicating things.
The X axis can be accessed with the right keyword when accessing any class which stores axis information
The Y axis can be accessed with the Up keyword when accessing any class which stores axis information
The Z axis can be accessed with the forward keyword when accessing any class which stores axis information
Similarly, when modifying a Vector, we can easily flip these axis by accessing the opposite of these keywords -
The X negative axis can be accessed with the left keyword when accessing any class which stores axis information
The Y negative axis can be accessed with the down keyword when accessing any class which stores axis information
The Z negative axis can be accessed with the back keyword when accessing any class which stores axis information
So, the Vector3 equivalents to these would be
X axis, Vector3(1.0f, 0.0f, 0.0f), is equivalent to right
Y axis, Vector3(0.0f, 1.0f, 0.0f), is equivalent to up
Z axis, Vector3(0.0f, 0.0f, 1.0f), is equivalent to forward
X negative axis, Vector3(-1.0f, 0.0f, 0.0f), is equivalent to left
Y negative axis, Vector3(0.0f, -1.0f, 0.0f), is equivalent to down
Z negative axis, Vector3(0.0f, 0.0f, -1.0f), is equivalent to back
Quaternion
Official Quaternion Struct Documentation
Shortcuts
Since Unity has many features and shortcuts available that will widen the gap between an experienced developer and a beginner, I'll list some of my most frequently used shortcuts and tricks here. Though these can all be viewed and modified by opening the panel below in Edit->Shortcuts..., there is a huge amount of shortcuts and this can be a lot to look at.

Transform Controls
Official Positioning Documentation
At the top-left of your Unity editor, you'll notice the transform control buttons where you can switch between Hand, Move, Rotate, Scale, Rect, and Universal controls. Each of these can also be toggled by pressing Q, W, E, R, T, and Y, respectively.

Snapping to Collision
There will be many cases where you want to place an object on a table or ground within your scene. You should not need to manually fumble with axis to do this, but instead given that both objects have collision of some kind you can simply hold Shift+Ctrl while using the Move tool and dragging the grey box that appears in the center of the object, NOT the axis themselves. This will immediately snap the object to the collision nearest to your cursor as you drag it around the scene. There may be minor adjustments needed, but overall this should do the trick for most basic items.
Object to Scene View Transform
You will frequently want to move an object to the position and rotation of your current scene view in World space. You could manually drag the object across the scene in unity, adjusting each axis as needed. Alternatively, you can fly to a position near your desired location for the object, select the object, then press Shift-Ctrl-F to move the object to your exact position and rotation. This is very useful when setting up cameras, as you can just fly to the view you want the camera to display, select the camera, and press Shift-Ctrl-F to set it to that exact position with a lot less fumbling around.
Unclickable Objects
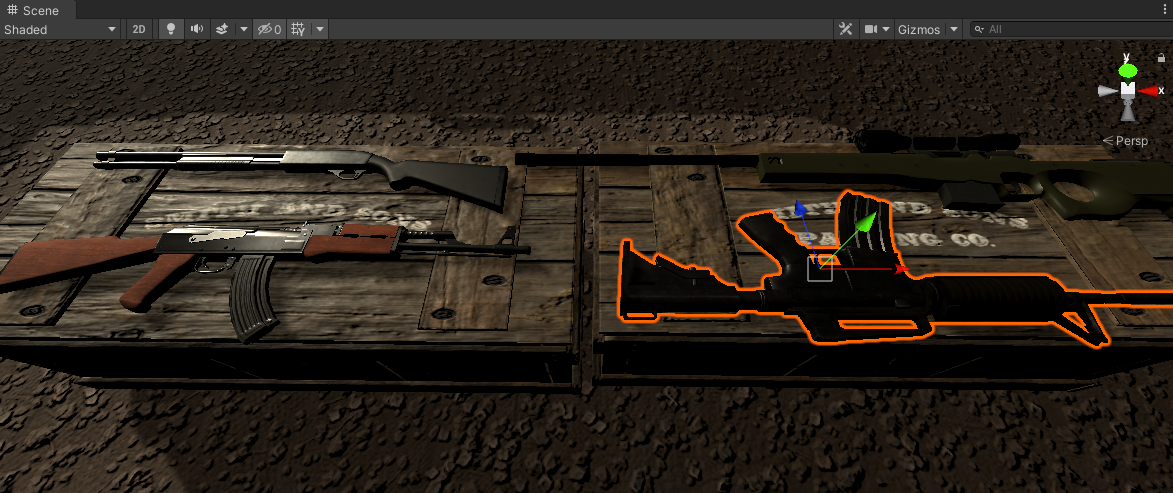
Tired of clicking in the scene view and selecting the terrain or some other GameObject? Within the scene hierarchy you can toggle whether or not an object should be clickable. Simply click the small hand next to the object's name in the hierarchy.
You can also toggle hiding and showing objects by clicking the eye icon just to the left of this setting
Prefabs
Since the Unity workflow is built around prefabs, I figured I'd document some specific use cases for the many features introduced in the Unity LTS 2019 release which added support for prefab variants and nested prefabs. On this page, I'll cover some good practices and features these prefab features provide.
I'd highly recommend heading over to devassets.com to grab some of the assets you see featured across the Unity pages on Knoats. They are entirely free and give you a lot to work with when learning. If you can afford it, I would recommend donating to the developers. Not only does this unlock more assets you can get with the package you donated to, but it shows support to the developer that organized all of these great assets in one place for you to learn with.
Positioning Prefabs
Being relatively new to Unity, I began by grabbing some assets off the Unity Store. Like most free assets on the store, these did not come entirely assembled for me and required me to work a bit to get things in a state that is usable for even the most basic games. This has been a good learning experience, and required no scripting, so if you are new to Unity and not quite ready to script, doing this will give you experience creating prefabs, working with materials, shaders, lighting, textures, and much more.
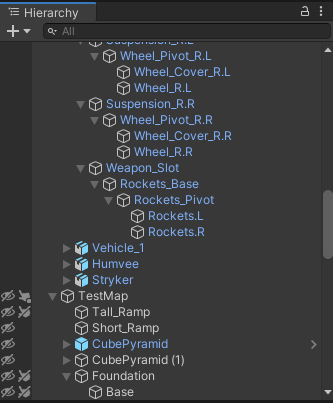
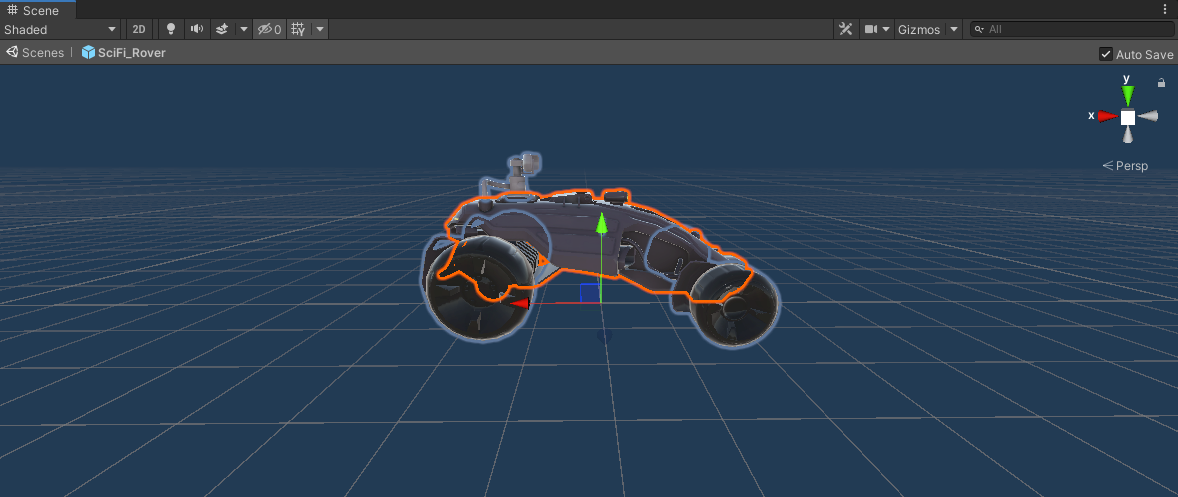
At first when creating a prefab of an object that exists within your scene, you may see something like the below when opening the prefab to edit
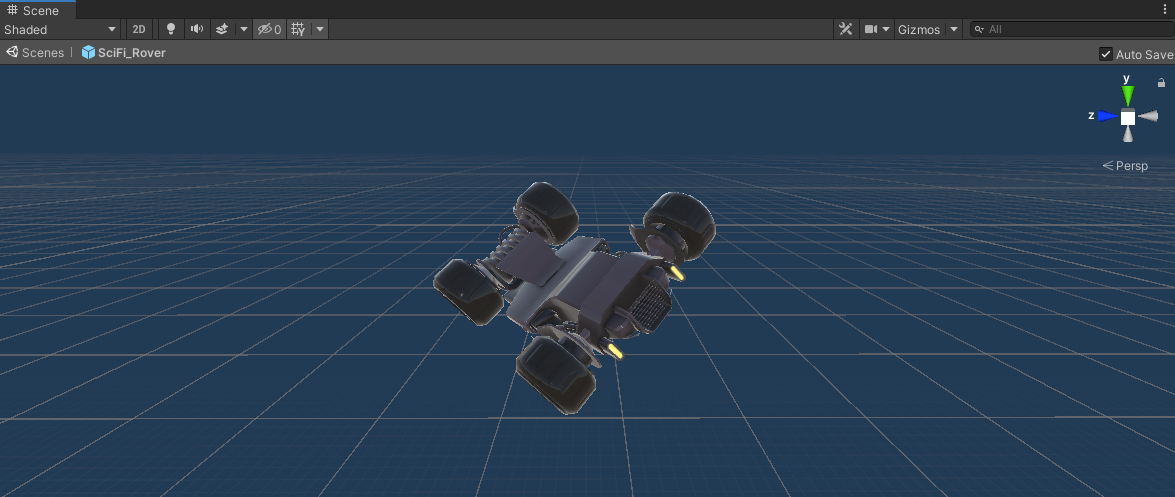
This is clearly not the orientation that we expect this SciFi_Rover vehicle to have when initially placed in our scene. To fix this, be sure you are editing the prefab in the prefab editor and NOT directly within your scene. Then adjust the transform to be in the orientation desired.
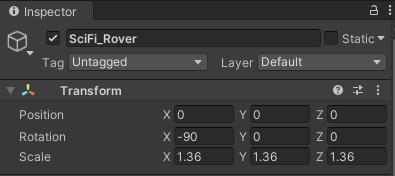
Below, we see the initial transform settings
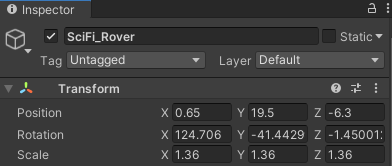
First, set all but the Scale of your object to 0. Shown in the screenshot below, there will be many cases that this does not produce the desired results, so we still need to modify the transform further
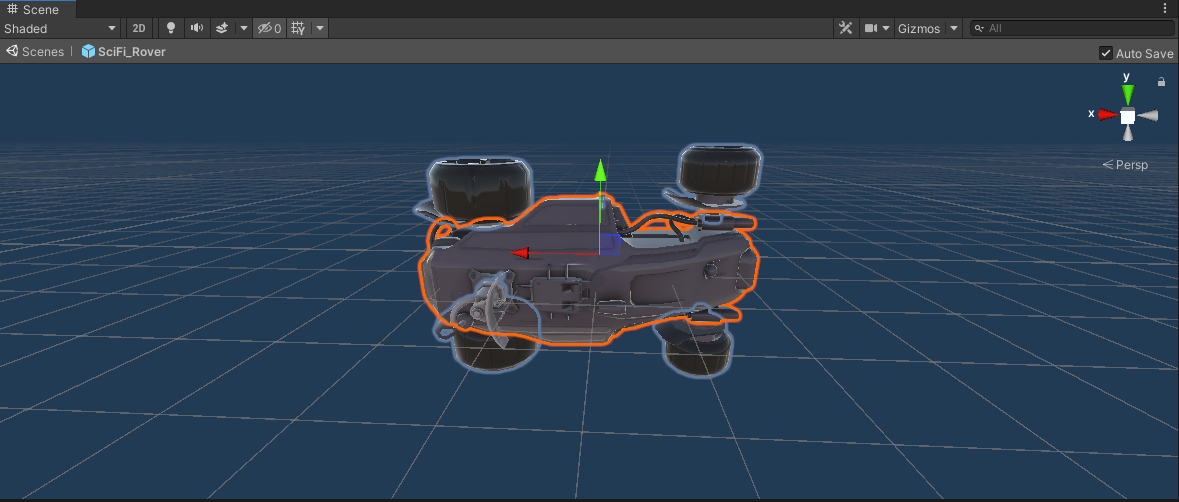
After making some adjustments, the object's final orientation within the prefab editor is seen below
And the final transform properties of the root GameObject are now much cleaner -
Post Processing
Good graphics are good. That's why I was excited to find adding Post Processing to my Unity 3D project was not only easy to do, but a huge improvement to the visuals within my scene. This enables common modern graphics features like Motion Blur, Ambient Occlusion, Depth of Field, and more.
Add Post Processing
Post Processing is added to each scene individually, and not a project as a whole. To add this to a Unity 3D project, we first need to add the Post-process Layer component to our scene's main camera. Next we'll add a Post Processing Volume that globally effects our entire scene. Then we can add a PostProcessing_Profile for our scene and add new visual effects accordingly.
Configuring the Camera
Its important that the camera the player views the game from contains this component. Otherwise, if the player can toggle between a camera which has the Post-process Layer and one that does not, they effects gained by post processing will only be rendered in one view and not the other.

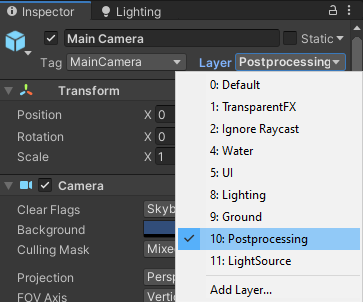
Once we've added the above component to the scene's main camera, we need to adjust the layer of both this component and our main camera to reflect this. Change to the Postprocessing Layer in the Post-process Layer component.
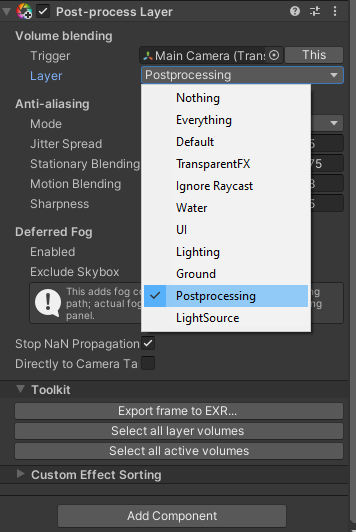
Now change the layer of the camera itself to the Postprocessing Layer as well
Creating the Volume
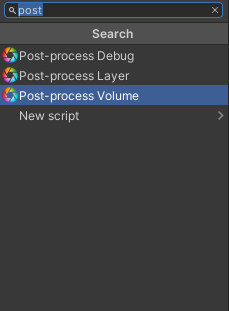
Now anywhere within your current scene hierarchy, add an empty GameObject and name it PostProcessingVolume or otherwise something relative to your specific scenario. Set this GameObject's layer to Post Processing. Select this new GameObject and within the inspector Add Component->Post-processing Volume as seen below
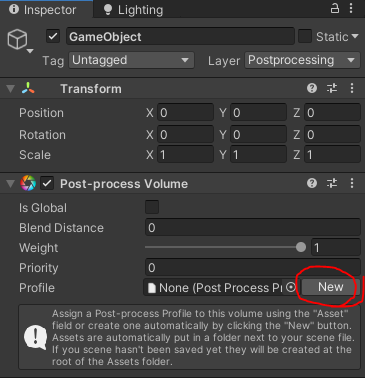
At a glance, there is not much here. But once we add a Post Process Profile and finish configuring our scene we will use this component to adjust some pretty neat looking visuals.
Be sure to apply the Post Processing layer to the Camera and Volume GameObjects within your scene before continuing or the effects will not be applied
Creating the Profile
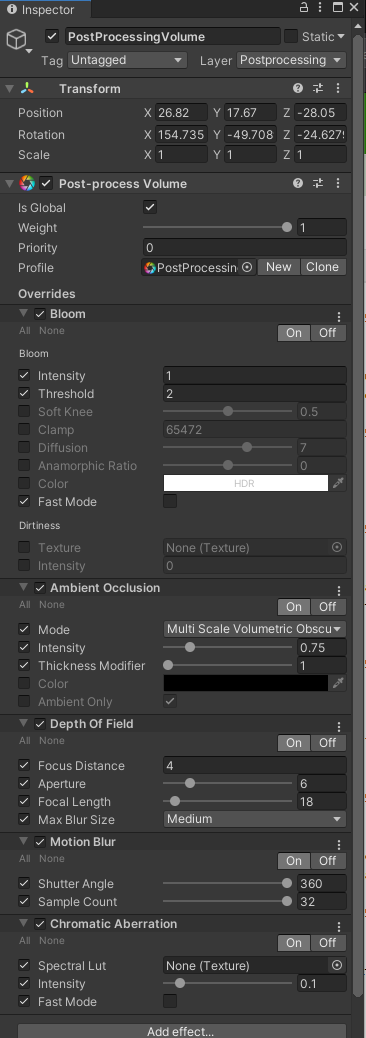
Within the GameObject created for our Volume click New to the right of the Profile field in the new Post-processing Volume component.
Unity will automatically create a Post Processing Profile and place it in a directory relative to your scene. Now we can check the Global tick box to apply this volume to our entire scene and start adding new effects to our scene!
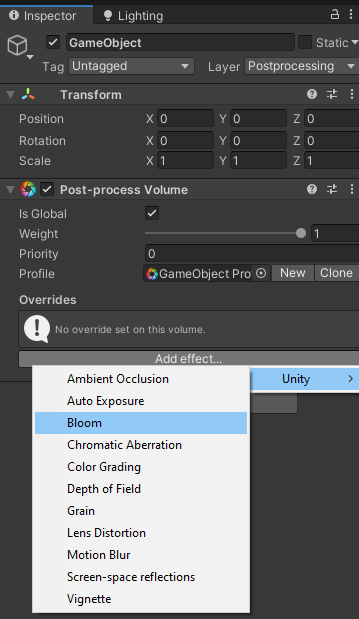
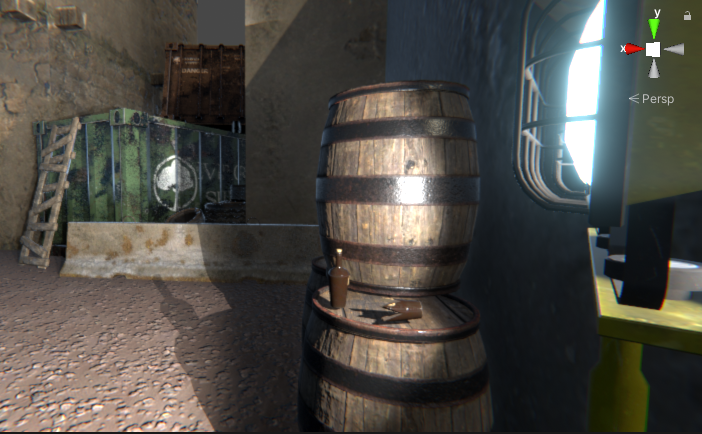
An example of some effects that I added to my scene to achieve the screenshot at the top of this page
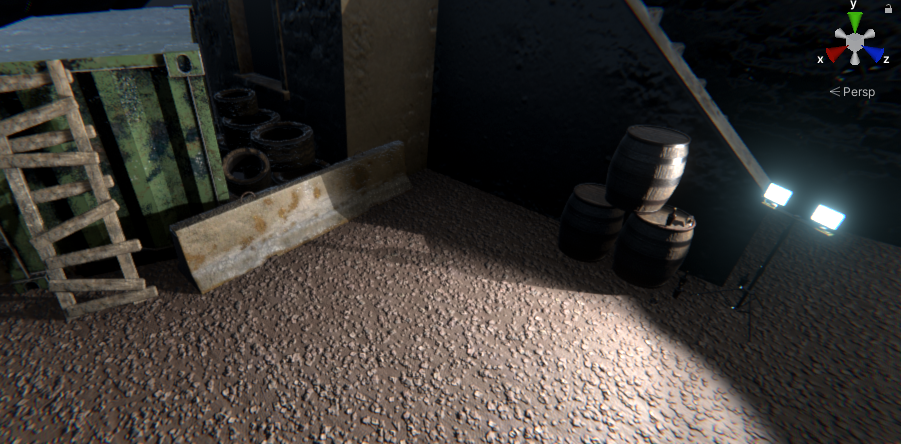
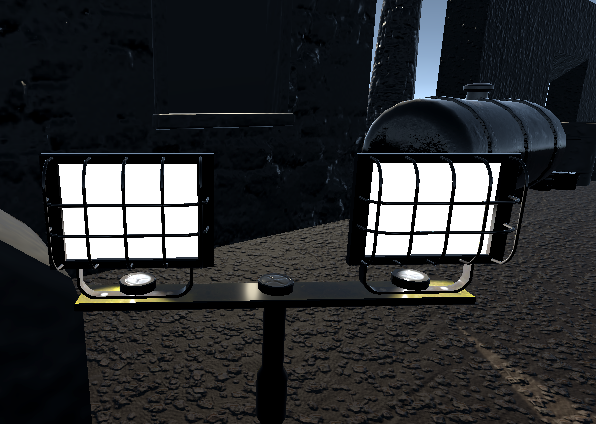
That's it! See the glow coming from the lights in the pictures below for an example of how this can be used to add the Bloom effect to an emissive light source.
Post Processing on

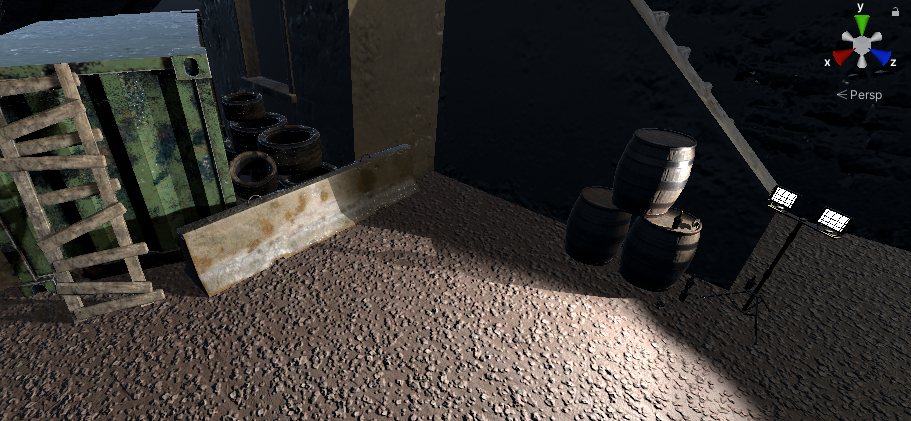
Post Processing off
New Input System
Setup
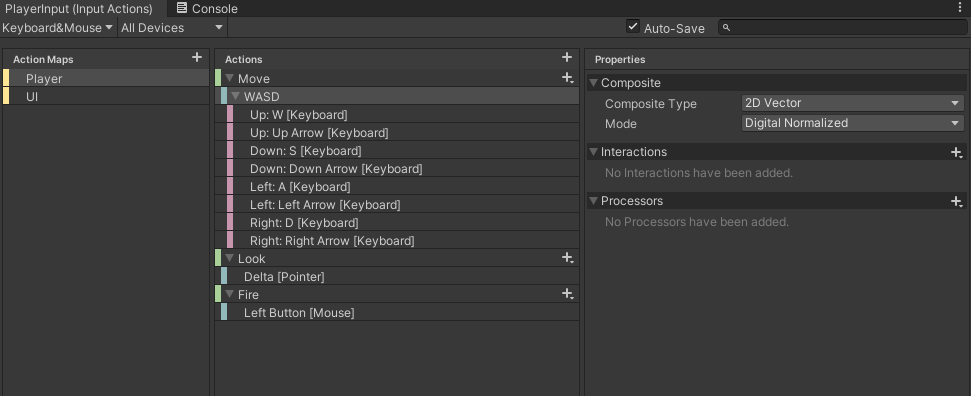
Using the default configuration for a keyboard&mouse / Gamepad Input Actions asset in unity, we can implement universal controls given various input devices.
Issues getting an input device to work? Click Window->Analysis->Input Debugger and at the top-left of the new window select Options->Add Devices Not Listed in 'Supported Devices' and any input device that was not previously working should now be passing input to unity.
This was a weird bug for me to figure out, so I thought it was worth a mention. For me, I had to do this in order to get Unity to accept input from my Corsair gaming mouse. I searched up a lot of information on this new input system thinking I was using it wrong, and later found that my mouse was not passing input to unity and my code was correct.

Use
We can call a specific function from a specific component
Using PlayerInput component->Behavior->Invoke Unity Events -
  Rigidbody playerRigidbody;
  public PlayerControls controls;
  Vector2 playerVelocity;
  public float playerSpeed = 5.0f;

  void Awake() {
    playerRigidbody = GetComponent<Rigidbody>();
    controls = new PlayerControls();
  }

  void OnEnable() {
    controls.Player.Enable();
  }

  void OnDisable() {
    controls.Player.Disable();
  }

  public void OnMove(InputAction.CallbackContext context) {
    print("Moving: " + context.ReadValue<Vector2>());
    playerVelocity = context.ReadValue<Vector2>();
  }

  public void OnLook(InputAction.CallbackContext context) {
    print("Look: " + context.ReadValue<Vector2>());
  }

  public void OnFire(InputAction.CallbackContext context) {
    print("Bang");
  }

  void Update()
  {
    playerRigidbody.position += new Vector3(playerVelocity.x * Time.deltaTime * playerSpeed,
      0,
      playerVelocity.y * Time.deltaTime * playerSpeed);
  }
Or we can let Unity call functions defined using the naming convention void On\[ActionName\](InputValue value)
Using PlayerInput component->Behavior->Send Messages -
  Rigidbody playerRigidbody;
  public PlayerControls controls;
  Vector2 playerVelocity;
  public float playerSpeed = 5.0f;


  void Awake() {
    playerRigidbody = GetComponent<Rigidbody>();
    controls = new PlayerControls();
  }

  void OnEnable() {
    controls.Player.Enable();
  }

  void OnDisable() {
    controls.Player.Disable();
  }

  public void OnMove(InputValue value) {
    playerVelocity = value.Get<Vector2>();
    print("Moving: " + value.Get<Vector2>());
  }


  public void OnMove(InputValue value) {
    playerVelocity = value.Get<Vector2>();
    print("Moving: " + value.Get<Vector2>());
  }


  void Update()
  {
    playerRigidbody.position += new Vector3(playerVelocity.x * Time.deltaTime * playerSpeed,
      0,
      playerVelocity.y * Time.deltaTime * playerSpeed);
  }
Broadcast messages is the same as Send Messages, except broadcasting invokes the same methods on all child objects who have a component with function definitions that match this naming convention.
Unreal Engine 5
Linux Setup
The setup process for UE4 on Linux is pretty straight forward, and the official instructions are very well documented. Follow those steps, and return here once you're done. Below, I just outline some of the issues I encountered using UE4 on Linux post-installation and how I solved them.
Marketplace Assets
Epic Games doesn't seem to provide any support for the UE4 Marketplace for Linux. As a result, Epic also does not support downloading and adding any assets to your project. Bummer.
I would like to note a blog post on this same issue by alexandra-zaharia, I would have very much preferred her solution but after attempting it I could not get it to work. I could install Epic Games through Lutris, but symlinking my projects (or copying them) into Wine Windows FS did not result in the Epic Games launcher detecting the projects.
What I ended up doing was using the unofficial nmrugg/UE4Launcher on GitHub. It works great, but I do miss some things like asset engine version information and browsing the marketplace.
You can install assets with it though, as long as you own them and they're linked to the Epic account you sign in with. That's all I need for now, I'm just playing with the idea of learning some C++ for UE4.
UI Scaling
Initially the UI for Unreal was very large and practically unusable. This could be due to the fact that I'm running on an integrated graphics CPU, but I'm not sure. To fix this, I just opened a project and navigated to Edit->Editor Preferences and then unchecked the Enable High DPI Support option under the General/Appearance settings menus. After restarting UE4, everything was good and UI was normal again.
Application Launchers
The shortcuts initialized by Unreal during the build process didn't work for me. I couldn't figure out why, so I just made my own. I placed these files into ~/.local/share/applications/
You will need to change the Path value to point to the same directories on your local system for the following configurations.
For the Unreal Engine Editor, the following UnrealEngine.desktop file will launch a window to open or create a UE4 project
#!/usr/bin/env xdg-open

[Desktop Entry]
Version=1.0
Type=Application
Exec=UE4Editor
Path=/home/kapper/Code/Clones/UnrealEngine/Engine/Binaries/Linux
Name=Unreal Engine Editor
Icon=ubinary
Terminal=false
StartupWMClass=UE4Editor
MimeType=application/uproject
Comment=Open or create UE4 projects
And for the open source UE4Launcher, I created the following UnrealEngineLauncher.desktop file to run npm start in the UE4Launcher repository directory.
#!/usr/bin/env xdg-open

[Desktop Entry]
Version=1.0
Type=Application
Exec=npm start
Path=/home/kapper/Code/Clones/UE4Launcher/
Name=Unreal Engine Launcher
Icon=ubinary
Terminal=false
StartupWMClass=UE4Editor
MimeType=application/uproject
Comment=UE4 Project and asset management
Hardlinks for Editor Layouts
In the editor you can create and save layouts under the Window->Load Layout toolbar menus. After creating a layout, it will by default be output into the UnrealEngine/Engine/Saved/Config/Layouts/ directory.
I thought it'd be really useful to store the layout in the root directory of a project (tracked by github) and hardlink it from there to ~/Code/Clones/UnrealEngine/Engine/Saved/Config/Layouts instead. This way, when you clone the project for development on another machine you keep your layout, and UE4 will still recognize it within the menus for loading and saving layouts.
To create the hardlink, I ran this command
ln ~/Code/Clones/UnrealEngine/Engine/Saved/Config/Layouts/EditorLayoutKapper.ini ~/Code/GameDev/UnrealProjects/ThirdPerson/EditorLayoutKapper.ini
Debugging
See Build Configuration documentaiton for more information of the various build targets that are made available when generating a C++ project solution with UE4. Also see Compiling Projects for how to build and debug with Visual Studio.
I watched this video on YouTube to learn how to debug UE4 projects using vscode. The instructions are for windows but it was very similar for linux. Just had to install vscode on Linux first.
Once you have vscode installed, open the UE4 editor as you normally would to edit your project. Then, go to Edit->Editor Preferences and navigate to the Source Code settings menu from the left. Select Visual Studio Code from the drop down. You'll get a prompt to restart the editor, which you should do before continuing.
Once the UE4 editor has been restarted, navigate to File->Generate Visual Studio Code Project, there will be some loading screen that appears and once that finishes you can go to File->Open Visual Studio Code
Once inside our UE4 vscode project, push CTRL+SHIFT+B and run the <YOUR_PROJECT_NAME>Editor (Development) build task. This task was defined for us by UE4 when we generated our vscode project in the previous step, and the entry within my launch.json is seen below.
{
	"name": "ThirdPersonEditor (Development)",
	"request": "launch",
	"preLaunchTask": "ThirdPersonEditor Linux Development Build",
	"program": "/home/kapper/Code/Clones/UnrealEngine/Engine/Binaries/Linux/UE4Editor",
	"args": [
		"/home/kapper/Code/GameDev/UnrealProjects/unrealgame/ThirdPerson.uproject"
	],
	"cwd": "/home/kapper/Code/Clones/UnrealEngine",
	"type": "lldb"
},
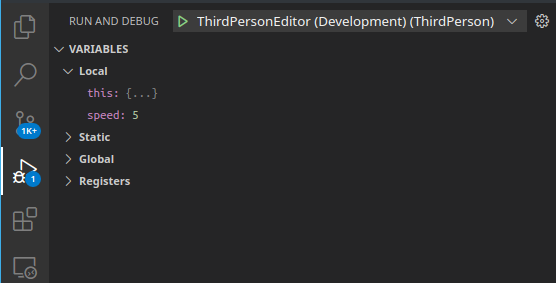
Running this task for the first time could take a bit of time depending on the size of your project. When this finishes building, it should automatically start a new UE4 editor with your project open and in debug mode. If it doesn't, just select the <YOUR_PROJECT_NAME>Editor (Development) debug configuration in the sidebar and click the run button.
I also had to run the following command to install a missing dependency. The first time I tried to build there was an error and after reading it I traced it to this package and installed. The development build was successful after installing.
sudo apt install libopenvr-dev
Now you can run the same debug configuration and once the UE4 editor launches make sure whatever script you're debugging is active within your scene or your code breakpoint will not be hit.
Debugging on Windows under Visual Studios is very well documented, so while I do also have a windows development setup for UE4 I wont cover that here.
No luck with CLion, I seen memory usage during the build jump from 6GB to 16GB, plus an additional 4GB of swap space was also ate up.
Possibly a better solution: Running UE4 from Qt Creator
Since writing this, I've been using Rider for Unreal Engine, It's in EA right now so you have to apply for access but I was accepted almost immediately so you shouldn't have any issues.
Gameplay Ability System
Links and sources
Example of using the GAS: GASShooter GitHub project
Unofficial but detailed GAS Documentation
Epic livestream in depth look at GAS
Highly recommended: Setting up GAS youtube tutorial
Notes
Any Actor that wishes to use GameplayAbilities, have Attributes, or receive GameplayEffects must have one AbilitySystemComponent (ASC) attached to them.
ASC can be assigned to weapons, players, or AI
The Actor with the ASC attached to it is referred to as the OwnerActor of the ASC.
The physical representation Actor of the ASC is called the AvatarActor
The OwnerActor and AvatarActor can either be the same or different depending on the use case
If your Actor will respawn and need persistence of Attributes or GameplayEffects between spawns (like a hero in a MOBA), then the ideal location for the ASC is on the PlayerState.
Brief
In the sections below, my game is named unrealgame5, and any appearances of this string should be replaced by your own project name. This page outlines the process of setting up the Gameplay Ability System for use in an Unreal Engine 5 game using C++. Blueprints can still be used for prototyping new abilities, which can later be translated to C++.
Project Plugins and Modules
To setup out UE5 project to use the required modules, we need to edit our <PROJECT_NAME>.build.cs file. This file should have been generated by Unreal Engine when your project was created, and for me my file is named unrealgame5.build.cs
Initial contents of unrealgame5.build.cs, before I made any changes.
using UnrealBuildTool;

public class unrealgame5 : ModuleRules
{
	public unrealgame5(ReadOnlyTargetRules Target) : base(Target)
	{
		PCHUsage = PCHUsageMode.UseExplicitOrSharedPCHs;

		PublicDependencyModuleNames.AddRange(new string[] {"Core", "CoreUObject", "Engine", "InputCore", "HeadMountedDisplay"});
  }
}
Add "GameplayAbilities", "GameplayTags", "GameplayTasks" modules to unrealgame5.build.cs so your file looks like the following.
using UnrealBuildTool;

public class unrealgame5 : ModuleRules
{
	public unrealgame5(ReadOnlyTargetRules Target) : base(Target)
	{
		PCHUsage = PCHUsageMode.UseExplicitOrSharedPCHs;

		PublicDependencyModuleNames.AddRange(new string[] { "Core", "CoreUObject", "Engine", "InputCore", "HeadMountedDisplay" });
		PublicDependencyModuleNames.AddRange(new string[] { "GameplayAbilities", "GameplayTags", "GameplayTasks" });
	}
}
Then within the editor go to Edit->Plugins... and enable the Gameplay Abilities plugin. You will need to restart the editor for the changes to apply.

C++ Initial Setup
To set up the scaffolding for the GAS, we need a few things -
- Enumeration of abilities to correlate with input actions
- Core GameplayAbilitySystem
- Set of attributes for our player and / or enemies
- Player character inheriting from
IAbilitySystemInterfaceclass - GameplayEffect to apply default attributes for our player / enemies
- AnimGraphs with Montage slots for handling abilitiy animations
So, to complete this setup you will at least need to define a few new classes for your project.
For my project I follow the same naming convention used with GASDocumentation. I'll paste it below, but for the first few files required to set up the Gameplay Ability System (GAS), we are defining the backend of the system so none of these conventions apply. For these files, I added the GAS_ convention.
Prefix 	Asset Type
GA_ 	GameplayAbility
GC_ 	GameplayCue
GE_ 	GameplayEffect
GAS_    GameplayAbilitySystem (Core Configurations)
Ability Enumeration
First, we need to modify the contents of the header file for our unreal project. My project is named unrealgame5 so the file is unrealgame5.h, and the contents are below. If you already have information here, just make sure the EGASAbilityInputID enumeration is added to the header file and save your changes. This enumeration is used to correlate input actions to activate certain abilities in our game.
Note: Attack below must either be changed to match or made to match some keybind within your Edit->Project Settings->Input options menu.
// Copyright Epic Games, Inc. All Rights Reserved.

#pragma once

#include "CoreMinimal.h"

UENUM(BlueprintType)
enum class EGASAbilityInputID : uint8
{
  None,
  Confirm,
  Cancel,
  Attack
};
Ability System Component
Next, we need to create an AbilitySystemComponent. This will be the component that we attach to actors that we want to take use with the GAS. To create this component, open your project in unreal and create a new C++ source file, inheiriting from the AbilitySystemComponent base class.
This base class is provided by UE5, assuming you have the GameplayAbilities plugin installed to your project. In order to inherit from it, we need to create a new C++ Class. We must be in the C++ Classes subdirectory of our project in order to do this.

Next click All Classes and search for AbilitySystemComponent.

Click next and name your class, I'll name this class GAS_AbilitySystemComponent.

The generated files are seen below. You don't need to put anything else in here for now. Note that UE5 prefixed our original class name GAS_AbilitySystemComponent with a U - it's name in the source code is UGAS_AbilitySystemComponent, this is normal and to be expected.
// GAS_AbilitySystemComponent.h
// All content (c) Shaun Reed 2021, all rights reserved

#pragma once

#include "CoreMinimal.h"
#include "AbilitySystemComponent.h"
#include "GAS_AbilitySystemComponent.generated.h"

/**
 *
 */
UCLASS()
class UNREALGAME5_API UGAS_AbilitySystemComponent : public UAbilitySystemComponent
{
	GENERATED_BODY()

};
// GAS_AbilitySystemComponent.cpp
// All content (c) Shaun Reed 2021, all rights reserved

#include "GAS_AbilitySystemComponent.h"
Gameplay Abilities
Next we'll setup the base class that we will use for adding abilities to our game. To do this we need to create another new C++ Source file like we did in the previous step, only this time we will inherit from the GameplayAbility class provided with the GameplayAbilities UE5 plugin.

I named this class GAS_GameplayAbility and the source code is seen below
// GAS_GameplayAbility.h
// All content (c) Shaun Reed 2021, all rights reserved

#pragma once

#include "../unrealgame5.h"

#include "CoreMinimal.h"
#include "Abilities/GameplayAbility.h"
#include "GAS_GameplayAbility.generated.h"

UCLASS()
class UNREALGAME5_API UGAS_GameplayAbility : public UGameplayAbility
{
	GENERATED_BODY()

public:
	UGAS_GameplayAbility();

	UPROPERTY(BlueprintReadOnly, EditAnywhere, Category = "Ability")
		EGASAbilityInputID AbilityInputID = EGASAbilityInputID::None;
};
// All content (c) Shaun Reed 2021, all rights reserved
// GAS_GameplayAbility.cpp

#include "GAS_GameplayAbility.h"

UGAS_GameplayAbility::UGAS_GameplayAbility() { }
Attribute Sets
Next, we need to create an AttributeSet for our game. Repeat the process of creating a new C++ sourcce file for your ue5 project, but this time inherit from AttributeSet

I named this class GAS_AttributeSet and the files genereated are below
// GAS_AttributeSet.h
// All content (c) Shaun Reed 2021, all rights reserved

#pragma once

#include "AbilitySystemComponent.h"

#include "CoreMinimal.h"
#include "AttributeSet.h"
#include "GAS_AttributeSet.generated.h"

// Macros to define getters and setters for attributes (AttributeSet.h)
#define ATTRIBUTE_ACCESSORS(ClassName, PropertyName) \
		GAMEPLAYATTRIBUTE_PROPERTY_GETTER(ClassName, PropertyName) \
		GAMEPLAYATTRIBUTE_VALUE_GETTER(PropertyName) \
		GAMEPLAYATTRIBUTE_VALUE_SETTER(PropertyName) \
		GAMEPLAYATTRIBUTE_VALUE_INITTER(PropertyName)

UCLASS()
class UNREALGAME5_API UGAS_AttributeSet : public UAttributeSet
{
	GENERATED_BODY()

  UGAS_AttributeSet();

public:
	virtual void GetLifetimeReplicatedProps(TArray<FLifetimeProperty>& OutLifetimeProps) const override;

	/*
	* Attribute Definitions
	*/

	// Health

	UPROPERTY(BlueprintReadOnly, Category = "Attributes", ReplicatedUsing = OnRep_Health)
	FGameplayAttributeData Health;
	// Use macros we defined from AttributeSet.h to generate getters and setters
	ATTRIBUTE_ACCESSORS(UGAS_AttributeSet, Health);

	UFUNCTION()
		virtual void OnRep_Health(const FGameplayAttributeData& OldHealth);

	// Stamina

	UPROPERTY(BlueprintReadOnly, Category = "Attributes", ReplicatedUsing = OnRep_Stamina)
	FGameplayAttributeData Stamina;
	ATTRIBUTE_ACCESSORS(UGAS_AttributeSet, Stamina);

	UFUNCTION()
		virtual void OnRep_Stamina(const FGameplayAttributeData& OldStamina);

	// Attack Power

	UPROPERTY(BlueprintReadOnly, Category = "Attributes", ReplicatedUsing = OnRep_AttackPower)
	FGameplayAttributeData AttackPower;
	ATTRIBUTE_ACCESSORS(UGAS_AttributeSet, AttackPower);

	UFUNCTION()
		virtual void OnRep_AttackPower(const FGameplayAttributeData& OldAttackPower);
};
// GAS_AttributeSet.cpp
// All content (c) Shaun Reed 2021, all rights reserved

#include "Net/UnrealNetwork.h"  // DOREPLIFETIME
#include "GAS_AttributeSet.h"

UGAS_AttributeSet::UGAS_AttributeSet()
{
}

void UGAS_AttributeSet::GetLifetimeReplicatedProps(TArray<FLifetimeProperty>& OutLifetimeProps) const
{
  Super::GetLifetimeReplicatedProps(OutLifetimeProps);

  DOREPLIFETIME_CONDITION_NOTIFY(UGAS_AttributeSet, Health, COND_None, REPNOTIFY_Always);
  DOREPLIFETIME_CONDITION_NOTIFY(UGAS_AttributeSet, Stamina, COND_None, REPNOTIFY_Always);
  DOREPLIFETIME_CONDITION_NOTIFY(UGAS_AttributeSet, AttackPower, COND_None, REPNOTIFY_Always);

}

void UGAS_AttributeSet::OnRep_Health(const FGameplayAttributeData& OldHealth)
{
  GAMEPLAYATTRIBUTE_REPNOTIFY(UGAS_AttributeSet, Health, OldHealth);
}

void UGAS_AttributeSet::OnRep_Stamina(const FGameplayAttributeData& OldStamina)
{
  GAMEPLAYATTRIBUTE_REPNOTIFY(UGAS_AttributeSet, Stamina, OldStamina);
}

void UGAS_AttributeSet::OnRep_AttackPower(const FGameplayAttributeData& OldAttackPower)
{
  GAMEPLAYATTRIBUTE_REPNOTIFY(UGAS_AttributeSet, AttackPower, OldAttackPower);
}
Character Setup
In the files below, my character is named ThirdPersonCharacter, so any appearances of this string may need to be replaced with your character's name instead. To setup your character that inherits from ACharacter base class, make the following changes to your files.
In the ThirdPersonCharacter.h file, make sure you're inheriting from public IABilitySystemInterface. The start of your class should look like this. Pay attention to the includes.
// All content (c) Shaun Reed 2021, all rights reserved

#pragma once

// GAS includes
#include "AbilitySystemInterface.h"
#include <GameplatEffectTypes.h>

#include "CoreMinimal.h"
#include "GameFramework/Character.h"
#include "ThirdPersonCharacter.generated.h"

UCLASS()
class UNREALGAME5_API AThirdPersonCharacter : public ACharacter, public IAbilitySystemInterface
{
	GENERATED_BODY()

public:

// more code....
Character Components
Next, we add an instance of our GAS_AbilitySystem class using the UGAS_AbilitySystemComponent typename, and we also add an instance of our GAS_AttributeSet class using the UGAS_AttributeSet type.
UCLASS()
class UNREALGAME5_API AThirdPersonCharacter : public ACharacter, public IAbilitySystemInterface
{
	GENERATED_BODY()

public:
	// GAS declarations
	UPROPERTY(VisibleAnywhere, BlueprintReadOnly, Category = "GAS")
	class UGAS_AbilitySystemComponent* AbilitySystemComponent;

	UPROPERTY(VisibleAnywhere, BlueprintReadOnly, Category = "GAS")
    class UGAS_AttributeSet* Attributes;
// more code....
Now we need to modify the character's constructor to add the new components we've declared. I removed the code from my constructor that wasn't related to the GAS. The additions are below.
// ThirdPersonCharacter.cpp

AThirdPersonCharacter::AThirdPersonCharacter()
{
 	// Initializing any components unrelated to GAS...
	// ...

	  // Initialize GAS related components
	AbilitySystemComponent = CreateDefaultSubobject<UGAS_AbilitySystemComponent>(TEXT("AbilitySystemComponent"));
	AbilitySystemComponent->SetIsReplicated(true);
	AbilitySystemComponent->SetReplicationMode(EGameplayEffectReplicationMode::Minimal);
    Attributes = CreateDefaultSubobject<UGAS_AttributeSet>(TEXT("Attributes"));
}
So we have the components we need, and the next step is to provide the required definitions for virtual functions we've inheirted from IAbilitySystemInterface
Virtual Functions
To start, we declare the required virtual functions that we will need to define to use the GAS.
UCLASS()
class UNREALGAME5_API AThirdPersonCharacter : public ACharacter, public IAbilitySystemInterface
{
	GENERATED_BODY()

public:
	// GAS declarations
	UPROPERTY(VisibleAnywhere, BlueprintReadOnly, Category = "GAS")
	class UGAS_AbilitySystemComponent* AbilitySystemComponent;

	UPROPERTY(VisibleAnywhere, BlueprintReadOnly, Category = "GAS")
    class UGAS_AttributeSet* Attributes;

	virtual class UAbilitySystemComponent* GetAbilitySystemComponent() const override;

// more code....
We implement GetAbilitySystemComponent, which is just a simple getter that returns our UGAS_AbilitySystemComponent component.
// ThirdPersonCharacter.cpp
UAbilitySystemComponent* AThirdPersonCharacter::GetAbilitySystemComponent() const
{
	return AbilitySystemComponent;
}
Next we need to overload a virtual function InitializeAttributes() to handle initializing the attributes for our game at the start. We also declare the DefaultAttributeEffect member variable to help define and apply the default attributes for our character.
// ThirdPersonCharacter.h
UCLASS()
class UNREALGAME5_API AThirdPersonCharacter : public ACharacter, public IAbilitySystemInterface
{
	GENERATED_BODY()

public:
	// GAS declarations
	UPROPERTY(VisibleAnywhere, BlueprintReadOnly, Category = "GAS")
	class UGAS_AbilitySystemComponent* AbilitySystemComponent;

	UPROPERTY(VisibleAnywhere, BlueprintReadOnly, Category = "GAS")
    class UGAS_AttributeSet* Attributes;

	virtual class UAbilitySystemComponent* GetAbilitySystemComponent() const override;

    // Add these lines
  	virtual void InitializeAttributes();
    UPROPERTY(BlueprintReadOnly, EditDefaultOnly, Category = "GAS")
    TSubclassOf<class UGameplayEffect> DefaultAttributeEffect;
// more code....
Define InitializeAttributes()
// ThirdPersonCharacter.cpp
void AThirdPersonCharacter::InitializeAttributes()
{
	// If the ASC and DefaultAttributeEffect objects are valid
	if (AbilitySystemComponent && DefaultAttributeEffect)
	{
		// Create context object for this gameplay effecct
		FGameplayEffectContextHandle EffectContext = AbilitySystemComponent->MakeEffectContext();
		EffectContext.AddSourceObject(this);

		// Create an outgoing effect spec using the effect to apply and the context
		FGameplayEffectSpecHandle SpecHandle = AbilitySystemComponent->MakeOutgoingSpec(DefaultAttributeEffect, 1, EffectContext);

		if (SpecHandle.IsValid())
		{
			// Apply the effect using the derived spec
			// + Could be ApplyGameplayEffectToTarget() instead if we were shooting a target
			FActiveGameplayEffectHandle GEHandle = AbilitySystemComponent->ApplyGameplayEffectSpecToSelf(*SpecHandle.Data.Get());
		}
	}
}
Similar to how we defined default attributes, we define default abilities for our character by overloading the GiveAbilities() function. We also add the DefaultAbilities array to store the default abilities for the character.
Notice that we use the UPROPERTY macro to apply EditDefaultOnly to our components. This will later allow us to modify these components in the UE5 editor for our character's blueprint, so we can dynamically add and remove attributes and abilities for our player without modifying the code each time.
// ThirdPersonCharacter.h
UCLASS()
class UNREALGAME5_API AThirdPersonCharacter : public ACharacter, public IAbilitySystemInterface
{
	GENERATED_BODY()

public:
	// GAS declarations

	// Define components to store ASC and attributes
	UPROPERTY(VisibleAnywhere, BlueprintReadOnly, Category = "GAS")
	class UGAS_AbilitySystemComponent* AbilitySystemComponent;
	UPROPERTY(VisibleAnywhere, BlueprintReadOnly, Category = "GAS")
  class UGAS_AttributeSet* Attributes;

	virtual class UAbilitySystemComponent* GetAbilitySystemComponent() const override;
	// Overload to initialize attributes for GAS, and component to store default attributes
	virtual void InitializeAttributes();
	UPROPERTY(BlueprintReadOnly, EditDefaultOnly, Category = "GAS")
  TSubclassOf<class UGameplayEffect> DefaultAttributeEffect;

	// Overload to initialize abilities for GAS, and component to store default abilities
	virtual void GiveAbilities();
	UPROPERTY(BlueprintReadOnly, EditDefaultOnly, Category = "GAS")
	TArray<TSubclassOf<class UGAS_GameplayAbility>> DefaultAbilities;
public:
// more code....
And we define GiveAbilities below to handle the allocation of default abilities to our character.
// ThirdPersonCharacter.cpp
void AThirdPersonCharacter::GiveAbilities()
{
	// If the server has the authority to grant abilities and there is a valid ASC
	if (HasAuthority() && AbilitySystemComponent)
	{
		// Foreach ability in DefaultAbilities, grant the ability
		for (TSubclassOf<UGAS_GameplayAbility>& StartupAbility : DefaultAbilities)
		{
			// `1` below is the level of the ability, which could later be used to allow abilities to scale with player level
			AbilitySystemComponent->GiveAbility(
				FGameplayAbilitySpec(StartupAbility, 1, static_cast<int32>(StartupAbility.GetDefaultObject()->AbilityInputID), this));
		}
	}
}
For the next step, we need to override PossessedBy and OnRep_PlayerState() to define how to update the server and client of the player state respectively.
// ThirdPersonCharacter.h
UCLASS()
class UNREALGAME5_API AThirdPersonCharacter : public ACharacter, public IAbilitySystemInterface
{
	GENERATED_BODY()

public:
	// GAS declarations

	// Define components to store ASC and attributes
	UPROPERTY(VisibleAnywhere, BlueprintReadOnly, Category = "GAS")
	class UGAS_AbilitySystemComponent* AbilitySystemComponent;
	UPROPERTY(VisibleAnywhere, BlueprintReadOnly, Category = "GAS")
  class UGAS_AttributeSet* Attributes;

	virtual class UAbilitySystemComponent* GetAbilitySystemComponent() const override;
	// Overload to initialize attributes for GAS, and component to store default attributes
	virtual void InitializeAttributes();
	UPROPERTY(BlueprintReadOnly, EditDefaultOnly, Category = "GAS")
  TSubclassOf<class UGameplayEffect> DefaultAttributeEffect;

	// Overload to initialize abilities for GAS, and component to store default abilities
	virtual void GiveAbilities();
	UPROPERTY(BlueprintReadOnly, EditDefaultOnly, Category = "GAS")
	TArray<TSubclassOf<class UGAS_GameplayAbility>> DefaultAbilities;
public:
// more code....
And see the definitions for these functions below
// ThirdPersonCharacter.cpp
void AThirdPersonCharacter::PossessedBy(AController* NewController)
{
	Super::PossessedBy(NewController);

	// Owner and Avatar are bother this character
	AbilitySystemComponent->InitAbilityActorInfo(this, this);

	InitializeAttributes();
	GiveAbilities();
}

void AThirdPersonCharacter::OnRep_PlayerState()
{
	Super::OnRep_PlayerState();

	AbilitySystemComponent->InitAbilityActorInfo(this, this);
	InitializeAttributes();

	if (AbilitySystemComponent && InputComponent)
	{
		// Where the 3rd parameter is a string equal to enum typename defined in unrealgame5.h
		const FGameplayAbilityInputBinds Binds("Confirm", "Cancel", "EGASAbilityInputID", static_cast<int32>(EGASAbilityInputID::Confirm), static_cast<int32>(EGASAbilityInputID::Cancel));
		AbilitySystemComponent->BindAbilityActivationToInputComponent(InputComponent, Binds);
	}
}
As a final modification, add the following code to the function equivalent to ThirdPersonCharacter::SetupPlayerInputComponent() in your project. This is the same code as the last portion of OnRep_PlayerState
void AThirdPersonCharacter::SetupPlayerInputComponent(UInputComponent* PlayerInputComponent)
{
	// Code unrelated to GAS...
	// ...

	// Make sure GAS is valid along with player input component
	if (AbilitySystemComponent && InputComponent)
	{
		// Where the 3rd parameter is a string equal to enum typename defined in unrealgame5.h
		const FGameplayAbilityInputBinds Binds("Confirm", "Cancel", "EGASAbilityInputID", static_cast<int32>(EGASAbilityInputID::Confirm), static_cast<int32>(EGASAbilityInputID::Cancel));
		AbilitySystemComponent->BindAbilityActivationToInputComponent(InputComponent, Binds);
	}
}
And just to be sure we have all the headers we need, here are the final includes for my character
// ThirdPersonCharacter.h
// GAS includes
#include "AbilitySystemInterface.h"
#include <GameplayEffectTypes.h>
#include "GAS_AbilitySystemComponent.h"
#include "GAS_GameplayAbility.h"
#include "GAS_AttributeSet.h"

#include "CoreMinimal.h"
#include "GameFramework/Character.h"
#include "ThirdPersonCharacter.generated.h"
// ThirdPersonCharacter.cpp
// All content (c) Shaun Reed 2021, all rights reserved

#include "ThirdPersonCharacter.h"

// Custom includes (Not related to GAS)
#include "ActorSpawner.h"  // Fireball spawner object
#include "BallActor.h"  // Fireball object

// Includes for GAS
#include "../unrealgame5.h"

// Engine includes
#include "Kismet/GameplayStatics.h" // For spawning fireball static mesh
#include "Camera/CameraComponent.h"
#include "GameFramework/SpringArmComponent.h"
#include "GameFramework/CharacterMovementComponent.h"
Defining Abilities
At this point we have configured GAS for our project and our character, so we're ready to start defining our abilities!
In my assets folder, I just created an Abilities subdirectory and continued with the steps below, creating the assets within this directory.
Default Abilities
First I created a new Blueprint Class using the editor and derived from the GameplayEffect class. Applying this effect will result in the player or character being granted a set of default abilities.

I named this GE_CharacterDefaults, and opened it for editing. The screenshot below contains all settings I modified under the Class Defaults panel. If it isn't in this screenshot, I didn't change it.

Then I opened my BP_ThirdPersonCharacter blueprint for editing and applied the following settings within the details panel. You should notice at this point that the DefaultAttributeEffect and DefaultAttributes in this screenshot are actually the components we exposed to the editor in our ThirdPersonCharacter.h file earlier with UPROPERTY and EditDefaultsOnly.

Damage Effect
To prove the system is working, create a new blueprint that derives from GameplayEffect and apply the settings below

Then, in the event chart for your BP_ThirdPersonCharacter add a BeginPlay node and apply the damage when the game starts.

Hit play and then open a console and type showdebug abilitysystem to see that your HP should now be 80 on the lefthand side. Remove the damage to your player when youre done testing, but you can keep the GE_Damage asset around to use it later.
Attack Ability
First, open the animation blueprint for your character and add a montage Slot 'DefaultSlot' to your anim graph. For me, the screen looks like the below after the changes have been made. Make sure to save and apply these changes.

Make a new blueprint deriving from the GAS_GameplayAbilitiy class that we defined earlier.

I named this GA_Attack and opened it for editing.
Make sure the Ability Input ID matches the input action we want the ability to be mapped to. This is found under the details panel.


Next, open GA_Attack for editing and add the following blueprint nodes. Add the GetActorInfo node in the context menu in the screenshot, be sure to uncheck 'Context Sensitive' if it isn't appearing at first.

Now right click the GetActorInfo node and select Split Struct Pin to split the actor into its components

And connect the skeletal mesh pins to finish the blueprint for GA_Attack

Under the Montage To Play pin on the Play Montage node, you may not have a montage available for your skeleton.
If you also don't have an animation, check out Mixamo for a free anmation and see the page on Retargeting Skeleton Animations
Then create a montage by watching this quick youtube video. If you're doing a simple punch animation, you probably just need to create a montage and click and drag the animation into the center of the screen and save. It's pretty simple, but you can use Motages to do some pretty neat things. Maybe for the first montage try making a one-off animation that doesn't loop like punching or a grab motion for interactions.
Once you have the montage made, select it here in this node, and then play the game. You'll now be able to see your character performing the attack!
Additional Abilities
At a higher level, the steps for adding a new ability are below
- Add the input action to the enum defined in
unrealgame5.h(AKA<YOUR_PROJECT_NAME>.h) - Recompile in the editor or within the IDE of your choice
- Restart the editor
- Create a blueprint deriving from GAS_GameplayAbility
- Define the
ActivateAbilitiyevent for this new blueprint, and assign anAbility Input IDwithin theDetailspanel - Create a new Animation Montage for the ability, if needed (and assign to play on
ActivateAbilityevent) - Grant the abilitiy under the
Detailstab in theDefault Abilitiessection while editing theBP_ThirdPersonCharacterblueprint - Add the input action to your project under
Edit->Inputif it doesn't already exist
Debugging
To see useful information on the GAS, enter play mode and hit the tilde (~) key to open a console. Then, type showdebug abilitysystem, and youll notice you can see your character stats even if there's no UI elements to represent them yet.

Retarget Skeleton Animations
These systems have changed with the official release of UE5. See the links above for updated tutorials
If you're not an animator, you might also get use out of sites like Mixamo that provide some free animations. To use these though, you need to retarget the animation for your skeleton in UE5.
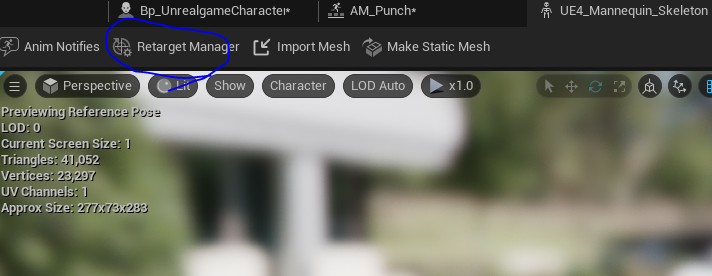
First, open the Skeleton asset for your character. For the UE4 Mannequin, it should be called something like UE4_Mannequin_Skeleton. Once it's open for editing, click Retarget Manager at the top of the screen.
It will reveal a new side panel like the below. Select the the Humanoid option from the dropdown menu and it should automatically populate all the bones for your skeleton if you are using the UE4 mannequin. If you are not, you will probably have to manually make these assignments, as I did for the next skeleton in this section.
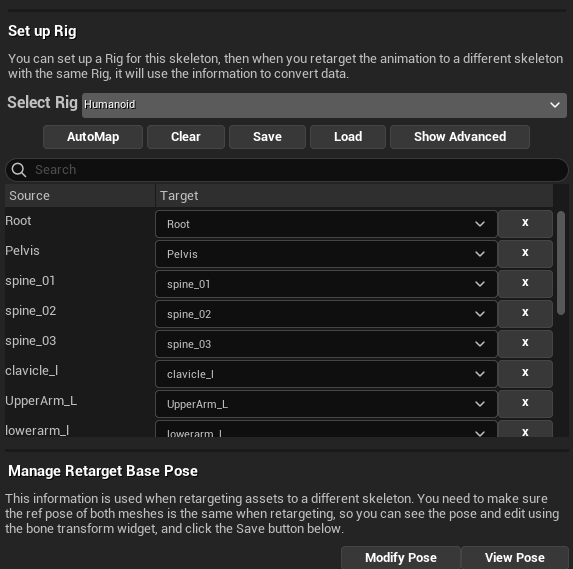
Next, click the Save button in the above Set up Rig dialog, and save the rig someplace safe.
Open the other Skeleton asset that was used for the animation you want to use, and again click the Retarget Manager button at the top of the screen. Then select the Humanoid option from the dropdown, and assign the bones to their respective members on the skeleton.
When you're finished, it should look like the screenshot below. Click the Show Advanced button and do the same for as many bones as you can. Don't worry if you can't figure some of them out, you can still produce a good result most of the time. It might seem like overkill to assign each finger, but if you're doing a punching animation like I was it will look more like a slap if you don't.

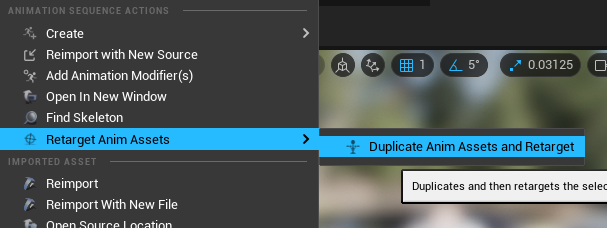
Click the Save button and storre this Rig asset somewhere. Then, make sure you also save changes to both Skeleton assets, and right click the animation you want to retarget. Select Duplicate Anim Assets and Retarget from the context menu as seen in the screenshot below.
Select your skeleton on the left hand side and then set a name for the file and choose a location to save the retargeted animation.

If the Source and Target skeletons dont have similar poses in the above dialog, open the skeleton with the abnormal pose in the Retarget Manager and adjust it to match the more normal pose. Then, in the Set up Rig dialog select Modify Pose->Use Current Pose as seen in the screenshot below.

Once you're happy with the poses of the skeletons, you can retarget the animation and see the results. If you aren't happy with the retargeted animation, try defining more bones in the Rig assets for your skeletons, or maybe select a different animation.