Customization
i3
i3 is a tiling window manager. See i3 User Guide for official documentation.
Also see my notes below on various settings, modules, etc
Because this is such a broad topic, I'll put some links here for the sources I used to configure my own Manjaro Linux system running the i3wm and polybar.
Alsa / Volume Mixers - Cannot find simple element
Inserting Unicode Characters Into Vim
i3-gaps
i3 has been altered for various reasons and you may want a different version, i3-gaps is a popular choice right now as it leaves a configurable amount of space between your windows that gives some visual relief to your workspace. It looks nice, depending on your opinion. To check it out, you'll need to REMOVE i3 and reinstall using an alternate version. Run the following commands -
sudo apt-get install software-properties-common
# Head over to https://launchpad.net/ubuntu/+ppas?name_filter=i3-gaps and pick one.
# I chose https://launchpad.net/~kgilmer/+archive/ubuntu/speed-ricer as it was recommended by the owner / maintainer of i3 on GitHub.

# Run the following command to add the PPA to your system (DEBIAN ONLY)
#+ If you are on arch, just use yay AUR manager.
sudo add-apt-repository ppa:kgilmer/speed-rice
sudo apt update
sudo apt install i3-gaps
Some basic i3-gaps configurations / settings taken from My Dotfiles Repo -
#################################################################
### Settings for i3-gaps  #######################################
#################################################################

# Set inner/outer gaps default values
gaps inner 14
gaps outer -2

# Additionally, you can issue commands with the following syntax. This is useful to bind keys to changing the gap size.
# gaps inner|outer current|all set|plus|minus <px>
# gaps inner all set 10
# gaps outer all plus 5

# Smart gaps (gaps used if only more than one container on the workspace)
smart_gaps on

# Smart borders (draw borders around container only if it is not the only container on this workspace)
# on|no_gaps (on=always activate and no_gaps=only activate if the gap size to the edge of the screen is 0)
smart_borders on

# Press $mod+Shift+g to enter the gap mode. Choose o or i for modifying outer/inner gaps. Press one of + / - (in-/decrement for current workspace) or 0 (remove gaps for current workspace). If you also press Shift with these keys, the change will be global for all workspaces.
set $mode_gaps Gaps: (o) outer, (i) inner
set $mode_gaps_outer Outer Gaps: +|-|0 (local), Shift + +|-|0 (global)
set $mode_gaps_inner Inner Gaps: +|-|0 (local), Shift + +|-|0 (global)
bindsym $mod+Shift+g mode "$mode_gaps"

mode "$mode_gaps" {
        bindsym o      mode "$mode_gaps_outer"
        bindsym i      mode "$mode_gaps_inner"
        bindsym Return mode "default"
        bindsym Escape mode "default"
}
mode "$mode_gaps_inner" {
        bindsym plus  gaps inner current plus 5
        bindsym minus gaps inner current minus 5
        bindsym 0     gaps inner current set 0

        bindsym Shift+plus  gaps inner all plus 5
        bindsym Shift+minus gaps inner all minus 5
        bindsym Shift+0     gaps inner all set 0

        bindsym Return mode "default"
        bindsym Escape mode "default"
}
mode "$mode_gaps_outer" {
        bindsym plus  gaps outer current plus 5
        bindsym minus gaps outer current minus 5
        bindsym 0     gaps outer current set 0

        bindsym Shift+plus  gaps outer all plus 5
        bindsym Shift+minus gaps outer all minus 5
        bindsym Shift+0     gaps outer all set 0

        bindsym Return mode "default"
        bindsym Escape mode "default"
}
Xkeybinds
X11 can help configure media keys on laptops and aftermarket keyboards to pair with their intended use by running a command or action when pressed. This can seem confusing to configure, and may be time consuming at first but once you get the hang of it and know where to look it isn't all that bad. There is a GUI tool if you'd prefer to use it, but Ill still show how to do this via a terminal below.
# Install and use GUI xbindkeys-config tool on debian
sudo apt install xbindkeys-config
xbindkeys-config
# Use the GUI to set an action (command) to be performed for each key in the list
Through a terminal -
# Capture next keypress and output keycode information to console
xbindkeys --key
Press combination of keys or/and click under the window.
You can use one of the two lines after "NoCommand"
in $HOME/.xbindkeysrc to bind a key.
"(Scheme function)"
    m:0x0 + c:75
    F9

# OR

# Capture next multi-keypress and output keycode information to console
xbindkeys --multikey
Press combination of keys or/and click under the window.
You can use one of the two lines after "NoCommand"
in $HOME/.xbindkeysrc to bind a key.
Press combination of keys or/and click under the window.
You can use one of the two lines after "NoCommand"
in $HOME/.xbindkeysrc to bind a key.

--- Press "q" to stop. ---
"(Scheme function)"
    m:0x1 + c:75
    Shift + F9
# This will continue to capture until you press Q.
Take the above output into your clipboard and vim ~/.xbindkeysrc to add the commands needed. Below, I configure media keys for volume functionality -
#~/.xbindkeysrc
#

#Volume Up
"pactl set-sink-volume @DEFAULT_SINK@ +10%"
    m:0x0 + c:76
    F10

#Volume Down
"pactl set-sink-volume @DEFAULT_SINK@ -10%"
    m:0x0 + c:75
    F9

#Toggle Audio
"pactl set-sink-mute @DEFAULT_SINK@ toggle"
    m:0x0 + c:74
    F8
Thats it! Above, you could change the pactl set-sink-mute commands to anything youd like to happen when the F8-10 keys are pressed. After you're done, apply your changes by running xbindkeys --poll-rc
If you're having issues using certain keys, try the xev command. There will be a lot more output than what xbindkeys --key provides, but if pushing the key doesn't send output to xev then your system is handling the button independent from your OS.
Additionally, you can run xbindkeys_show to show the current settings applied with xbindkeys. This is useful when debugging to verify you have applied settings correctly and none are being overwritten or modified.
Backlight
run sudo ls /sys/class/backlight - if you see intel_backlight there you are in luck, follow the steps below to configure xbacklight to adjust your display brightness.
sudo apt install xbacklight
sudo vim /etc/X11/xorg.conf
# If the above file doesnt exisit, make it.
# If it does, append the lines below
Section "Device"
  Identifier  "Intel Graphics"
  Driver      "intel"
  Option      "Backlight"  "intel_backlight"
EndSection
# Save and exit, reboot your PC or logout of your xsession and login again.

# Now the below commands should work and can be bound to any key the same way we bound volume keys in the section above
# Decrease brightness by 10%
xbacklight -dec 10
# Increase brightness by 10%
xbacklight -inc 10
Alternately, brightnessctl can be used to control the backlight. Run the following commands, replacing <YOUR_USERNAME> with the user on your system that you want to use to control backlight. For me, this was just my primary user, kapper.
git clone https://github.com/Hummer12007/brightnessctl
cd brightnessctl
sudo ./configure && sudo make install
sudo usermod -aG video <YOUR_USERNAME>
Then after a reboot we can run the following command to decrese brightness by 10%
brightnessctl s 10%-

Updated device 'intel_backlight':
Device 'intel_backlight' of class 'backlight':
        Current brightness: 14400 (15%)
        Max brightness: 96000
Or to increase brightness by 10%
brightnessctl s +10%

Updated device 'intel_backlight':
Device 'intel_backlight' of class 'backlight':
        Current brightness: 24000 (25%)
        Max brightness: 96000
Notification Systems
Useful commands / tools for handling desktop notification dialogs -
# Install, use notify-send
sudo apt install libnotify-bin
notify-send "Test Notification"

# Install kdeconnect for connecting mobile devices on the same network which have been paired using kdeconnect-cli
sudo apt install kdeconnect
# Be sure to download the KDEconnect app on your mobile device in your respective app store and connect to the same Wi-Fi network as your PC

# list devices with KDEconnect on your network
kdeconnect-cli -l --id-name-only
13b9d56df4c8815b KapperDroid
kdeconnect-cli -l --id-only
13b9d56df4c8815b

# Given the ID corresponding with the name you chose for your device within the KDEconmnect app...
kdeconnect-cli --pair -d 13b9d56df4c8815b
Pair requested
# Check the KDEconnect app on your phone for the prompt, you may have to open the app and navigate to the side panel -> 'Add new device'

# See help text
kdeconnect-cli -h
Polybar
Polybar is a simple community driven solution to configuring custom status bars. Generally, configurations are handled within the ~/.config/polybar/config file, but some specific cases may require editing other files.
The general requirements of using Polybar is installation via your package manager, for me, this is pacman. After installing, we need to define our polybars, then configure i3 to handle these settings for us.
sudo pacman -Syu polybar
Optionally, polybar can be built from source by running the following commands. This was tested and worked for me on Ubuntu 20.04.
sudo apt install build-essential git cmake cmake-data pkg-config python3-sphinx python3-packaging libuv1-dev libcairo2-dev libxcb1-dev libxcb-util0-dev libxcb-randr0-dev libxcb-composite0-dev python3-xcbgen xcb-proto libxcb-image0-dev libxcb-ewmh-dev libxcb-icccm4-dev libxcb-xkb-dev libxcb-xrm-dev libxcb-cursor-dev libasound2-dev libpulse-dev i3-wm libjsoncpp-dev libmpdclient-dev libcurl4-openssl-dev libnl-genl-3-dev
git clone git@github.com:polybar/polybar.git
cd polybar
./build.sh
After installing, we need to configure our bars within ~/.config/polybar/config, then we can simply run polybar top to run a polybar titled top within said config file.
Configure i3 for Polybar
To start, a default ~/.config/i3/config will contain a block defining the i3status and its settings
bar {
	i3bar_command i3bar
	status_command i3status
	position bottom

# please set your primary output first. Example: 'xrandr --output eDP1 --primary'
	tray_output primary
	tray_output eDP1

	bindsym button4 nop
	bindsym button5 nop
   font xft:URWGothic-Book 11
	strip_workspace_numbers yes

    colors {
        background #222D31
        statusline #F9FAF9
        separator  #454947

                      border  backgr. text
        focused_workspace  #F9FAF9 #16a085 #292F34
        active_workspace   #595B5B #353836 #FDF6E3
       inactive_workspace #595B5B #222D31 #EEE8D5
       binding_mode       #16a085 #2C2C2C #F9FAF9
       urgent_workspace   #16a085 #FDF6E3 #E5201D
   }
}
We are going to remove this, or comment it all out, and replace it with the exec_always line below. Now copy the start-polybar.sh script to ~/.config/polybar/ for use with i3 startup configuration below. This is just telling i3 that we are starting Polybar from a script we've written and stored within the ~/.config/polybar/ directory on initial startup.
My bar { ... } define within ~/.config/i3/config -
# Custom startup apps
exec_always --no-startup-id $HOME/.config/polybar/start-polybar.sh

# Don't use i3 status bar, comment out this block or remove it entirely
#bar { }
Now just press the <Mod><Shift><R> (i3 default setting) to reload i3 and your Polybars should start up instead of the default i3status
Define Polybars / Modules
For example, my ~/.config/polybar/config -
[bar/top]
monitor = ${env:MONITOR}
width = 100%
height = 34
background = #00000000
foreground = #ccffffff
line-color = ${bar/bottom.background}
line-size = 16
spacing = 2
padding-right = 5
module-margin = 4
font-0 = NotoSans-Regular:size=8;-1
font-1 = MaterialIcons:size=10;0
font-2 = Termsynu:size=8:antialias=false;-2
font-3 = FontAwesome:size=10;0
font-4 = Unifont:size=8;0
modules-left = powermenu
modules-center = ki3
modules-right = volume wired-network clock

[bar/bottom]
monitor = ${env:MONITOR}
bottom = true
width = 100%
height = 27
background = ${bar/top.background}
foreground = ${bar/top.foreground}
line-color = ${bar/top.background}
line-size = 2
spacing = 3
padding-right = 4
module-margin-left = 0
module-margin-right = 6
font-0 = NotoSans-Regular:size=8;0
font-1 = unifont:size=6;-3
font-2 = FontAwesome:size=8;-2
font-3 = NotoSans-Regular:size=8;-1
font-4 = MaterialIcons:size=10;-1
font-5 = Termsynu:size=8:antialias=false;0
These first two blocks define our top and bottom status bars. Continuing on in the ~/.config/polybar/config file, we see the defines for the modules -
[module/powermenu]
type = custom/menu
format-padding = 5
label-open = ䷡
label-close = X
menu-0-0 = Terminate WM
menu-0-0-foreground = #fba922
menu-0-0-exec = bspc quit -1
menu-0-1 = Reboot
menu-0-1-foreground = #fba922
menu-0-1-exec = menu_open-1
menu-0-2 = Power off
menu-0-2-foreground = #fba922
menu-0-2-exec = menu_open-2
menu-1-0 = Cancel
menu-1-0-foreground = #fba922
menu-1-0-exec = menu_open-0
menu-1-1 = Reboot
menu-1-1-foreground = #fba922
menu-1-1-exec = sudo reboot
menu-2-0 = Power off
menu-2-0-foreground = #fba922
menu-2-0-exec = sudo poweroff
menu-2-1 = Cancel
menu-2-1-foreground = #fba922
menu-2-1-exec = menu_open-0
[module/cpu]
type = internal/cpu
interval = 0.5
format = <label> <ramp-coreload>
label = CPU
ramp-coreload-0 = ▁
ramp-coreload-0-font = 2
ramp-coreload-0-foreground = #aaff77
ramp-coreload-1 = ▂
ramp-coreload-1-font = 2
ramp-coreload-1-foreground = #aaff77
ramp-coreload-2 = ▃
ramp-coreload-2-font = 2
ramp-coreload-2-foreground = #aaff77
ramp-coreload-3 = ▄
ramp-coreload-3-font = 2
ramp-coreload-3-foreground = #aaff77
ramp-coreload-4 = ▅
ramp-coreload-4-font = 2
ramp-coreload-4-foreground = #fba922
ramp-coreload-5 = ▆
ramp-coreload-5-font = 2
ramp-coreload-5-foreground = #fba922
ramp-coreload-6 = ▇
ramp-coreload-6-font = 2
ramp-coreload-6-foreground = #ff5555
ramp-coreload-7 = █
ramp-coreload-7-font = 2
ramp-coreload-7-foreground = #ff5555
[module/clock]
type = internal/date
interval = 2
date = %%{F#999}%Y-%m-%d%%{F-} %%{F#fff}%H:%M%%{F-}
[module/date]
type = internal/date
date = %%{F#99}%Y-%m-%d%%{F-} %%{F#fff}%H:%M%%{F-}
date-alt = %%{F#fff}%A, %d %B %Y %%{F#fff}%H:%M%%{F#666}:%%{F#fba922}%S%%{F-}
[module/memory]
type = internal/memory
format = <label> <bar-used>
label = RAM
bar-used-width = 30
bar-used-foreground-0 = #aaff77
bar-used-foreground-1 = #aaff77
bar-used-foreground-2 = #fba922
bar-used-foreground-3 = #ff5555
bar-used-indicator = |
bar-used-indicator-font = 6
bar-used-indicator-foreground = #ff
bar-used-fill = ─
bar-used-fill-font = 6
bar-used-empty = -
bar-used-empty-font = 6
bar-used-empty-foreground = #444444
[module/ki3]
type = internal/i3
; Only show workspaces defined on the same output as the bar
;
; Useful if you want to show monitor specific workspaces
; on different bars
;
; Default: false
pin-workspaces = true
; This will split the workspace name on ':'
; Default: false
strip-wsnumbers = true
; Sort the workspaces by index instead of the default
; sorting that groups the workspaces by output
; Default: false
index-sort = true
; Create click handler used to focus workspace
; Default: true
enable-click = false
; Create scroll handlers used to cycle workspaces
; Default: true
enable-scroll = true
; Wrap around when reaching the first/last workspace
; Default: true
wrapping-scroll = true
; Set the scroll cycle direction
; Default: true
reverse-scroll = false
; Use fuzzy (partial) matching on labels when assigning
; icons to workspaces
; Example: code;♚ will apply the icon to all workspaces
; containing 'code' in the label
; Default: false
fuzzy-match = true
[module/volume]
type = internal/alsa
speaker-mixer = IEC958
headphone-mixer = Headphone
headphone-id = 9
format-volume = <ramp-volume> <label-volume>
label-muted = muted
label-muted-foreground = #66
ramp-volume-0 =
ramp-volume-1 =
ramp-volume-2 =
ramp-volume-3 =
[module/wired-network]
type = internal/network
interface = net0
interval = 3.0
label-connected = %{T3}%local_ip%%{T-}
label-disconnected-foreground = #66
[module/wireless-network]
type = internal/network
interface = net1
interval = 3.0
ping-interval = 10
format-connected = <ramp-signal> <label-connected>
label-connected = %essid%
label-disconnected = not connected
label-disconnected-foreground = #66
ramp-signal-0 =
ramp-signal-1 =
ramp-signal-2 =
ramp-signal-3 =
ramp-signal-4 =
animation-packetloss-0 =
animation-packetloss-0-foreground = #ffa64c
animation-packetloss-1 =
animation-packetloss-1-foreground = ${bar/top.foreground}
animation-packetloss-framerate = 500
Now that we have our status bars and Polybar Modules defined, we need to configure i3 to use Polybar instead of the default i3status that comes configured within the bar { ... } block of the i3 config file. See the beginning of this Polybar section for details on adding polybar to i3 instead, if you haven't already.
Starting Polybar
If you have one monitor, you can simply run polybar top to start the top status bar created above, and creating a start script should be straight-forward. If you are using multiple monitors and want to replicate the status bars across all displays, create the below script within ~/.config/polybar/, name it what you wish, but be sure it corresponds with how you choose to exec_always in your i3 config later on.
#!/bin/bash
## Author: Shaun Reed | Contact: shaunrd0@gmail.com | URL: www.shaunreed.com ##
##  A script placed in ~/.config/polybar/ - Uses ${env:MONITOR}              ##
##  Starts polybars top and bottom on multiple displays                      ##
###############################################################################
# start-polybar.sh

# Kill any previous polybars
pkill -f polybar

# For each monitor in list up to ':'
for m in $(polybar --list-monitors | cut -d":" -f1); do
  # Reload polybars with monitor device name
  MONITOR=$m polybar --reload top &
  MONITOR=$m polybar --reload bottom &
done
Now, in your ~/.config/polybar/config file, ensure the ${env:MONITOR} environment variable is used to define the monitors -
[bar/top]
monitor = ${env:MONITOR}
width = 100%
height = 34
background = #00000000
foreground = #ccffffff
# Reduced..
Make the script executable and run it, polybar will start with your custom configs -
sudo chmod a+x start-polybar.sh
./start-polybar.sh
You may see errors for symbols used in fonts you do not have installed, see below for troubleshooting information.
To kill all Polybars, run pkill -f polybar
Verify / Install Fonts
You may run into issues with Unicode characters used in these configurations, see the links / commands below for help troubleshooting. The goal is usually to track down the font you are missing and install it, preferably via your system package manager. If you see an error like the below when starting your Polybars, this is likely the issue
warn: Dropping unmatched character ▁ (U+2581)
It is important to note that not defining the relevant font in the Polybar definition within ~/.config/polybar/config will result in the same error.
Cross-check that you have the supported fonts installed by searching up your character in a Unicode Character Search and checking that a relevant font is installed with the below command
fc-match -s monospace:charset=04de1
This matches the Great Power Hexagram, which I use for my system power options / context menu.
The fc-match command above will output all fonts compatible with that symbol, if there is no output, see the Supporting Fonts link from the character's search result, and install it via your package manager.
If it is not installed, search fonts available to install via pacman package manager
sudo pacman -Ss ttf- |grep unicode
sudo pacman -Ss otf- |grep unicode
If it is installed an the error is still present, see that the corresponding font for the character is included in the define for the status bar it is used in. For example, to use the Hexagram above, I added the Unifont:size=8;0 line to my top Polybar definition in ~/.config/polybar/config -
[bar/top]
monitor = ${env:MONITOR}
font-0 = NotoSans-Regular:size=8;-1
font-1 = MaterialIcons:size=10;0
font-2 = Termsynu:size=8:antialias=false;-2
font-3 = FontAwesome:size=10;0
font-4 = Unifont:size=8;0
If still having issues, check the following commands for more info / useful output
# Search for installed fonts
fc-list | grep fontname
Installing Fonts
See the Arch wiki on Fonts for much more information. Some of this information has been copied from there for my own reference / notes.
List Installed Fonts
These commands will list installed fonts, see the subcategories below for sorting through installed fonts.
# List all installed fonts
fc-list

# List verbose information on a font
# Shows us font family, full-name, and postscriptname
# If this isn't grepped, we will list ALL fonts verbosely
fc-list -v | grep Weather

# List fonts for specified lang
fc-list -f '%{file}\n' :lang=ar
#+ list all japanese font families
fc-list -f "%{family}\n" :lang=ja
Aliases
Font aliases such as serif, sans-serif, monospace, and others can be used to list fonts with the below command -
fc-match monospace
Unicode Character Support
This is useful when trying to verify that the proper font is installed for displaying a unicode character.
For example, the below is matching a font for the character for a pile of poo, or U+1F4A9 -
# Match unicode character with supported font
fc-match -s monospace:charset=1F4A9
Input this character into vim by running :UnicodeSearch! U+1F4A9 or enter <Ctrl><V>U1F4A9 while in insert mode within vim.
Installed by Package Manager
To list fonts installed by Pacman -
## list font packages installed by pacman
fc-list -f "%{file} " | xargs pacman -Qqo | sort -u
Manual Installation
To install fonts manually, see the ~/.local/share/fonts directory and copy the correct font file format within. For example, to install Weather Icons simply clone the repository and copy the needed Font File to the ~/.local/share/fonts directory.
For me, the file I needed was weathericons-regular-webfont.ttf, which installed the font with the full-name Weather Icons, seen by the output below -
fc-list -v | grep Weather
        family: "Weather Icons"(s)
        fullname: "Weather Icons Regular"(s)
        postscriptname: "WeatherIcons-Regular"(s)
Sometimes it may be necessary to then run fc-cache to update the font configuration cache on our system, but generally this will be handled automatically. Nevertheless, it is a simple step to perform and ensures the font is fully recognized by our system.
If the font is not appearing in a terminal or application, ensure that the app or terminal is configured to use the newly installed font.
Misc
The below, and some of the other commands here, from user thisoldman on Arch discussions -
## list all fonts and styles known to fontconfig
fc-list : | sort
## list monospace fonts by family and file
fc-list -f "%{family} : %{file}\n" :spacing=100 | sort
## all bold fonts
fc-list :style=Bold | sort
Mount Google Drive
To mount your google drive as a network storage location on Linux, check out google-drive-ocamlfuse. It's a very useful cli tool to quickly mount your google drive to a local directory.
I don't see why I should duplicate the official installation instructions, see there for instructions to setup the utility on Ubuntu. Once that's done, you can mount your Google Drive with a simple command
mkdir /path/to/mount/directory
google-drive-ocamlfuse /path/to/mount/directory
Usually, I do something like this
mkdir /path/to/mount/directory
google-drive-ocamlfuse ~/GDrive
Once running this command, a browser will open and you can select the google account to authenticate with. The Drive associated with this account is the one that will mount to the directory.
User configurations are in ~/.gdfuse/default/ by default. Setting download_docs=false in ~/.gdfuse/default/config can sometimes help for mounting drives with a large number of Google Docs files.
I have had the following issue randomly appear when hopping between i3 and plasma desktop sessions. For now I'm just documenting it, I'll report findings on the GitHub soon.
kapper@xps:~$ ls GDrive
ls: cannot access 'GDrive': Transport endpoint is not connected
kapper@xps:~$ ls .config/autostart-scripts/
kapper@xps:~$ rm -r GDrive
rm: cannot remove 'GDrive': Transport endpoint is not connected
kapper@xps:~$ sudo rm -r GDrive
[sudo] password for kapper:
rm: cannot remove 'GDrive': Is a directory
kapper@xps:~$ ll
ls: cannot access 'GDrive': Input/output error
total 772
drwxr-xr-x 39 kapper kapper   4096 Dec 20 12:33 ./
drwxr-xr-x  3 root   root     4096 Dec  6 09:28 ../
lrwxrwxrwx  1 kapper kapper     17 Dec  6 17:44 .bash_aliases -> dot/.bash_aliases
-rw-------  1 kapper kapper  29382 Dec 20 12:29 .bash_history
-rw-r--r--  1 kapper kapper    220 Dec  6 09:28 .bash_logout
lrwxrwxrwx  1 kapper kapper     11 Dec  6 17:44 .bashrc -> dot/.bashrc
-rw-rw-r--  1 kapper kapper    172 Dec 18 14:39 .bash_secrets
drwx------  3 kapper kapper   4096 Dec 20 01:00 .gdfuse/
d?????????  ? ?      ?           ?            ? GDrive/
-rw-rw-r--  1 kapper kapper     54 Dec 13 15:15 .gitconfig
To fix this, we first need to get the ~/GDrive directory in a workable state again. The mountdrive.sh script in the command below is a script I wrote to mount my drive automatically. This file will not exist on your system, but for this first step you should make sure you have no script or automation that mounts your Google Drive on reboot or login, then reboot the system. Optionally, you can try to run sudo umount --force /path/to/mount/directory instead of rebooting.
rm ~/.config/autostart-scripts/mountdrive.sh
sudo reboot now
When logging back in, we can see the directory is fine, so we made some progress
kapper@xps:~$ ls GDrive/
kapper@xps:~$ ll
total 772
drwxr-xr-x 39 kapper kapper   4096 Dec 20 12:33 ./
drwxr-xr-x  3 root   root     4096 Dec  6 09:28 ../
lrwxrwxrwx  1 kapper kapper     17 Dec  6 17:44 .bash_aliases -> dot/.bash_aliases
-rw-------  1 kapper kapper  29382 Dec 20 12:29 .bash_history
-rw-r--r--  1 kapper kapper    220 Dec  6 09:28 .bash_logout
lrwxrwxrwx  1 kapper kapper     11 Dec  6 17:44 .bashrc -> dot/.bashrc
-rw-rw-r--  1 kapper kapper    172 Dec 18 14:39 .bash_secrets
drwx------  3 kapper kapper   4096 Dec 20 01:00 .gdfuse/
drwxrwxr-x  2 kapper kapper   4096 Dec 19 23:52 GDrive/
-rw-rw-r--  1 kapper kapper     54 Dec 13 15:15 .gitconfig
Next, we remove all configurations for google-drive-ocamlfuse that are stored in our home directory. To do this, run the command below. Note that this will remove all authentication with your google accounts.
sudo rm -r ~/.gdfuse/default/*
Now we can just reauthenticate and the drive will mount successfully. This is the only workaround I have found so far, and I'm not sure how I can reproduce the bug. I tried clearing the cache with the -cc flag, and that did not fix the problem.
google-drive-ocamlfuse ~/GDrive
tmux
Multiplexers can be used to reattach to previous sessions and manage clipboard content / session history. This means that when you close a terminal, the session still exists in the background and can be called to the foreground using your choice of tmux commands.
To reload you tmux config, press Ctrl+B and then : to bring up a command prompt, and type the following command in the prompt -
:source-file ~/.tmux.conf
This will reload the changes made in your configuration and apply them to all active tmux sessions
Start tmux with the -u flag to enable utf8 support -
tmux -u
alias tmux='tmux -u'
Session / Server Management
# Start the tmux server
# If ran while a tmux server is active, Tmux will not allow you to nest servers within eachother
tmux
tmux list-commands
# List active tty sessions tracked by the local tmux server
tmux list-sessions
# Interactive terminal to choose from previous sessions. Shows a thumbnail of the session in its last known state
tmux choose-session


# If you are running on a potato, you might need to use the following commands periodically to clean up your server as it will consume significant RAM.

# Kills all sessions, without killing the server.
# This command can confuse the interface / tmux status if you utilize session ID within your tmux status bar.
# ie.) If you run this on an active server within session ID 25, all sessions will be killed but your new session IDs will not reset to 1..2.. etc
# To fix this, restart your tmux server
tmux kill-session -a
# Kill tmux server, this will close ALL terminals and any WIP will be lost if it has not been saved.
tmux kill-server
Configuration / Status
Tmux has a very nice interface which can be customized to suit your needs and display the information relevant to your environment. This can be found in the ~/.tmux.conf file but is recommended to be customized within the ~/.tmux.conf.local file.
Some useful settings can be found below, taken from my Dotfiles Repository
# .tmux.conf
#
# If symbols or powerline layout fail to appear...
#+ Check your terminal emulator font settings include these fonts
#+ Check that required fonts are installed
#
# Note: The use of 256colours in this file allows for portable color definitions between platforms and applications
#+ Changing to a different color interpretation may result in some apps displaying colors differently than others
#+ Vim plugin 'Colorizer' does not reflect the actual 256colour values
#+ See https://jonasjacek.github.io/colors/ for a full list of 256colours
# Mouse interaction
set -g mouse on
# Status bar location
set-option -g status-position top
# Status update interval
set -g status-interval 1
# Basic status bar colors
set -g status-style fg=colour240,bg=colour233
# Left side contents of status bar
set -g status-left-style bg=colour233,fg=colour243
set -g status-left-length 40
# Note: No bold required, no BG reveal produced by symbol gaps on left side
#+ Font: Powerline Consolas
#+ Some unicode characters may not appear when viewing this code via web browser
#+ Symbols below are 'left_hard_divider' and can be seen here (https://www.nerdfonts.com/cheat-sheet)
set -g status-left "#[fg=colour233,bg=colour100,bold] #S #[fg=colour100,bg=colour240,nobold]#[fg=colour233,bg=colour240] #(uname -m)#F #[fg=colour240,bg=colour235]#[fg=colour240,bg=colour235] #I:#P #[fg=colour235,bg=colour233]#[fg=colour240,bg=colour233] #(uname -r)"
# Above, we use the #(COMMAND) syntax to print the output of COMMAND to the tmux status bar.
# #I, #P, #F above are all tmux custom variables which can be found in the tmux manpage.
# Right side of status bar
set -g status-right-style bg=colour233,fg=colour243
set -g status-right-length 150
# Hide right bar entirely
#set -g status-right ""
# Note: Powerline font requires alternate of bold on right side
# Corrects gap on right of character that reveals BG color
#+ Font: Powerline Consolas
#+ Some unicode characters may not appear when viewing this code via web browser
#+ Symbols below are 'right_hard_divider' and can be seen here (https://www.nerdfonts.com/cheat-sheet)
set -g status-right "#[fg=colour235,bg=colour233,bold]#[fg=colour240,bg=colour235,nobold] %H:%M:%S #[fg=colour240,bg=colour235,bold]#[fg=colour233,bg=colour240,nobold] %d-%b-%y #[fg=colour100,bg=colour240,bold]#[fg=colour233,bg=colour100,bold] #H "
# Window status (Centered)
set -g window-status-current-format "#[fg=colour255,bg=colour233]#[fg=colour100,nobold] #(whoami)@#H #[fg=colour255,bg=colour233,nobold]"
# Current window status
set -g window-status-current-style bg=colour100,fg=colour235
# Window with activity status
set -g window-status-activity-style bg=colour233,fg=colour245
# Window separator
set -g window-status-separator ""
# Window status alignment
set -g status-justify centre
# NOTE
# These are just SOME useful settings and not a complete configuration. See https://gitlab.com/shaunrd0/dot/blob/master/.tmux.conf for a full configuration that I use / edit frequently. It may look very different then the above, but uses the same ideas.
Want your current working directory to show some git repository information in your status bar? Gitmux
#(date) # Run a shell command in status bar
#I 		# Window index
#S 		# Session name
#W 		# window name
#F 		# window flags
#H 		# Hostname
#h 		# Hostname, short
#D 		# pane id
#P 		# pane index
#T 		# pane title
C-b [       # Enter scroll mode then press up and down
C-b ? 		# Show help
Yakuake
Yakuake is a drop-down terminal application that i've used for years and may one day consider contributing to. This page is a collection of notes for the application.
sudo apt install yakuake
I set yakuake as a startup application so it's always available when I reboot my computer. It's just nice to have a terminal readily available.
yakuakerc
User configuration is in ~/.config/yakuakerc, an example file is below. This file is all of the settings outlined on the yakuake repository, with the default setting applied. It's just meant to put all the available configurations in front of you so you can pick and choose which you want.
[Animation]
AutoOpen=false
Frames=17
PollInterval=500
UseVMAssist=true

[Appearance]
BackgroundColor=#000000
BackgroundColorOpacity=0.4
Blur=false
KeyboardInputBlockIndicatorColor=#FF0000
KeyboardInputBlockIndicatorDuration=250
Skin=default
SkinInstallWithKns=false
TerminalHighlightDuration=250
Translucency=false

[Behavior]
FocusFollowMouse=false
OpenAfterStart=false
RememberFullscreen=false

[Dialogs]
ConfirmQuit=true
FirstRun=false
Note that yakuake will automatically alphabetize this file and all configurations within. I've only noticed this happening when stopping yakuake completely with pkill yakuake and then starting the application again. This is the same process required to reload a ~/.config/yakuakerc after making some changes.
Shortcuts
I think the yakuakerc file also supports shortcuts and keybinds, but I've not had much luck yet. Using the keybind scheme exporter and importer is simple, it just would be nice to have my keybinds automatically loaded and save the clicking around. But you really will only have to do this when you're migrating user configurations to a new system, which isn't often.
Go to the configure keyboard shotcuts screen in yakuake settings, then click ManageSchemes->MoreActions->ExportScheme
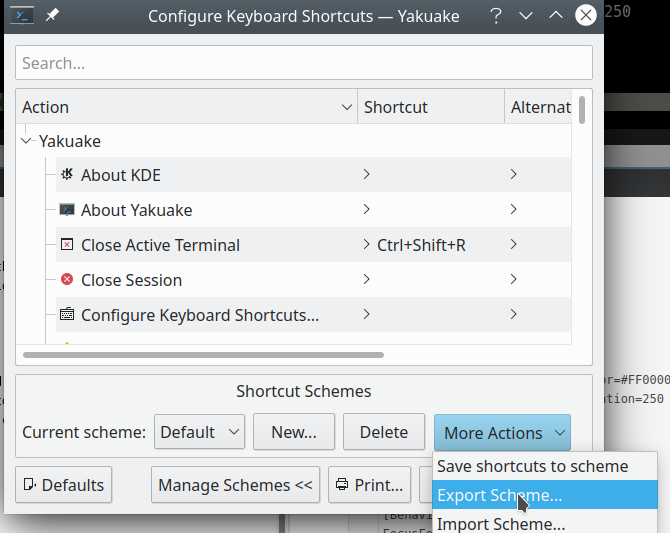
This will ask you where to place a yakuake.shortcuts file - you can put this file wherever you want, because you will be manaually loading it using the Import option in the screenshot above. The contents of this file is seen below. You can edit the file or use the GUI tool. toggle-window-state global shortcut is the one used for open / retracting the terminal.
[Global Shortcuts]
toggle-window-state=Meta+`

[Shortcuts]
close-active-terminal=Ctrl+Shift+R
close-session=none
decrease-window-height=Alt+Shift+Up
decrease-window-width=Alt+Shift+Left
edit-profile=none
file_quit=Ctrl+Shift+Q
grow-terminal-bottom=Ctrl+Alt+Down
grow-terminal-left=Ctrl+Alt+Left
grow-terminal-right=Ctrl+Alt+Right
grow-terminal-top=Ctrl+Alt+Up
help_about_app=none
help_about_kde=none
help_report_bug=none
help_whats_this=Shift+F1
increase-window-height=Alt+Shift+Down
increase-window-width=Alt+Shift+Right
keep-open=none
manage-profiles=none
move-session-left=Ctrl+Shift+Left
move-session-right=Ctrl+Shift+Right
new-session=Ctrl+Shift+T
new-session-quad=none
new-session-two-horizontal=none
new-session-two-vertical=none
next-session=Shift+Right
next-terminal=Ctrl+Tab; Shift+Tab
options_configure=Ctrl+Shift+,
options_configure_keybinding=none
options_configure_notifications=none
previous-session=Shift+Left
previous-terminal=Ctrl+Shift+Tab
rename-session=none
split-left-right=Ctrl+(
split-top-bottom=Ctrl+)
switch-to-session-1=none
switch-to-session-12=none
switch-to-session-2=none
switch-to-session-3=none
switch-to-session-4=none
switch-to-session-5=none
switch-to-session-6=none
switch-to-session-7=none
switch-to-session-8=none
switch-to-session-9=none
toggle-session-keyboard-input=none
toggle-session-monitor-activity=Ctrl+Shift+A
toggle-session-monitor-silence=Ctrl+Shift+I
toggle-session-prevent-closing=none
toggle-window-state=none
view-full-screen=Ctrl+Shift+F11