Solidity
This page will cover setting up a local environment for working with Solidity. This is not required to deploy an ERC20 token, but in my experiencce it has been a good learning experience to set up these environments yourself, instead of using a provided service like Remix. That said, Remix is a really neat tool, and I would recommend maybe getting into some basic solidity there first and deploying a test contract to ropsten. For that process, I found a lot of information available online, so I won't cover it here, but here's my ERC20 token GitHub repository, feel free to use whatever code there might help you along the way. The code there may be more up-to-date then the code on this page, so there will probably be discrepancies from the screenshots and snippets seen here.
Once you deploy on Remix, if you still want to get a development environment and repository of your own setup, this page might be useful to you.
OpenZeppelin Documentation This is a great resource
OpenZeppelin ERC20 Decoumentation specific to the IERC20 interface I inherit in my token contract.
OpenZeppelin Contracts GitHub Useful for looking at how things are implemented
Remix ETH Web IDE You can use this Web IDE as an alternative to setting up a local development environment.
MetaMask
You will need the MetaMask browser extension and wallet. Google and install it onto your web browser. Be sure to save your mnemonic phrase. This goes for all wallets, but we will specifically need this phrase to deploy our contract.
Switch to the Ropsten test net within metamask, and visit the link below and enter your wallet address to give yourself free test ethereum. This is only for testing on the Ropsten network.
Ropsten ETH Faucet for testnet use only

You will need this test ETH to pay the transaction fees for deploying your contract when creating your ERC20 token. Don't skip this step, visit the link to the ropsten faucet above.
Custom Coins
You will only need to do this once you have your contract deployed
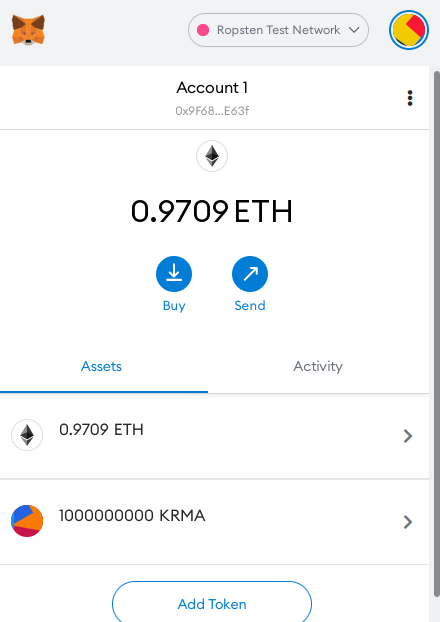
To get your custom token balances to show in metmask, you need to add a custom coin. Be sure you are on ropsten, or your test net of choice, and see the images below.
In your MetaMask wallet, click Add Token, and go to the Custom Token tab. Enter your contract address you recieved when deploying.

Click Add Tokens on the confimation screen, and they will appear in your wallet!

Project Setup
Solidity is the language used to create an ERC20 Token. This section will cover compilation of a contract on a local machine. If it compiles locally, it will deploy successfully. The section after this will cover deploying Solidity projects to a remote networks with Truffle. After that deploy is done, your token will be available on the Ropsten test net.
How to setup a Solidity project
First, we need to make a project directory and install everything we need. If you don't have git or npm, you'll need to install them first. We will also install the Truffle compiler -
mkdir /some/project/dir
cd /some/project/dir
git init	// Git is useful. Use it as needed, or don't. I won't cover any git commands here.
npm init -y		// Modify the generated package.json file, if needed
if you want to use OpenZeppelin, you will need to run the following command to install it, making it available to import in your contracts
npm install --save-dev @openzeppelin/contracts
Now, within a new contracts/contract-ERC20.sol file we can import the ETH ERC20 interface provided by OpenZeppelin -
import "@openzeppelin/contracts/token/ERC20/IERC20.sol"
Compiling Solidity With Truffle
We need to install the Truffle compiler -
npm install --save-dev truffle
The next steps will overwrite your contracts/ and test/ directories. If you have files there you want to keep, move or copy them somewhere else. After running the following initialization command, move them back, but keep any other additional files that Truffle has generated.
Run the following command to initialize a new Truffle project
npx truffle init

Check the truffle-config.js generated by npx truffle init, and modify your compiler version as needed. For me, all active settings in this config are seen below. This will work for compiling locally, but not on any remote public network. The next section will cover deploying to a remote network.
// truffle-config.js
module.exports = {
  // Set default mocha options here, use special reporters etc.
  mocha: {
  },
  // Configure your compilers
  compilers: {
    solc: {
      version: "0.8.0",    // <------- Modify your version if needed!
    }
  },
  db: {
    enabled: false
  }
};
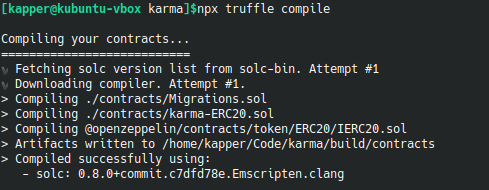
Be sure to move any contracts you have into the contracts/ directory, and any tests you have into the test/ directory. For my project, I have a simple network test and a single contract. The screenshot below of my compilation output should provide some insight into how my project is structured.
Now, when we run the following command truffle will compile all contracts in the contracts/ directory.
npx truffle compile
Now that our contract compiles, we need to configure truffle to connect to a testnet. The next section will cover doing this.
Deploy Truffle to Public Networks
Deploying Truffle to Remote Networks
Install hdwallet-provider for Truffle. We will use this to configure our wallet address when deploying the contract.
npm install --save-dev @truffle/hdwallet-provider
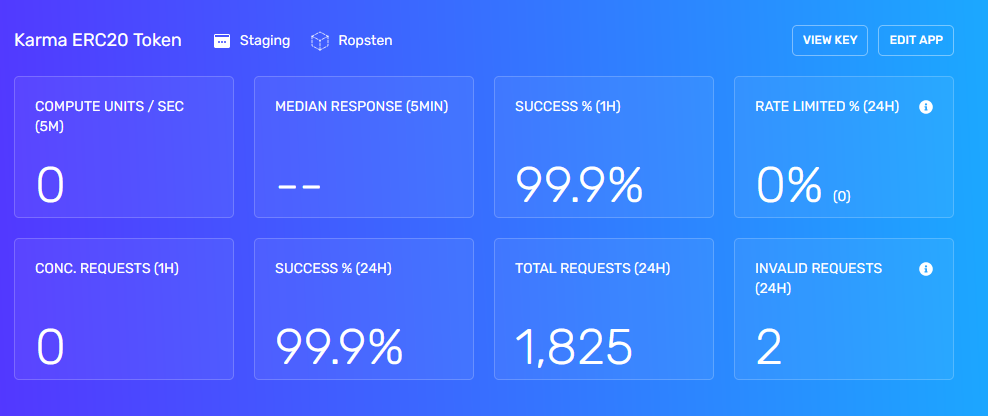
Grab your alchemy API key first, because you will need it! Once registered, the Alchemy dashboard will let you create a new project. Name it whatever you want, put it on whatever network you want just make sure this matches the network you put in your config below. Oncce you create the app, click View Key in the screenshot below. This can be found on the dashboard for the application itself. Copy the HTTPS key provided.
Now you're ready to look at your config. Add your mnemonic attached to your MetaMask wallet as the phrase, and add your Alchemy API key as the providerOrUrl -
// truffle-config.js
const HDWalletProvider = require('@truffle/hdwallet-provider');

module.exports = {
  networks: {
    ropsten: {
      provider: () => new HDWalletProvider({
        mnemonic: {
          phrase: 'word word word word word word word word word word word word word word'
        },
        providerOrUrl: "https://eth-ropsten.alchemyapi.io/v2/xxxxxxx_YOUR_ALCHEMY_API_KEY_xxxxxxxx",
        chainId: 3	// <--- Don't forget this! For me, excluding this line caused errors. cainId 3 is for ropsten
      }),
      network_id: 3,       // Ropsten's id
      gas: 5500000,        // Ropsten has a lower block limit than mainnet
      confirmations: 2,    // # of confs to wait between deployments. (default: 0)
      timeoutBlocks: 200,  // # of blocks before a deployment times out  (minimum/default: 50)
      skipDryRun: true     // Skip dry run before migrations? (default: false for public nets )
    },
  },
  // Set default mocha options here, use special reporters etc.
  mocha: {
  },

  // Configure your compilers
  compilers: {
    solc: {
      version: "0.8.0",    // <------- Modify your version if needed!
    }
  },
  db: {
    enabled: false
  }
};
Now we are ready to test that we can connect to the ropsten network, and verify our wallet connection at the same time.
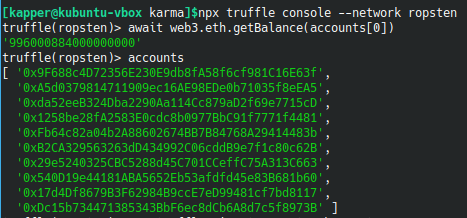
npx truffle console --network rinkeby
This should open a console prompt, type await web3.eth.getBalance(accounts[0]), followed by accounts. If you get a response, things are configured correctly! You should notice your wallet address is listed after entering the second accounts command.
One final step before we can deploy our contract to ropsten. Create the file migrations/2_deploy.js, and add the contents below. Be sure to pay attention to comments and change the values as needed.
// migrations/2_deploy.js
// Set variable name Karma to your whatever you named your token
const Karma = artifacts.require("Karma"); // <-- Set string in call to articfacts.require to your token name

module.exports = function (deployer) {
    deployer.deploy(Karma); // <----- Use const variable declared above in call to deployer.deploy
};
Now, we are finally ready to deploy our contract. run this final command to deploy to ropsten testnet.
npx truffle migrate --network ropsten
This may take a while, but when it completes you should see the output below

We have deployed Karma to the ETH ropsten testnet! You can take the contract address and view it on EtherScan. Here's the link for the contract we deployed in this section. It is useful, once you have a contract deployed or some transactions to look at, to explore etherscan a bit to see how things are organized. Notice on my contract page, you can see that 1 Billion Karmas were minted and sent to my wallet address, since I am the contract owner, and our contrract constructor looks like this -
    /**
     * Constrctor function
     *
     * Initializes contract with initial supply tokens to the creator of the contract
     */
    constructor()
    {
        name = "Karma";    // Name of the token
        symbol = "KRMA";         // Abbreviation of the token
        decimals = 18;          // Number of decimals that can be used to split token


        // FORMAT: <SUPPLY><DECIMALS>
        // Where SUPPLY is the number of coins in base 10 decimal notation
        // And DECIMALS is a trailing number of 0's; Count must match `decimals` value set above
        // 1000 000 000 000000000000000000 == 1 billion total supply;
        //  + trailing 0's represent the 18 decimal locations that can be used to send fractions
        _totalSupply = 1000000000000000000000000000;


        // Set the remaining balance of the contract owner to the total supply
        balances[msg.sender] = _totalSupply; // msg.sender is the calling address for this constructor
        // Transfer the total supply to the contract owner on initialization
        emit Transfer(address(0), msg.sender, _totalSupply); // address(0) is used to represent a new TX
    }
This constructor only happens wheen the contract is deployed. Future updates will not remint these tokens and provide me with 1B more or reset the supply.