Getting Started
unzip arduino-ide_2.3.4_Linux_64bit.zip -d ./arduino-ide_2.3.4
cd arduino-ide_2.3.4/
sudo chown root:root /home/shaun/Downloads/arduino-ide_2.3.4/chrome-sandbox
# Maybe
sudo chmod 4755 /home/shaun/Downloads/arduino-ide_2.3.4/chrome-sandbox

# For permissions to access USB devices
newgrp uucp
newgrp dialout

# Start IDE
./arduino-ide
I bought this board on Amazon
Tutorials specific to this board are here.
Some other tutorials / refrences I collected going down this rabbit hole -
- lafvintech/Basic-Starter-Kit-for-ESP32-S3-WROOM
- espressif/esp-idf
- espressif/arduino-esp32
- basic-starter-kit-for-esp32-s3-wroom.readthedocs
- esp32 forum
- esp32 datasheet
- Migrating from API 2.X to 3.0
- lafvintech tutorial starter kits (paid)
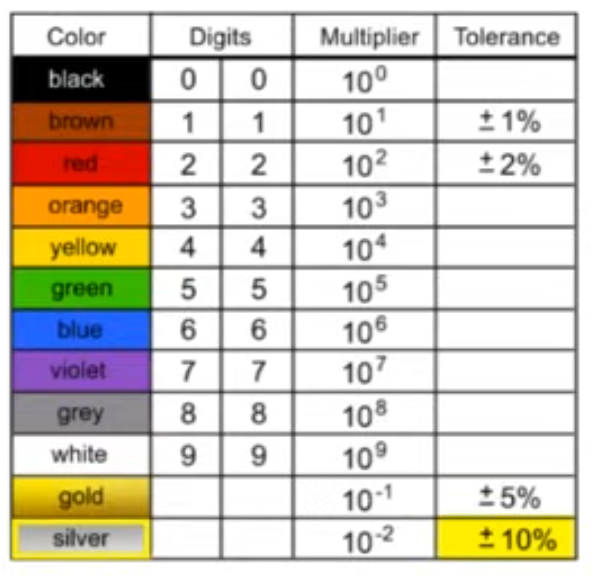
ResistorsDevelopment Methods
There are different ways to organize ESP32 projects, below is a brief on formats I've explored.
Arduino IDE
The Arduino IDE can be used to load sketches easily and flash to your ESP32.
This is easiest for a beginner, but you will have to use the Arudino IDE.
unzip arduino-ide_2.3.4_Linux_64bit.zip -d ./arduino-ide_2.3.4
cd arduino-ide_2.3.4/
sudo chown root:root /home/shaun/Downloads/arduino-ide_2.3.4/chrome-sandbox
# Maybe
sudo chmod 4755 /home/shaun/Downloads/arduino-ide_2.3.4/chrome-sandbox

# For permissions to access USB devices
newgrp uucp
newgrp dialout

# Start IDE
./arduino-ide
ESP-IDF (CMake / CLion)
This is recommended for advanced setups only. If just getting started I would recommend the section above on Arduino IDE.
The ESP-IDF supports using arduino APIs via an IDK component configuration. See the official GitHub example here
YoutubeOfficial videoArduino documentation for using Arduino as an ESP-IDF component.
Installing
Install esp-idf following GitHub instructions on ubuntu 24.04
WARNING: Pay attention to Arduino-esp32 releases for the latest supported esp-idf version. The latest esp-idf version is likely not currently supported by Arduino-esp32. At the time of this writing, the latest Arduino-esp32 release is based on ESP-IDF 5.3.2, so below we checkout the v5.3.2 branch of github.com/espressif/esp-idf.git.
# https://docs.espressif.com/projects/esp-idf/en/latest/esp32/get-started/linux-macos-setup.html#step-1-install-prerequisites
sudo apt-get install -y git wget flex bison gperf python3 python3-pip python3-venv cmake ninja-build ccache libffi-dev libssl-dev dfu-util libusb-1.0-0

# Clone v5.3.2 esp-idf and install (install / export output removed)
git clone -b v5.3.2 git@github.com:espressif/esp-idf.git
cd esp-idf
./install.sh
. ./export.sh

# To switch versions after previously installing esp32-idf
cd /path/to/esp-idf
git checkout v5.3.2
git submodule update --init --recursive
./install.sh
. ./export.sh
If everything worked correctly, you should end up with this final output in your terminal -
Done! You can now compile ESP-IDF projects.
Go to the project directory and run:

  idf.py build
Project Example
First set up your environment to use esp-idf tools, and to have the correct exports required for building with CMake.
# Source esp-idf script
source /home/shaun/Code/Clones/esp-idf/export.sh
# Make IDF_PATH and esp-idf tools available automatically
# Otherwise you will need to source the `export.sh` script every time you want to use idf.py or similar commands
echo "export IDF_PATH=$HOME/esp/v5.4/esp-idf" >> $HOME/.bash_aliases
echo "export PATH=\"$IDF_PATH/tools:$PATH\"" >> $HOME/.bash_aliases
Building
Now we can configure and build the project
# My example project directory
cd ~/Code/klips/esp/cpp/04_esp-idf-arduino
idf.py set-target esp32
# IMPORTANT: We set the 3.1.1 version because the release is compatible with esp-idf v5.3.2 we installed in the first step
# https://github.com/espressif/arduino-esp32/releases/tag/3.1.1
idf.py add-dependency "espressif/arduino-esp32^3.1.1"

# Autostart Arduino for use of `loop()` and `setup()` functions
# You can also use the esp-idf `app_main()` function if preferred
# https://docs.espressif.com/projects/arduino-esp32/en/latest/esp-idf_component.html#configuration
# You can alternatively do this in the GUI tool `idf.py menuconfig`
echo "CONFIG_AUTOSTART_ARDUINO=y" >> sdkconfig
sed -i -e 's/CONFIG_FREERTOS_HZ=100/CONFIG_FREERTOS_HZ=1000/' sdkconfig

# Build the project
idf.py build
ESP-IDF example using app_main()
ESP-IDF example using Arduino loop() and setup()
If everything completed normally, the build output will end with
Project build complete. To flash, run:
 idf.py flash
or
 idf.py -p PORT flash
or
 python -m esptool --chip esp32 -b 460800 --before default_reset --after hard_reset write_flash --flash_mode dio --flash_size 2MB --flash_freq 40m 0x1000 build/bootloader/bootloader.bin 0x8000 build/partition_table/partition-table.bin 0x10000 build/main.bin
or from the "/home/shaun/Code/klips/esp/cpp/04_esp-idf-arduino/build" directory
 python -m esptool --chip esp32 -b 460800 --before default_reset --after hard_reset write_flash "@flash_args"
Flashing
Find the device for the ESP32. Mine is /dev/ttyUSB0 in the output below.
$ ls /dev/tty*
/dev/tty    /dev/tty16  /dev/tty24  /dev/tty32  /dev/tty40  /dev/tty49  /dev/tty57  /dev/tty8       /dev/ttyS14  /dev/ttyS22  /dev/ttyS30
/dev/tty0   /dev/tty17  /dev/tty25  /dev/tty33  /dev/tty41  /dev/tty5   /dev/tty58  /dev/tty9       /dev/ttyS15  /dev/ttyS23  /dev/ttyS31
/dev/tty1   /dev/tty18  /dev/tty26  /dev/tty34  /dev/tty42  /dev/tty50  /dev/tty59  /dev/ttyprintk  /dev/ttyS16  /dev/ttyS24  /dev/ttyS4
/dev/tty10  /dev/tty19  /dev/tty27  /dev/tty35  /dev/tty43  /dev/tty51  /dev/tty6   /dev/ttyS0      /dev/ttyS17  /dev/ttyS25  /dev/ttyS5
/dev/tty11  /dev/tty2   /dev/tty28  /dev/tty36  /dev/tty44  /dev/tty52  /dev/tty60  /dev/ttyS1      /dev/ttyS18  /dev/ttyS26  /dev/ttyS6
/dev/tty12  /dev/tty20  /dev/tty29  /dev/tty37  /dev/tty45  /dev/tty53  /dev/tty61  /dev/ttyS10     /dev/ttyS19  /dev/ttyS27  /dev/ttyS7
/dev/tty13  /dev/tty21  /dev/tty3   /dev/tty38  /dev/tty46  /dev/tty54  /dev/tty62  /dev/ttyS11     /dev/ttyS2   /dev/ttyS28  /dev/ttyS8
/dev/tty14  /dev/tty22  /dev/tty30  /dev/tty39  /dev/tty47  /dev/tty55  /dev/tty63  /dev/ttyS12     /dev/ttyS20  /dev/ttyS29  /dev/ttyS9
/dev/tty15  /dev/tty23  /dev/tty31  /dev/tty4   /dev/tty48  /dev/tty56  /dev/tty7   /dev/ttyS13     /dev/ttyS21  /dev/ttyS3   /dev/ttyUSB0
To flash run the following commands.
# Manually selecting port with above output
# Baud rate matters: https://docs.espressif.com/projects/esp-idf/en/stable/esp32/get-started/establish-serial-connection.html#connect-esp32-to-pc
idf.py -p /dev/ttyUSB0 -b 115200 flash

# Let esp-idf automatically detect port and baud rate
idf.py flash
To open serial monitor with esp-idf via the commandline -
idf.py monitor -b 115200
Or in CLion the Serial Monitor extension works well.

