VirtualBox Networks
TLDR - If you are working in a VirtualBox VM, you should check that your VM's network settings are using the bridged option before trying to perform any pentesting or reconnaissance on your local network. To do this, right click the VM in VirtualBox and navigate to Settings->Network->Attached-to->Bridged Here's a link to a solution on ServerFault that might help explain the issues that could arise within VirtualBox VMs using nmap.
To get some more insight on how VirtualBox interfaces with our network on a Windows host, we can open a command prompt and check the output of ipconfig. Below, pay attention to the VirtualBox Host-only Network -
Microsoft Windows [Version 10.0.19042.1237]
(c) Microsoft Corporation. All rights reserved.

C:\Users\shaun>ipconfig

Windows IP Configuration


Ethernet adapter Ethernet:

   Connection-specific DNS Suffix  . : neo.rr.com
   IPv6 Address. . . . . . . . . . . : 2603:6010:2d27:f400::1
   IPv6 Address. . . . . . . . . . . : 2603:6010:2d27:f400:d875:971d:f6f4:b86e
   Temporary IPv6 Address. . . . . . : 2603:6010:2d27:f400:1c21:9254:c8b7:8cda
   Temporary IPv6 Address. . . . . . : 2603:6010:2d27:f400:1cec:7aa9:6b61:4454
   Temporary IPv6 Address. . . . . . : 2603:6010:2d27:f400:2df1:15f0:2959:de49
   Temporary IPv6 Address. . . . . . : 2603:6010:2d27:f400:4449:e5e4:7734:9ea3
   Temporary IPv6 Address. . . . . . : 2603:6010:2d27:f400:6d5e:b8dd:83b2:4cc4
   Temporary IPv6 Address. . . . . . : 2603:6010:2d27:f400:e80b:b075:4eee:8b31
   Link-local IPv6 Address . . . . . : fe80::d875:971d:f6f4:b86e%7
   IPv4 Address. . . . . . . . . . . : 192.168.0.5
   Subnet Mask . . . . . . . . . . . : 255.255.255.0
   Default Gateway . . . . . . . . . : fe80::42b8:9aff:fed7:ecae%7
                                       192.168.0.1

Ethernet adapter VirtualBox Host-Only Network:

   Connection-specific DNS Suffix  . :
   Link-local IPv6 Address . . . . . : fe80::744c:1fd4:4f28:f3ec%2
   IPv4 Address. . . . . . . . . . . : 192.168.56.1
   Subnet Mask . . . . . . . . . . . : 255.255.255.0
   Default Gateway . . . . . . . . . :

Ethernet adapter VMware Network Adapter VMnet1:

   Connection-specific DNS Suffix  . :
   Link-local IPv6 Address . . . . . : fe80::491:f5bb:bbe4:826%11
   IPv4 Address. . . . . . . . . . . : 192.168.70.1
   Subnet Mask . . . . . . . . . . . : 255.255.255.0
   Default Gateway . . . . . . . . . :

Ethernet adapter VMware Network Adapter VMnet8:

   Connection-specific DNS Suffix  . :
   Link-local IPv6 Address . . . . . : fe80::14ab:b26a:7ff5:4e20%16
   IPv4 Address. . . . . . . . . . . : 192.168.227.1
   Subnet Mask . . . . . . . . . . . : 255.255.255.0
   Default Gateway . . . . . . . . . :

Ethernet adapter Bluetooth Network Connection:

   Media State . . . . . . . . . . . : Media disconnected
   Connection-specific DNS Suffix  . :
Notice the Ethernet adapter VirtualBox Host-Only Network in the output above. When you select host only within your virtual machine's network settings, this is the subnet that VirtualBox will use to provision local addresses to virtual machines that should only be accessible from the host OS. These IPs would not be available to another machine.
If you select bridged connection from within your VM network settings, VirtualBox will use the 192.168.0.0/24 subnet to assign new hosts local IP addresses. In the output above, we can see that our host OS (Windows in this case) is within this subnet at the IP address 192.168.0.5. This means that the new VM will exist on the same subnet as our host, which makes this VM accessible from other machines that are using the same local network.
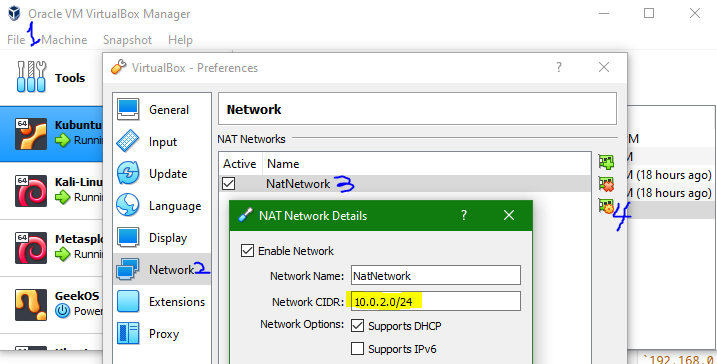
If you select a NAT connection from within your VM network settings, VirtualBox will use the subnet defined in VirtualBox VM Manager->File->Preferences->Network->NatNetwork->Edit. The settings window will look something like the image below -
Hopefully this information helps you to decide which network setting is appropriate for your VM in your case. For me, the bridged option was the way to go.

