HomeAssistant
Installation
There are two methods below. The recommeneded method IMO is KVM. You could use VirtualBox and maybe that would be simpler if you are already familiar. I wanted to learn about KVMs.
Docker Compose
This method of installation does not support add-ons. To use add-ons in home assistant see the KVM installation method.
https://www.home-assistant.io/installation/linux#docker-compose
services:
  homeassistant:
    container_name: homeassistant
    image: "ghcr.io/home-assistant/home-assistant:stable"
    volumes:
      - /home/shaun/home-assistant/config:/config
      - /etc/localtime:/etc/localtime:ro
      - /run/dbus:/run/dbus:ro
    restart: unless-stopped
    privileged: true
    network_mode: host
Nothing too fancy here. Slap this configuration into a docker-compose.yaml and docker compose up -d in the same directory. If you don't want add-ons, this will work just fine.
The KVM method looks long and painful, I assure you it's not that bad.
Kernel-based Virtual Machine
To summarize this method of installation before we get started -
I'll create a homeassistant KVM running HaOS that is made avaialble on my local network via a network bridge. Next, I'll use my router's configuration panel to create a static lease for the new homeassistant device that appears on my network. Finally, I'll use an nginx server of mine to route requests to home.shaunreed.com to the local IP address I designated in the static lease. That way even though the IP is dead-simple to remember, I can just access home.shaunreed.com while connected to my local network.
Obviously accessing this URL from outside of my network is.. a waste of time. You might get lucky and get some response from a device on your network, but probably not.
These instructions don't offer much to the KVM newcomer, but here are the official instructions to install HAOS on a KVM -
Official Linux HomeAssistant OS Installation Instructions Using KVM
KVM Host Setup
The bash commands below are really just a way to make these instructions portable, you could also just browse the HaOS releases on github to fetch the file we need.
First we need to find the latest release tag for HaOS.
export TAG=$(curl https://api.github.com/repos/home-assistant/operating-system/releases/latest -s | jq .tag_name -r)

# Download qcow2 KVM file and unzip it.
wget https://github.com/home-assistant/operating-system/releases/download/$TAG/haos_ova-$TAG.qcow2.xz

unxz haos_ova-$TAG.qcow2.xz
Now we install the tools needed to manage KVMs. You must reboot after installing this package. It's possible that your system came with these tools installed, and there will be no need to install them or reboot.
sudo apt install virtinst
# This is the next command in the official documentation.
# I ran into some errors and work through each of them in the next code block.
virt-install --name haos --description "Home Assistant OS" --os-variant=generic --ram=4096 --vcpus=2 --disk $PWD/haos_ova-$TAG.qcow2,bus=scsi --controller type=scsi,model=virtio-scsi --import --graphics none --boot uefi
If you see this error, you need to reboot after installing virtinst
virt-install --name haos --description "Home Assistant OS" --os-variant=generic --ram=4096 --vcpus=2 --disk $PWD/haos_ova-$TAG.qcow2,bus=scsi --controller type=scsi,model=virtio-scsi --import --graphics none --boot uefi
ERROR binary '/usr/sbin/libvirtd' does not exist in $PATH: No such file or directory
Install libvirt-daemon-system to fix this error.
virt-install --name haos --description "Home Assistant OS" --os-variant=generic --ram=4096 --vcpus=2 --disk /home/shaun/homelab/home-assistant/haos_ova-13.2.qcow2,bus=scsi --controller type=scsi,model=virtio-scsi --import --graphics none --boot uefi
ERROR    Failed to connect socket to '/var/run/libvirt/libvirt-sock': No such file or directory
Add your user to the libvirt group by running newgrp libvirt to fix this error.
virt-install --name haos --description "Home Assistant OS" --os-variant=generic --ram=4096 --vcpus=2 --disk /home/shaun/homelab/home-assistant/haos_ova-13.2.qcow2,bus=scsi --controller type=scsi,model=virtio-scsi --import --graphics none --boot uefi
ERROR    Failed to connect socket to '/var/run/libvirt/libvirt-sock': Permission denied
Almost there!
To fix this error, run sudo -E vim /etc/libvirt/qemu.conf and make the changes shown in the code block below.
virt-install --name haos --description "Home Assistant OS" --os-variant=generic --ram=4096 --vcpus=2 --disk /home/shaun/homelab/home-assistant/haos_ova-13.2.qcow2,bus=scsi --controller type=scsi,model=virtio-scsi --import --graphics none --boot uefi
WARNING  /home/shaun/homelab/home-assistant/haos_ova-13.2.qcow2.xz may not be accessible by the hypervisor. You will need to grant the 'libvirt-qemu' user search permissions for the following directories: ['/home/shaun']
WARNING  Using --osinfo generic, VM performance may suffer. Specify an accurate OS for optimal results.

Starting install...
ERROR    internal error: process exited while connecting to monitor: 2024-10-19T18:18:10.481547Z qemu-system-x86_64: -blockdev {"driver":"file","filename":"/home/shaun/homelab/home-assistant/haos_ova-13.2.qcow2.xz","node-name":"libvirt-1-storage","auto-read-only":true,"discard":"unmap"}: Could not open '/home/shaun/homelab/home-assistant/haos_ova-13.2.qcow2.xz': Permission denied
Domain installation does not appear to have been successful.
If it was, you can restart your domain by running:
  virsh --connect qemu:///system start haos
otherwise, please restart your installation.
These are the changes to fix the last error above. The changes set the user to shaun which allows access to /home/shaun and the group to the default libvirt. There is a lot in this file and these lines will be commented out. Uncomment them and set them accordingly (your username might be different) -
# Some examples of valid values are:
#
#       user = "qemu"   # A user named "qemu"
#       user = "+0"     # Super user (uid=0)
#       user = "100"    # A user named "100" or a user with uid=100
#
user = "shaun"

# The group for QEMU processes run by the system instance. It can be
# specified in a similar way to user.
group = "libvirt"
Restart libvirt service after making the changes above to apply them
sudo systemctl restart libvirtd.service
At this point the command works for me. See the next section for next steps on how to access the home assistant frontend.
virt-install --name haos --description "Home Assistant OS" --os-variant=generic --ram=4096 --vcpus=2 --disk $PWD/haos_ova-$TAG.qcow2,bus=scsi --controller type=scsi,model=virtio-scsi --import --graphics none --boot uefi
If you ever want to start over and try to install again with the same KVM guest name this is how
virt-install --name haos --description "Home Assistant OS" --os-variant=generic --ram=4096 --vcpus=2 --disk $PWD/haos_ova-$TAG.qcow2,bus=scsi --controller type=scsi,model=virtio-scsi --import --graphics none --boot uefi
WARNING  Using --osinfo generic, VM performance may suffer. Specify an accurate OS for optimal results.

Starting install...
ERROR    Guest name 'haos' is already in use.
Domain installation does not appear to have been successful.
If it was, you can restart your domain by running:
  virsh --connect qemu:///system start haos
otherwise, please restart your installation.
Run the following commands -
shaun@bee:~$ virsh list --all
 Id   Name   State
----------------------
 1    haos   running

shaun@bee:~$ virsh undefine haos --remove-all-storage --nvram
Domain 'haos' destroyed

shaun@bee:~$ virsh list --all
 Id   Name   State
-----------------------
Now the command works so we can reinstall HaOS
virt-install --name haos --description "Home Assistant OS" --os-variant=generic --ram=4096 --vcpus=2 --disk $PWD/haos_ova-$TAG.qcow2,bus=scsi --controller type=scsi,model=virtio-scsi --import --graphics none --boot uefi
# Lots of output...
[    2.167746] systemd[1]: Finished Load Kernel Module efi_pstore.
[    2.169682] systemd[1]: modprobe@fuse.service: Deactivated successfully.
[    2.171076] systemd[1]: Finished Load Kernel Module fuse.
[    2.173527] systemd[1]: Finished Generate network units from Kernel command line.
[    2.177128] zram2: detected capacity change from 0 to 32768
[    2.178697] systemd[1]: Finished Remount Root and Kernel File Systems.
[    2.180025] systemd[1]: Reached target Preparation for Network.
[    2.184575] zram1: detected capacity change from 0 to 65536
[    2.186413] systemd[1]: Mounting FUSE Control File System...
[    2.187304] systemd[1]: Kernel Configuration File System was skipped because of an unmet condition check (ConditionPathExists=/sys/kernel/config).
[    2.190522] systemd[1]: Starting Create Static Device Nodes in /dev gracefully...
[    2.192376] systemd[1]: Started Journal Service.
[    2.237290] audit: type=1334 audit(1729364732.280:2): prog-id=6 op=LOAD
[    2.238125] audit: type=1334 audit(1729364732.280:3): prog-id=7 op=LOAD
[    2.306989] e1000 0000:00:02.0 enp0s2: renamed from eth0
[    2.563354] EXT4-fs (sda7): mounted filesystem 276bcccc-2827-4ba2-95cc-28ae4d61cfcd r/w with ordered data mode. Quota mode: none.

Welcome to Home Assistant
homeassistant login:
You do not need to login to this prompt. In the next section we will create a network bridge which exposes this KVM to your local network. Once this is done we can visit the frontend in a web browser and start the home assistant onboarding process. On startup, an admin user and password are generated and printed in the logs. It is recommended to set a new password for the admin account after logging in for the first time under Settings > Users.
Network Bridge
Now we need to setup a bridge for our network so our virtual machine will show up on our local network. Once this is done homeassistant will show up on your wifi router's list of devices with it's own local IP address. You can visit this local address 192.168.143.123:8123 to see the home assistant application from any device while connected to your network.
Note that any IP address found in this post is fake, and yours will be different.
Here are two good resources that helped me here
Before we make any changes, let's check the current connects and devices using nmcli
Show current connections
nmcli con show
NAME                UUID                                  TYPE      DEVICE
Wired connection 1  32ad924c-de8c-3d5f-8574-0350b5013a33  ethernet  enp1s0
lo                  1f94cfef-9a19-4a35-8a69-034b88a92162  loopback  lo
docker0             ed8b0fe6-ee1c-4eda-908a-796e1253599a  bridge    docker0
virbr0              db82dd0c-9afc-41c1-8ba9-25c172b8a725  bridge    virbr0
wifi                a1c5be8a-50da-4bcc-846e-0b8b15f1da8d  wifi      --
Wired connection 2  77b2cb41-bfca-3c15-90bf-6984f6c16a10  ethernet  --
Show devices and their status
nmcli device
DEVICE           TYPE      STATE                                  CONNECTION
enp1s0           ethernet  connected                              Wired connection 1
lo               loopback  connected (externally)                 lo
docker0          bridge    connected (externally)                 docker0
virbr0           bridge    connected (externally)                 virbr0
wlo1             wifi      disconnected                           --
p2p-dev-wlo1     wifi-p2p  disconnected                           --
enp2s0           ethernet  unavailable                            --
vethc3db6aa      ethernet  unmanaged                              --
Now, we need to create a bridge that will connect to our current ethernet connection enp1s0 from the list above -
nmcli con add type bridge ifname br0
Connection 'bridge-br0' (a426ed13-efe4-4102-9f5d-8d300ebb563c) successfully added.
The bridge is now in the list of connections but it is not yet active
nmcli con show
NAME                UUID                                  TYPE      DEVICE
Wired connection 1  32ad924c-de8c-3d5f-8574-0350b5013a33  ethernet  enp1s0
lo                  1f94cfef-9a19-4a35-8a69-034b88a92162  loopback  lo
docker0             ed8b0fe6-ee1c-4eda-908a-796e1253599a  bridge    docker0
virbr0              db82dd0c-9afc-41c1-8ba9-25c172b8a725  bridge    virbr0
wifi                a1c5be8a-50da-4bcc-846e-0b8b15f1da8d  wifi      --
bridge-br0          a426ed13-efe4-4102-9f5d-8d300ebb563c  bridge    br0
Wired connection 2  77b2cb41-bfca-3c15-90bf-6984f6c16a10  ethernet  --
Now make the connection from our ethernet device enp1s0 to the br0 bridge so that the KVM we host using the bridge network will appear on our local network. This is a slave connection that will always start with the bridge connection so that we are always tied to our ethernet.
nmcli con add type bridge-slave ifname enp1s0 master br0
Connection 'bridge-slave-enp1s0' (3065e93d-aa12-41f0-9f81-a7f215cc224b) successfully added.
Now bring up the bridge and the slave connection
nmcli con up bridge-br0
Connection successfully activated (master waiting for slaves) (D-Bus active path: /org/freedesktop/NetworkManager/ActiveConnection/32)

nmcli con up bridge-slave-enp1s0
Connection successfully activated (D-Bus active path: /org/freedesktop/NetworkManager/ActiveConnection/11)
Both should be assigned a device in the output below
nmcli con show
NAME                 UUID                                  TYPE      DEVICE
bridge-slave-enp1s0  36b4f332-4e17-44f6-b6e1-46c3a9e50ab1  ethernet  enp1s0
bridge-br0           55112f91-d19f-4544-b598-a23d4f6719b3  bridge    br0
lo                   13eec32a-6ecb-4f96-9826-42451ad97515  loopback  lo
virbr0               b39355aa-337f-4b2c-956b-707aa0a25c10  bridge    virbr0
vnet0                a2f06339-5832-4834-bcea-8e23ef495a9b  tun       vnet0
Wired connection 1   01bef55a-ef0c-3116-b621-582614d731b0  ethernet  --
Wired connection 2   1ff0150b-f0db-31c5-a99d-be6d93f45f0c  ethernet  --
Check device to see the status of the bridge connection is good. Here, we are waiting to connect. This can take some time so give it a few minutes.
nmcli device
DEVICE           TYPE      STATE                                  CONNECTION
enp1s0           ethernet  connected                              Wired connection 1
br0              bridge    connecting (getting IP configuration)  bridge-br0
br-5d311c779ca4  bridge    connected (externally)                 br-5d311c779ca4
lo               loopback  connected (externally)                 lo
br-f46f9264b01d  bridge    connected (externally)                 br-f46f9264b01d
docker0          bridge    connected (externally)                 docker0
virbr0           bridge    connected (externally)                 virbr0
wlo1             wifi      disconnected                           --
p2p-dev-wlo1     wifi-p2p  disconnected                           --
enp2s0           ethernet  unavailable                            --
vethc3db6aa      ethernet  unmanaged                              --
Check device status again and see that the connection is good. Note enp1s0 is now connected to bridge-slave-enp1s0 under CONNECTION column.
nmcli device
DEVICE           TYPE      STATE                   CONNECTION
br0              bridge    connected               bridge-br0
enp1s0           ethernet  connected               bridge-slave-enp1s0
br-5d311c779ca4  bridge    connected (externally)  br-5d311c779ca4
lo               loopback  connected (externally)  lo
br-f46f9264b01d  bridge    connected (externally)  br-f46f9264b01d
docker0          bridge    connected (externally)  docker0
virbr0           bridge    connected (externally)  virbr0
wlo1             wifi      disconnected            --
p2p-dev-wlo1     wifi-p2p  disconnected            --
enp2s0           ethernet  unavailable             --
vethc3db6aa      ethernet  unmanaged               --
Sometimes it can take a couple of minutes to connect if you have been toying around a lot, so give it a bit and check devices again if it says it's still trying to connect or something to that effect.
If you want this to be the default connection from now on you should enable autoconnect -
nmcli device set br0 autoconnect yes
KVM Host Configuration
Now we just need to tell our KVM host to use thet bridge network we just created. To do this we first need to define the network in virt-manager so if you haven't already..
sudo apt install virt-manager
List networks currently available to virt-manager -
virsh net-list --all
 Name      State    Autostart   Persistent
--------------------------------------------
 default   active   yes         yes
Define the bridge using a new XML file in any directory as temporary input to virsh net-define -
vim br0.xml
# The file should look like this...
<network>
  <name>br0</name>
  <forward mode="bridge"/>
  <bridge name="br0" />
</network>
Define the network using the temporary XML file we just created
virsh net-define br0.xml
Start the network, and then set it to automatically start on reboot
virsh net-start br0

virsh net-autostart br0
Network br0 marked as autostarted
We should now see the bridge in the list of networks
virsh net-list --all
 Name      State    Autostart   Persistent
--------------------------------------------
 br0       active   yes         yes
 default   active   yes         yes
Now open virt-manager, if you see a permisssions denied error connecting to libvirt socket then just reboot after installing virt-manager.
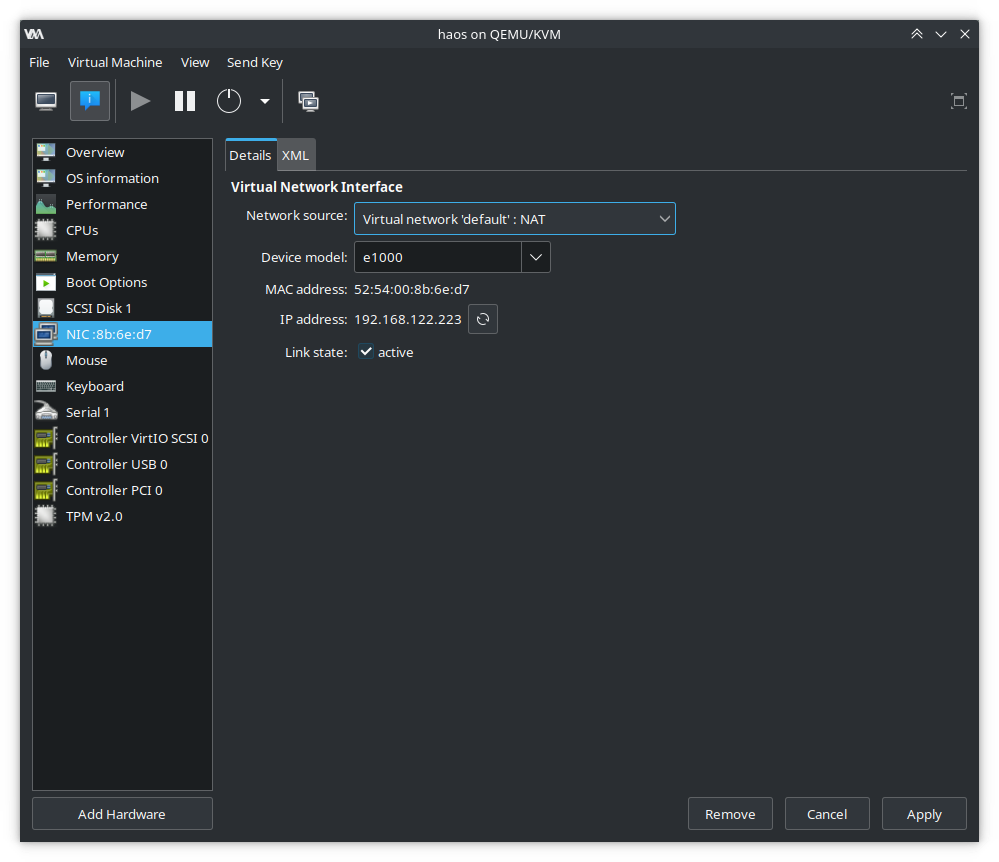
Change the Network source to use br0, note that the IP address may now appear as Unknown -
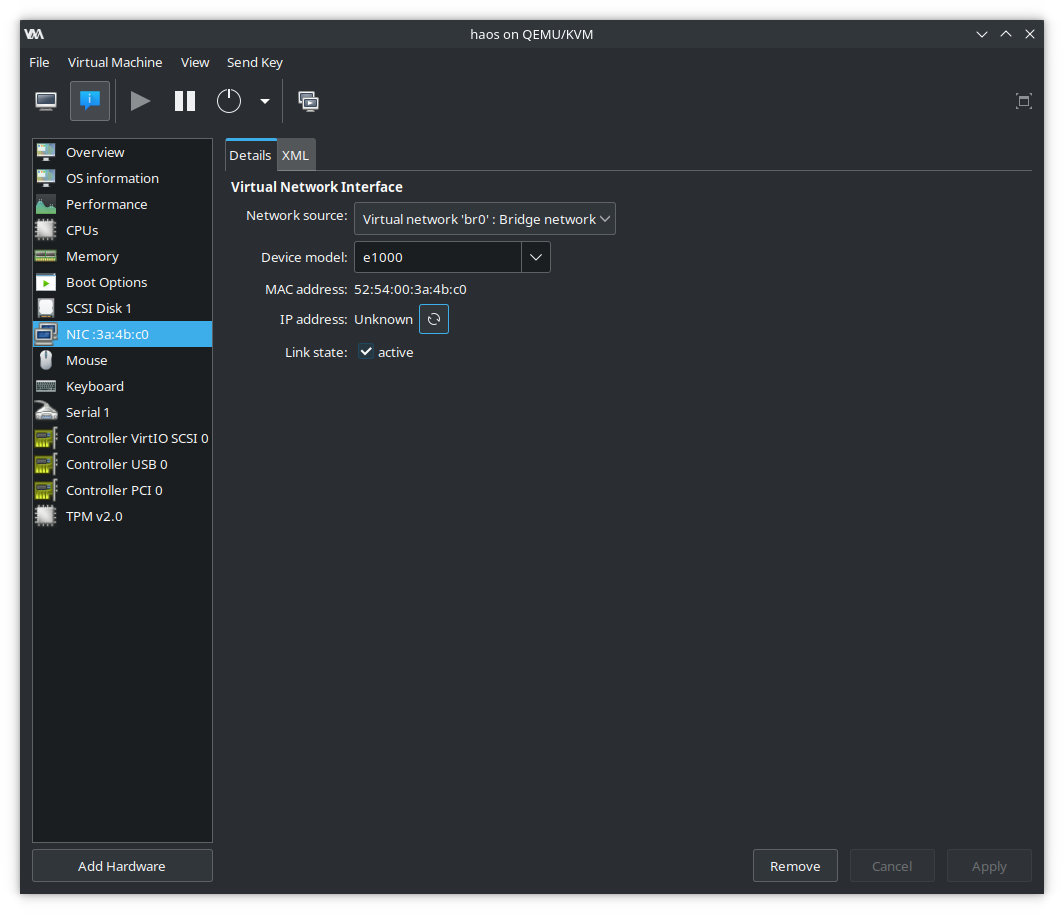
Restart the KVM and you should now see the virtual machine listed in your router's devices.

Using the IP in the screenshot above from my router's configuration panel, I can now visit 192.168.143.104:8123 in a web browser to start Home Assistant OS on boarding.

For me this means I can assign a static lease so that I know home assistant's local IP address at all times and it will never change. You can usually do this in your router's configuration panel.
Once this is done, I implement an nginx hack on one of my cloud servers to redirect requests to the local IP address assigned in the static lease -
# This exact configuration is not actually in use anywhere on the cloud.
user www-data;
worker_processes auto;
pid /run/nginx.pid;
include /etc/nginx/modules-enabled/*.conf;

events { }

http {
  include mime.types;

  server {
    listen 80;
    server_name home.shaunreed.com;
    rewrite ^ http://192.168.143.123:8123 permanent;
  }

  # Forward http requests to https
  server {
    listen 80;
    server_name shaunreed.com www.shaunreed.com;
    return 301 https://www.shaunreed.com$request_uri;
  }

  # Normal SSL for a secure web server.
  # This has nothing to do with home assistant, but serves as an example
  #   of using an existing web server to access your HAOS frontend.
  server {
    server_name shaunreed.com  www.shaunreed.com;
    server_tokens off;
    listen 443 ssl;
    ssl_certificate /some/path/to/fullchain.pem;
    ssl_certificate_key /some/path/to/privkey.pem;

    access_log /some/path/to/nginx/access.log;
    error_log /some/path/to/nginx/error.log;

    location / {
      include proxy_params;
      proxy_pass http://1.2.3.4:1234/;
    }
  }
}
HACS Installation
Enable Advanced mode in your user panel -

Settings->Add-ons->Add-on-Store then click the ... at the top right to open a drop-down menu and select repositories.
Add the HACS repo to the list https://github.com/hacs/addons

Install Get HACS in the Add-on store -
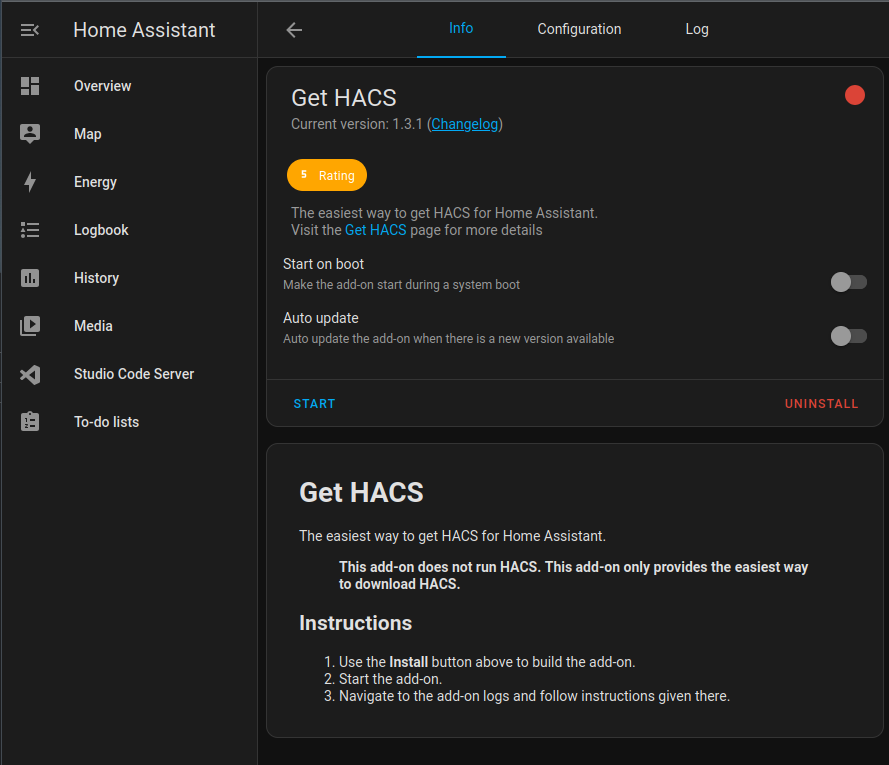
Run the add-on and view the logs to see the details.

So restart home by going to Settings->System and clicking the power button at the top-right.

Once the reboot is finished go to Settings->Devices and click Add Intergration at the bottom-right of the screen

Follow the steps and HACS will appear in the side-bar
Share Host Bluetooth Device
To enable Bluettoth connections in home assistant, you need a bluetooth dongle attached to your host machine. My host has an internal bluetooth adapter and I found it, but was not successful in sharing it with the KVM. A cheap USB bluetooth dongle worked perfectly though, first try using the steps below.
# List USB devices to find the bluetooth dongle use for bluetooth. Look for mention of hci, the kernel module for bluetooth.
sudo lsusb
Bus 001 Device 001: ID 1d6b:0002 Linux Foundation 2.0 root hub
Bus 002 Device 001: ID 1d6b:0003 Linux Foundation 3.0 root hub
Bus 003 Device 001: ID 1d6b:0002 Linux Foundation 2.0 root hub
Bus 003 Device 002: ID 25a7:fa67 Areson Technology Corp 2.4G Receiver
Bus 003 Device 004: ID 8087:0026 Intel Corp. AX201 Bluetooth
Bus 003 Device 013: ID 0a12:0001 Cambridge Silicon Radio, Ltd Bluetooth Dongle (HCI mode)
Bus 004 Device 001: ID 1d6b:0003 Linux Foundation 3.0 root hub
In the above output my cheap USB dongle is Bus 003 Device 013: ID 0a12:0001 Cambridge Silicon Radio, Ltd Bluetooth Dongle (HCI mode), and my system's internal bluetooth device that I could not get working is Bus 003 Device 004: ID 8087:0026 Intel Corp. AX201 Bluetooth. For the sake of sanity below I will not bother showing the attempt to use the system device, I will only show using the USB device that worked for me.
In virt-manager, open the KVM details panel and click Add Hardware, then select USB Host Device and find the device in the list.
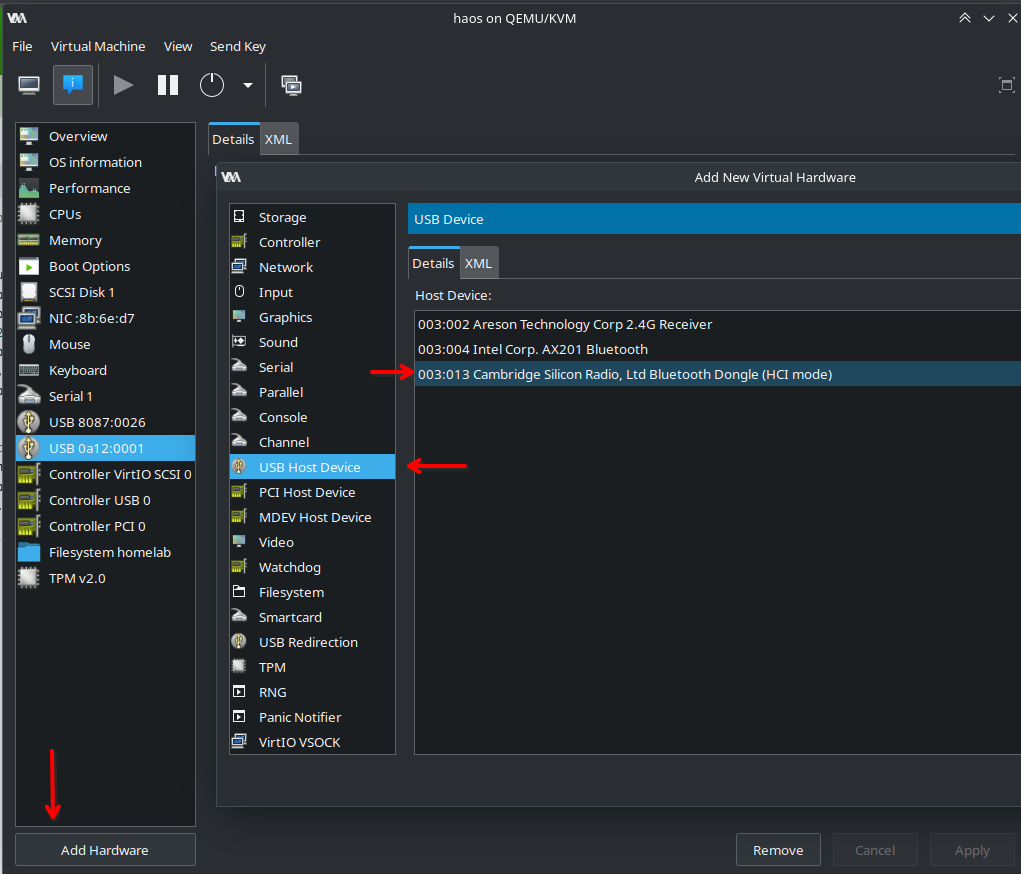
Add the device and reboot HAOS. You can now go to Settings->Devices->Add-Intergration->Bluetooth and a bluetooth receiver will be detected.
No comments to display
No comments to display