Configuring Multi-boot Filesystems
When installing a fresh Linux Distribution, you might want to dual-boot, or even multi-boot, into different desktop environments. There are some pretty specific requirements we'll need to setup manually for our new partitions though, see below for details on the different partitions needed to setup an open ended multi-boot system alongside windows. This configuration will prompt for selection of OS on boot, and will allow for nearly any number of distributions to be tested alongside each other. These instructions vary slightly based on your specific scenario, so be sure to read and understand the need for each setting below.
Installation Media
When installing any operating system, we first need to create our installation media. Sometimes these are distributed as Installation CDs, but a simple USB can be turned into the same thing very easily.
Depending on your system, see the sections below.
Choosing a Distribution
Not sure what distribution to use, or searching for a legit ISO?
Distrowatch is your friend. They provide rankings, comment boards, forums, and (usually) working links to ISO downloads.
Linux ISO Tools
To burn an image using umount and dd on Linux, run the commands below.
lsblk
the command above will list all block storage devices connected to your system, find your device in the list, and take note of the name assigned to it within the /dev/ directory. Usually, this name is sd<?><?> or sd<?> for the primary partition. Usually, we would want to write to the primary on the USB to ensure that we boot from our ISO.
sudo dd if=/home/user/Downloads/inputfile.iso of=/dev/sd<?><?> && sync
Windows ISO Image Writer
Universal USB Installer handles almost every scenario for most if not all distros. Head over to UUI's Download Page, grab the tool and see that your settings are adjusted for your needs.
Your Drive letters, distro release, and persistent file size may be different depending on the requirements you have for your media. To format a drive and prepare for writing -
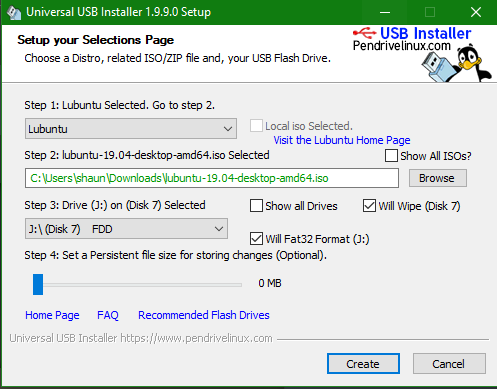
To create USB installation media -
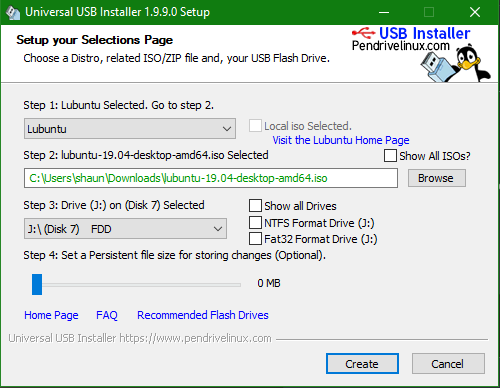
To create a persistant USB to boot wherever you like, adjust the slider on the bottom of the widows labeled Step 4: to your desired size.
When using this tool to create a persistent USB device, there is a temporary directory created in your C:\Users\shaun\AppData\Local\Temp\ directory! If there is not enough space on your drive, the process will not terminate itself, but it will not be able to complete. The temporary files tend to be named nsf9D50.tmp or similar, and will take up equal or slightly more space than is being written to your USB. So, if you create a persistent USB with 10GBs of storage ontop of writing a 2GB .iso, you can expect to need ~12GB on your C:\ drive in order for the process to complete successfully. Once completed, the temp files should be automatically deleted. If the process gets hung due to insufficient space on your drive, this may not happen and you may need to check your Temp directory to manually delete the files yourself.
Alternatively, you can check out the tools below if you have issues using Universal USB Installer.
If you've written to a USB and need to recreate the media for any reason, you'll need to clear the contents on the USB before you can attempt to reformat and reimage the storage device. To do this, ROSA can be used to clear the USB by selecting the device and clicking clear. After doing this you'll just need to format the drive using windows quick format tool via right click->format->FAT. Then, use win332diskimager to copy the new image to your device.
BIOS Configuration
When configuring a multi-boot system with specific partitions for different distributions, you'll need to enable the following settings within your BIOS -
- Disable Secure Boot
- Disable fast boot
- Set to UEFI mode only within boot options.
If you're unsure how to modify these settings, try running the setting in question through google along with the model of your motherboard. This will hopefully provide some more specific instructions on using the BIOS of your system.
Modifying these settings will allow us to create EFI files within a given EFI partition, created below, where the system defines the boot sequence for multiple operating systems. This allows us to leave our boot sequence open-ended, and easily append EFI system files to our partition / boot options during the installation of a new system. There are, unfortunately, a few discrepancies to how these steps will be performed - unless the system is to be configured exactly the same.
USB Boot / Install
Insert your USB installer you created above using ROSA Image Writer or dd command above, and reboot the system. Be sure to pay attention and press the required key to enter the BIOS during boot. For me, the key was delete or F2. Once in the BIOS, navigate to your boot sequence / options and there should be a list of connected storage devices, including all HDD, SSD, USBs, etc. Find your USB installer in the list and select it, this will boot into the installer for your distribution. The installer is usually found on the desktop as an executable application. These installers are usually usable systems, but be aware that there will be no persistent data between reboots until the installation is completed.
When selecting your installation media to boot from within BIOS, be sure to select the media that corresponds with how your system is configured to boot. In this example, the media should start similar to UEFI: USB .... If you were not using a UEFI configuration, simply select the same media without the UEFI: prefix.
Partitioning
Once booted into the USB created above, you will likely se an installation prompt. When given the choice, select 'custom installation or 'custom partition configuration option, and continue with the guide below.
Bootloader Partition
If you are already using Grub on an existing EFI partition, you won't need to create a new one. Skip this step, but make note of where this partition is, we will need it during installation.
This is the partition where we will create and store new bootloaders during installation of different distributions. You will not directly edit or view this partitions contents, but it is the backbone of the system-selection prompt (grub) that you will receive when booting after completing this configuration. There may be a need to step into this partition if you decide to customize your grub configuration, but we won't get into that here.
Size: 1GB (this is generous)
Type: FAT32
Location: Beginning of Space (Volume we are partitioning)
Mount: (Leave empty / blank)
Flags: boot, efi (also called ESP or EFISYS)
You should always choose to install the bootloader on the same disk the EFI filesystem exists, whether your case required the creation of a new EFI volume or if you are installing alongside a previous one. Failing to do so can could cause issues during installation.
The only exception to this is when initially installing a Linux / Grub Bootloader - you will have to create a new EFI partition for the Grub Bootloader. Grub will pick up the windows partition automatically, but if it doesn't, you can always run sup grub-update to search for new EFI partitions or configurations and update your Grub Bootloader appropriately.
Root Partition
This partition will store the Linux system files for your distribution, and unless otherwise partitioned separately, your user's home directory and all of its content. This should be set according to both your distributions total installation size, and if you are not partitioning dedicated space - you should figure in any extra space your user(s) might require for new packages, updates, and applications. Running out of space is a lot worse than having too much, so try to be a little generous here.
Size: Adjust according to installed size of distribution we are using.
Type: exf4 (Logical)
Location: Beginning of Space (Volume we are partitioning)
Mount: /
Flags: root
Swap Partition (Optional)
This is the space your system will use if you run out of memory. If you max out your RAM, this will prevent your system from freezing up. Be cautious of low RAM systems with little or no swap, the downfall to swap space is that once it is used it cannot be reallocated until the system reboots.
Size: 2GB-Preference (Ideally 50-100% of system RAM)
Type: linuxswap (Logical)
Location: Beginning of Space (Volume we are partitioning)
Mount: (Leave empty / blank)
Home Partition (Optional)
This is optional. I would recommend having a separate storage device (Massive HDDs are getting cheaper..) to mount your home directories in, so if you ever need to reinstall the root directory of your distributions you'll be able to do so without having to worry about backing up or losing data.
I would not advise taking the gamble, you will probably need to reinstall at some point - and it's good insurance to have.
Size: Preference
Type: exf4 (Primary)
Location: Beginning of Space (Volume we are partitioning)
Mount: /home
Installing
Now all we need to do is specify where to install the bootloader. This is easy since we just created that partition above, the EFI Partition. Select the partition from the dropdown and click 'continue' or 'install' at the bottom corner. After this is complete, you'll just need to reboot and witness the grub! From now on, you'll have an option of which system to boot into when starting your PC.
Adding New Systems
During installation of additional systems, we have two requirements, selecting a location for booting the system, and selecting a location for configuring the root filesystem.
Create a new /root (and /home, if you choose) partition(s), then select the EFI partition we created above for the bootloader install location (For me, this was sdb1 - the first partition of /dev/sdb) The basic requirements of both can be seen below
Bootloader
Size: 1GB (this is generous)
Type: FAT32
Location: Beginning of Space (Volume we are partitioning)
Mount: (Leave empty / blank)
Flags: boot, efi
Root
Size: Adjust according to installed size of distribution we are using.
Type: exf4 (Logical)
Location: Beginning of Space (Volume we are partitioning)
Mount: /
Flags: root
Grub Issues
If you're having issues with system options not appearing in grub, be sure to load into a previous system and run sudo update-grub - this command will search for new entries in the EFI partition and automatically add them to your grub configuration / system prompt. You can manually step through the EFI partition using the grub command-line to bail yourself out, but this shouldn't be needed as returning to an already configured system and running this command will pick up all new systems for next reboot.
grub rescue> set prefix=(hd0,1)/boot/grub
grub rescue> set root=(hd0,1)
grub rescue> insmod normal
grub rescue> normal
grub rescue> insmod linux
grub rescue> linux /boot/vmlinuz-3.13.0-29-generic root=/dev/sda1
grub rescue> initrd /boot/initrd.img-3.13.0-29-generic
grub rescue> boot
sudo apt install efibootmgr

sudo modprobe efivars

sudo efibootmgr

sudo efibootmgr -b 4 -B
test -d /sys/firmware/efi && echo UEFI || echo BIOS
sudo blkid
sudo parted -l
cat /proc/cmdline
No comments to display
No comments to display