Yubikey SSH Authentication
Overview
Yubikeys provide many different forms of secure authentication, for the sake of time this guide will only cover OTP (One Time Password) Authentication over SSH configured on an Ubuntu 19.04 box. This form of authentication allows you to consolidate all your 2FA passwords within one physical USB key. When plugged in and tapped, various configurations can be accessed and passed to be used for 2FA or primary auth, depending on your needs. In this guide, I will configure primary authentication using OTPs validated over Yubico's Authentication API via a collection of information such as time, ID, API Keys, and more. By cross referencing the information at the exact time of authentication / interaction with the associated physical Yubikey, we can login with a quick tap after some configuration on our services.
Yubikey Personalization Tool
To configure OTPs on our Yubikey, We'll need the Yubikey Personalization Tool - this will allow us to create a secondary configuration or overwrite the current running primary. Download the tool and select 'Yubico OTP' along the top bar, and click 'quick' configuration. You'll be greeted with the below window.
Writing OTP Configuration
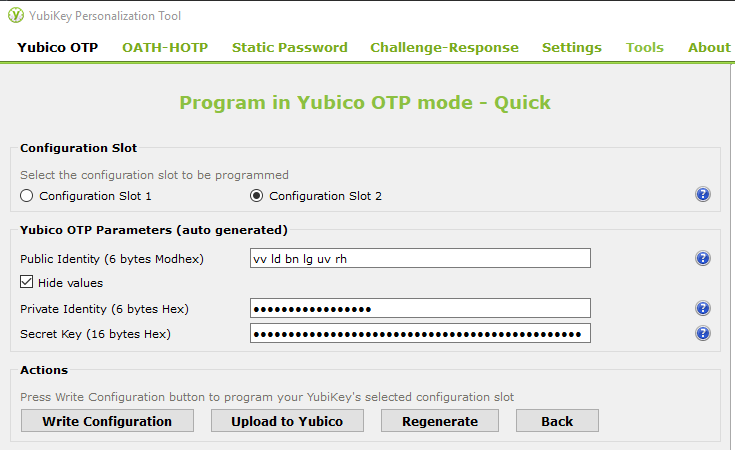
Write the configuration, and you will be prompted if you would like to create a log file of your configuration. This file can be used to recover your key configuration should you lose it - if you choose to save a log of this configuration you should take care to store it in a very secure place, if someone were to obtain it they could use it maliciously. Save the log file, or click cancel to create no logs and store the configuration only on the Yubikey.
It's important to note that the Yubikey configurations are write-only, this means that if in the future you want to obtain the configuration from the key you will need to overwrite the running config and save the log at the time of configuration. This is a security feature to prevent an on-site attacker from duplicating keys and configurations freely.
The firmware on the key is also burned into the chip so no modifications can be made to the back-end of the key to alter these security settings. This means no updates can be provisioned to the key. For me, this is a fair trade for my security. Should I need a newer version key, I will simply purchase a new one.
Upload Configuration Credentials
By uploading your configuration, you provide Yubico with the information required to authenticate you key with your new configuration when an attempt is made. Click Upload configuration, and you'll be redirected to a web page that will automatically populate some fields in the screenshot below. For the sake of this guide, I have deleted the information as it should not be shared publicly. You could find and fill out this form manually, without the Personalization Tool - though it would take some more effort that I won't cover here. If you want to see the page or access it remotely, the URL is just https://upload.yubico.com/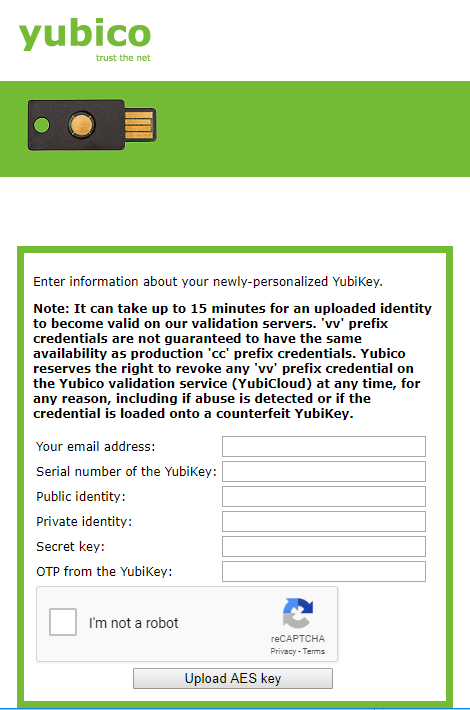
The 'OTP from the Yubikey' should be passed into the associated field by accessing the configuration you just wrote to your key. So, for this guide, I have used the Yubikey 5 NFC - Which allows for two configurations, selected within the Personalization Tool prior to writing our configuration.
This is how you will authenticate when prompted by your services.
To use configuration 1, tap the key.
To use configuration 2, tap and hold the key for 2-3 seconds.
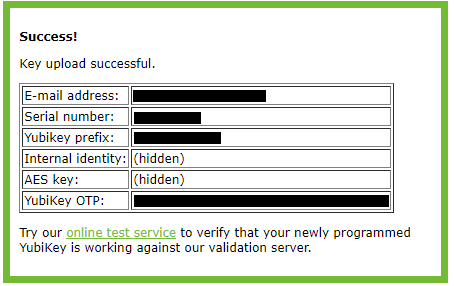
After completing this form, you'll be greeted with the one below - save it if you want to be able to restore your key settings should you lose this one.
Obtain Yubico API Key
To request an API key, fill out the Get API Key form from Yubico, note that this step must be completed after writing and uploading your configuration, and will be directly associated with the OTP authentication we have configured in the steps above. The form is simple, and provides a good test of our new configuration. Basically, we authenticate with our new OTP and Yubico provides us with an associated API key to use with our configuration files in the future.
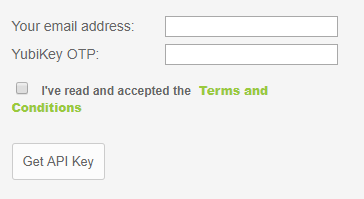
Once filled out, Yubico will present you with your new keys -

Ubuntu Server Configuration
The following steps will be performed via command-line within your Ubuntu server. Note that these steps may vary if you are not using Ubuntu, but generally they should be very similar in concept.
Any time you are directly modifying SSH access to a remote server, you should be careful to validate your new settings before exiting the session you've configured them in. This ensures that if your settings are not correct, you will still be logged in and therefore can just continue to alter them until they suit your needs.
If you exit your session to validate your settings and are unable to reconnect - you could be locked out. Don't get locked out, just start an entirely new session to test your settings.
SSHD Configuration
Some basic modifications need to be made to the /etc/ssh/sshd_config - see that the lines below exist in some form within your configuration. It is possible to mix-and-match these options with many other forms of authentication, should you want the user to be prompted for various things such as Google-2FA, PIN, or a basic password. By gating the second form of authentication behind the Yubikey, you remove the opportunity for brute-forcing or guessing at these PINs or passwords, so the need to update them is far less frequent, but they should still be maintained / reset occasionally.
#/etc/ssh/sshd_config

AuthenticationMethods keyboard-interactive
ChallengeResponseAuthentication yes
UsePAM yes
Now, we'll need to vim /etc/ssh/authorized_yubikeys to populate a list of server-level authorized keys. Note that you can create user-specific keys stored within home directories much like the default .ssh/authorized_keys file works.
#/etc/ssh/authorized_yubikeys

shaun:vrnfgfebjiji
guests:vrnfgfebjiji:hhrefkikfcgr:dllcfndknkbf
newuser:hhrefkikfcgr:vrnfgfebjiji
Yubico PAM Configuration
Yubico Provides a custom PAM which allows them to pass your authentication through their API when connecting to the SSHD. Run the following commands to download it for Ubuntu.
sudo add-apt-repository ppa:yubico/stable
sudo apt-get update
sudo apt-get install libpam-yubico
You may need to move pam_yubico.so to wherever PAM modules are stored on your system (usually lib/security). The Ubuntu package will automatically install the module in the appropriate location, but you can check to see whether it’s in the right location with ls /lib/security. It may also be stored in /usr/local/lib/security, in which case you will need to move it manually.
We'll need to modify the configuration for our new PAM for Yubikeys. Add auth required pam_yubico.so id=<clientid> id key=<SecretKey> key authfile=/etc/ssh/authorized_yubikeys to your /etc/pam.d/sshd configuration. Be sure to modify the <values> appropriately.
#/etc/pam.d/sshd

#Add the following line, modifying <values> appropriately.
auth required pam_yubico.so id=<clientid> id key=<SecretKey> key authfile=/etc/ssh/authorized_yubikeys

# Standard Un*x authentication. Uncomment this to use a password as well.
# @include common-auth
Note that the above file is a sequential configuration and the order of the lines added to this file is critical to the way it is read by your system.
It is possible to mix-and-match these options with many other forms of authentication, should you want the user to be prompted for various things such as Google-2FA, PIN, or a basic password. By gating other forms of authentication behind / after the Yubikey line we added above, you remove the opportunity for brute-forcing or guessing at these PINs or passwords, so the need to update them is far less frequent, but they should still be maintained / reset occasionally.
No comments to display
No comments to display