XPS 9310
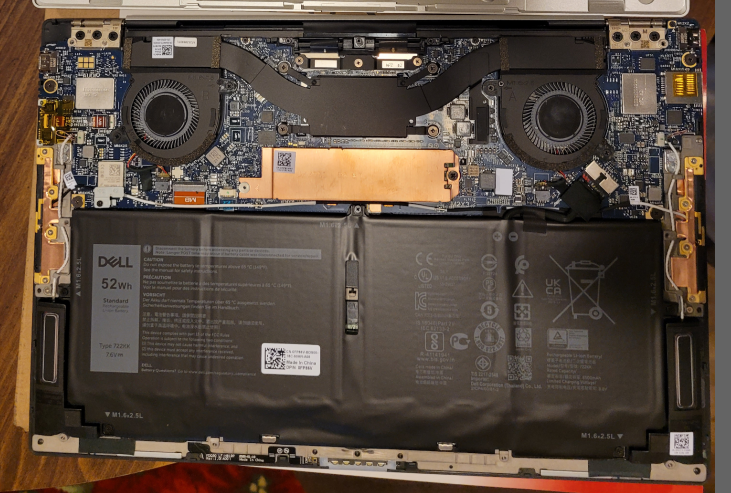
I intalled my own SSD after purchasing a model from dell with a small SSD installed. This was mostly because I wanted to store the SSD from dell as-is in a box so if I had to submit a claim or sell the laptop later I could reinstall it and it would be as it arrived from dell brand new. The install of the SSD was not difficult but did require a plastic prybar tool for removing the back cover of the laptop. Be very careful not to use any hard tools or too much force or you could damage the chasis. I was able to replace the SSD several times without issue and no damage to the chasis.
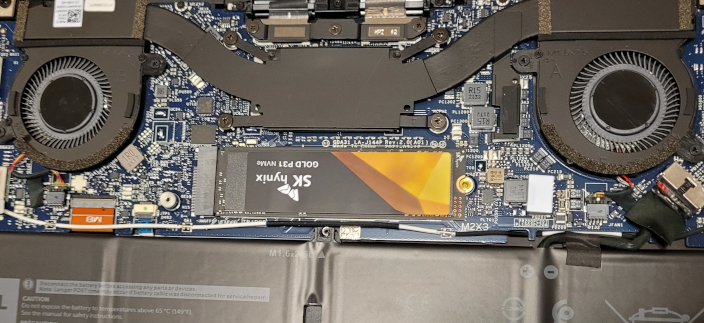
The heat shield removed, and my new SSD installed. Of course, be sure to put the heat shield back before closing up the laptop.
Dell provides service manuals for all laptops, check Dell's website for instructions. You'll just need to remove the back plate, then remove a heat shield over the SSD, then swap out the M.2 for your own. It's really not too difficult, but the back plate was a challenege the first time around. You'll get a feel for it after that, just be careful and take your time as your top priority should be to not damage the thing. Putting the back plate back on is also a bit strange, just follow the service manual. Start from the hinges and rotate the plate down into place. It should not require a lot of force, so be careful.
You'll need a Torx-5 screwdriver for the chasis, and I used a common Craftsman 6-in-1 screwdriver for the M.2. Don't use too small of a screwdriver on the M.2 screw, or you'll strip it out. Dell service manual has exact sizes for all screw heads.
WiFi worked out of the box on Kubuntu 20.04.
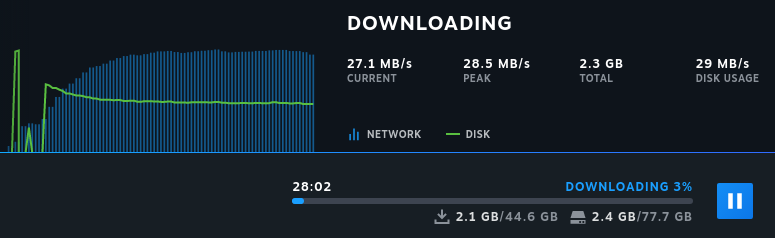
Had issues with Steam download speeds, see Steam section for details.
Fingerprint reader works, haven't configured my display manager to use it for login yet. See fingerprint section for details.
Iris graphics device works out of the box. OpenGL detects graphics interface.
OpenGL 4.6 (Core Profile) Mesa 21.0.3 ( CoreProfile )
OpenGL Vendor:  Intel
Rendering Device:  Mesa Intel(R) Xe Graphics (TGL GT2)
Some output from lscpu for context -
kapper@xps:~/Code/qtk/build$ lscpu
Architecture:                    x86_64
CPU op-mode(s):                  32-bit, 64-bit
Byte Order:                      Little Endian
Address sizes:                   39 bits physical, 48 bits virtual
CPU(s):                          8
On-line CPU(s) list:             0-7
Thread(s) per core:              2
Core(s) per socket:              4
Socket(s):                       1
NUMA node(s):                    1
Vendor ID:                       GenuineIntel
CPU family:                      6
Model:                           140
Model name:                      11th Gen Intel(R) Core(TM) i7-1195G7 @ 2.90GHz
Stepping:                        2
CPU MHz:                         2504.062
CPU max MHz:                     5000.0000
CPU min MHz:                     400.0000
BogoMIPS:                        5836.80
Virtualization:                  VT-x
L1d cache:                       192 KiB
L1i cache:                       128 KiB
L2 cache:                        5 MiB
L3 cache:                        12 MiB
NUMA node0 CPU(s):               0-7
Dell XPS Linux Drivers
First, search for Dell's OEM driver package for the XPS 13 9300 oem-somerville-melisa-meta.
sudo apt search "XPS 13 9300"

Sorting... Done
Full Text Search... Done
oem-somerville-factory-melisa-meta/unknown,unknown 20.04ubuntu12 all
  hardware support for Dell XPS 13 9300

oem-somerville-melisa-meta/unknown,unknown,now 20.04ubuntu12 all [installed]
  hardware support for Dell XPS 13 9300
Now, install both packages, and then update the package registry. We're updating because installing the somerville packages adds additional package repositories to our apt sources -
sudo apt install oem-somerville-melisa-meta oem-somerville-factory-melisa-meta && sudo apt update
Now you have installed factory drivers and updated your apt package registry to include additional drivers you can optionally download. To install fingerprint reader drivers, we will need the packages in these repositories.
Application Shortcuts
This is more of a Linux / Kubuntu thing, but it was a lot of help in setting up the XPS 9310 to use the start menu for launching custom AppImages, commands, and executables stored in /opt/.
ls ~/.local/share/applications

'7 Days to Die.desktop'     jetbrains-datagrip.desktop    jetbrains-webstorm.desktop
 bitwarden.desktop          jetbrains-dataspell.desktop  'Medieval Dynasty.desktop'
'Cities Skylines.desktop'   jetbrains-goland.desktop      mimeinfo.cache
 CryoFall.desktop           jetbrains-pycharm.desktop    'Oxygen Not Included.desktop'
'Gunfire Reborn.desktop'    jetbrains-rider.desktop       Rust.desktop
 Icarus.desktop             jetbrains-rubymine.desktop    unity-hub.desktop
 jetbrains-clion.desktop    jetbrains-toolbox.desktop
Here's an example of running the exeuctable at /opt/bitwarden to start the Bitwarden Linux client. For the Icon, you can just go online and download any .ico or .png file and use a full path to it.
[Desktop Entry]
Comment[en_US]=
Comment=
Exec=/opt/bitwarden
GenericName[en_US]=
GenericName=
Icon=/home/kapper/Documents/Icons/bitwarden_icon.ico
MimeType=
Name[en_US]=Bitwarden
Name=Bitwarden
Path=
StartupNotify=true
Terminal=false
TerminalOptions=
Type=Application
X-DBUS-ServiceName=
X-DBUS-StartupType=
X-KDE-SubstituteUID=false
X-KDE-Username=
Hidden=false
The libreoffice package installs a desktop file that customizes the right-click conext menu. See below for an example.
# sudo apt install libreoffice
# sudoedit /usr/share/applications/libreoffice-startcenter.desktop
[Desktop Entry]
Version=1.0
Terminal=false
NoDisplay=false
Icon=libreoffice-startcenter
Type=Application
Categories=Office;X-Red-Hat-Base;X-SuSE-Core-Office;X-MandrivaLinux-Office-Other;
Exec=libreoffice %U
MimeType=application/vnd.openofficeorg.extension;x-scheme-handler/vnd.libreoffice.cmis;
Name=LibreOffice
GenericName=Office
Comment=The office productivity suite compatible to the open and standardized ODF document for
mat. Supported by The Document Foundation.
StartupNotify=true
X-GIO-NoFuse=true
StartupWMClass=libreoffice-startcenter
X-KDE-Protocols=file,http,ftp,webdav,webdavs
X-AppStream-Ignore=True
NotShowIn=GNOME;

##Define Actions
Actions=Writer;Calc;Impress;Draw;Base;Math;

[Desktop Action Writer]
Name=Writer
Exec=libreoffice --writer

[Desktop Action Calc]
Name=Calc
Exec=libreoffice --calc

[Desktop Action Impress]
Name=Impress
Exec=libreoffice --impress

[Desktop Action Draw]
Name=Draw
Exec=libreoffice --draw

[Desktop Action Base]
Name=Base
Exec=libreoffice --base

[Desktop Action Math]
Name=Math
Exec=libreoffice --math

##End of actions menu
BIOS Upgrade
Only perform these commands when you have access to power, and the laptop is plugged in. If the laptop shuts down unexpectedly, you will have serious issues and will probably need to ship your machine to dell for a fix.
fwupdmgr get-devices
fwupdmgr refresh --force
fwupdmgr get-updates
fwupdmgr update
Then reboot the PC when connected to AC power and the BIOS update will start.
Steam
Bad download speeds on Steam
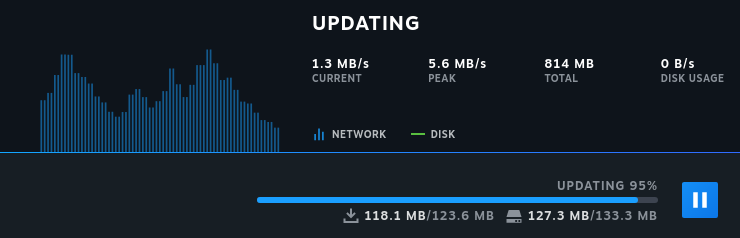
Download speeds fixed by disabling IPv6. After running the commands below and restarting Steam -
Followed instructions on linuxconfig.org
sudo sysctl -w net.ipv6.conf.all.disable_ipv6=1
sudo sysctl -w net.ipv6.conf.default.disable_ipv6=1
You should restart Steam if it is already running when changing these settings. There will be no notification to tell you to do so, but you could experience connection issues until you do.
You can enable IPv6 later with the opposite of these commands
sudo sysctl -w net.ipv6.conf.all.disable_ipv6=0
sudo sysctl -w net.ipv6.conf.default.disable_ipv6=0
To make this setting persist, you can add the lines above to the /etc/sysctl.conf configuration file. There will be a lot of comments and information in this file when you open it for editing, but just add the lines below and when you reboot the settings will be applied automatically.
#/etc/sysctl.conf
net.ipv6.conf.all.disable_ipv6=1
net.ipv6.conf.default.disable_ipv6=1
To check if we missed any settings, we can use the sysctl CLI -
sudo sysctl -a | grep disable_ipv6

net.ipv6.conf.all.disable_ipv6 = 1
net.ipv6.conf.default.disable_ipv6 = 1
net.ipv6.conf.lo.disable_ipv6 = 1
net.ipv6.conf.wlp0s20f3.disable_ipv6 = 1
These additional settings can be added to our configurations if needed.
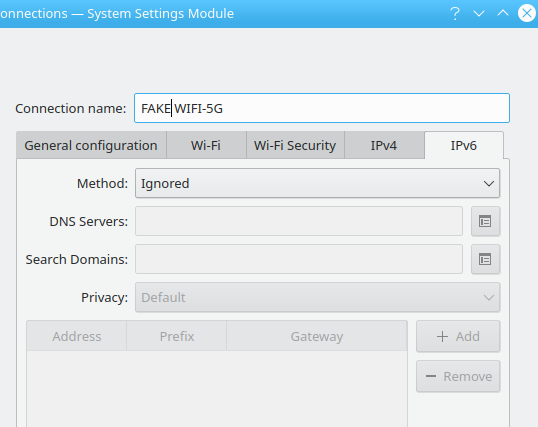
Editing the /etc/sysctl.conf file did not make these settings persist between reboots. What I ended up doing was just editing the connection settings using the default network manager that comes installed with Kubuntu in a Plasma desktop session. This is simply right-clicking the wifi icon in the start menu and editing the connections in the GUI window, or you can run kcmshell5 kcm_networkmanagement to open the same GUI directly from a console. The added benefit to doing it this way is you don't need to modify any kernel options, so the only time your computer will ignore IPv6 is if you're using this specific connection. Otherwise, IPv6 will be enabled as normal.
Fingerprint
Install the fingerprint reader drivers. To get these, you must have installed oem-somerville package in the first section.
sudo apt install libfprint-2-tod1-goodix
That's it! Now the fingerprint reader will work, but I haven't configured it to be used for any login or lock screen yet on Kubuntu. To enroll a fingerprint for the kapper user, run the command below
fprintd-enroll kapper -f right-index-finger
And to test, run the following command
fprintd-verify kapper -f right-index-finger

Using device /net/reactivated/Fprint/Device/0
Listing enrolled fingers:
 - #0: left-index-finger
 - #1: right-index-finger
Verify started!
Verifying: right-index-finger
Verify result: verify-match (done)
Battery Life Improvements
To improve battery I installed tlp and configured /etc/tlp.d/01-kapper.conf. These settings will be loaded the next time you reboot, or you can run tlp start to load the settings now without rebooting.
First, to see what the min and max frequency is for our CPU we should run the following command and check the output
sudo tlp-stat -p

--- TLP 1.3.1 --------------------------------------------

+++ Processor
CPU model      = 11th Gen Intel(R) Core(TM) i7-1195G7 @ 2.90GHz

/sys/devices/system/cpu/cpu0/cpufreq/scaling_driver    = intel_pstate
/sys/devices/system/cpu/cpu0/cpufreq/scaling_governor  = powersave
/sys/devices/system/cpu/cpu0/cpufreq/scaling_available_governors = performance powersave
/sys/devices/system/cpu/cpu0/cpufreq/scaling_min_freq  =   400000 [kHz]
/sys/devices/system/cpu/cpu0/cpufreq/scaling_max_freq  =  5000000 [kHz]
/sys/devices/system/cpu/cpu0/cpufreq/energy_performance_preference = balance_power [HWP.EPP]
/sys/devices/system/cpu/cpu0/cpufreq/energy_performance_available_preferences = default performance balance_performance balance_power power

/sys/devices/system/cpu/cpu1/cpufreq/scaling_driver    = intel_pstate
/sys/devices/system/cpu/cpu1/cpufreq/scaling_governor  = powersave
/sys/devices/system/cpu/cpu1/cpufreq/scaling_available_governors = performance powersave
/sys/devices/system/cpu/cpu1/cpufreq/scaling_min_freq  =   400000 [kHz]
/sys/devices/system/cpu/cpu1/cpufreq/scaling_max_freq  =  4800000 [kHz]
/sys/devices/system/cpu/cpu1/cpufreq/energy_performance_preference = balance_power [HWP.EPP]
/sys/devices/system/cpu/cpu1/cpufreq/energy_performance_available_preferences = default performance balance_performance balance_power power

/sys/devices/system/cpu/cpu2/cpufreq/scaling_driver    = intel_pstate
/sys/devices/system/cpu/cpu2/cpufreq/scaling_governor  = powersave
/sys/devices/system/cpu/cpu2/cpufreq/scaling_available_governors = performance powersave
/sys/devices/system/cpu/cpu2/cpufreq/scaling_min_freq  =   400000 [kHz]
/sys/devices/system/cpu/cpu2/cpufreq/scaling_max_freq  =  4800000 [kHz]
/sys/devices/system/cpu/cpu2/cpufreq/energy_performance_preference = balance_power [HWP.EPP]
/sys/devices/system/cpu/cpu2/cpufreq/energy_performance_available_preferences = default performance balance_performance balance_power power

/sys/devices/system/cpu/cpu3/cpufreq/scaling_driver    = intel_pstate
/sys/devices/system/cpu/cpu3/cpufreq/scaling_governor  = powersave
/sys/devices/system/cpu/cpu3/cpufreq/scaling_available_governors = performance powersave
/sys/devices/system/cpu/cpu3/cpufreq/scaling_min_freq  =   400000 [kHz]
/sys/devices/system/cpu/cpu3/cpufreq/scaling_max_freq  =  5000000 [kHz]
/sys/devices/system/cpu/cpu3/cpufreq/energy_performance_preference = balance_power [HWP.EPP]
/sys/devices/system/cpu/cpu3/cpufreq/energy_performance_available_preferences = default performance balance_performance balance_power power

/sys/devices/system/cpu/cpu4/cpufreq/scaling_driver    = intel_pstate
/sys/devices/system/cpu/cpu4/cpufreq/scaling_governor  = powersave
/sys/devices/system/cpu/cpu4/cpufreq/scaling_available_governors = performance powersave
/sys/devices/system/cpu/cpu4/cpufreq/scaling_min_freq  =   400000 [kHz]
/sys/devices/system/cpu/cpu4/cpufreq/scaling_max_freq  =  5000000 [kHz]
/sys/devices/system/cpu/cpu4/cpufreq/energy_performance_preference = balance_power [HWP.EPP]
/sys/devices/system/cpu/cpu4/cpufreq/energy_performance_available_preferences = default performance balance_performance balance_power power

/sys/devices/system/cpu/cpu5/cpufreq/scaling_driver    = intel_pstate
/sys/devices/system/cpu/cpu5/cpufreq/scaling_governor  = powersave
/sys/devices/system/cpu/cpu5/cpufreq/scaling_available_governors = performance powersave
/sys/devices/system/cpu/cpu5/cpufreq/scaling_min_freq  =   400000 [kHz]
/sys/devices/system/cpu/cpu5/cpufreq/scaling_max_freq  =  4800000 [kHz]
/sys/devices/system/cpu/cpu5/cpufreq/energy_performance_preference = balance_power [HWP.EPP]
/sys/devices/system/cpu/cpu5/cpufreq/energy_performance_available_preferences = default performance balance_performance balance_power power

/sys/devices/system/cpu/cpu6/cpufreq/scaling_driver    = intel_pstate
/sys/devices/system/cpu/cpu6/cpufreq/scaling_governor  = powersave
/sys/devices/system/cpu/cpu6/cpufreq/scaling_available_governors = performance powersave
/sys/devices/system/cpu/cpu6/cpufreq/scaling_min_freq  =   400000 [kHz]
/sys/devices/system/cpu/cpu6/cpufreq/scaling_max_freq  =  4800000 [kHz]
/sys/devices/system/cpu/cpu6/cpufreq/energy_performance_preference = balance_power [HWP.EPP]
/sys/devices/system/cpu/cpu6/cpufreq/energy_performance_available_preferences = default performance balance_performance balance_power power

/sys/devices/system/cpu/cpu7/cpufreq/scaling_driver    = intel_pstate
/sys/devices/system/cpu/cpu7/cpufreq/scaling_governor  = powersave
/sys/devices/system/cpu/cpu7/cpufreq/scaling_available_governors = performance powersave
/sys/devices/system/cpu/cpu7/cpufreq/scaling_min_freq  =   400000 [kHz]
/sys/devices/system/cpu/cpu7/cpufreq/scaling_max_freq  =  5000000 [kHz]
/sys/devices/system/cpu/cpu7/cpufreq/energy_performance_preference = balance_power [HWP.EPP]
/sys/devices/system/cpu/cpu7/cpufreq/energy_performance_available_preferences = default performance balance_performance balance_power power

/sys/devices/system/cpu/intel_pstate/min_perf_pct      =   8 [%]
/sys/devices/system/cpu/intel_pstate/max_perf_pct      = 100 [%]
/sys/devices/system/cpu/intel_pstate/no_turbo          =   0
/sys/devices/system/cpu/intel_pstate/turbo_pct         =  45 [%]
/sys/devices/system/cpu/intel_pstate/num_pstates       =  47

/sys/module/workqueue/parameters/power_efficient       = Y
/proc/sys/kernel/nmi_watchdog                          = 0
We can see our min and max CPU frequency is 400000 and 5000000
Next, we should check the frequency for our GPU. For me, this is an integrated intel CPU. To check the min and maximum frequencies I ran the following command
sudo tlp-stat -g

--- TLP 1.3.1 --------------------------------------------

+++ Intel Graphics
/sys/module/i915/parameters/enable_dc        = -1 (use per-chip default)
/sys/module/i915/parameters/enable_fbc       = -1 (use per-chip default)
/sys/module/i915/parameters/enable_psr       = -1 (use per-chip default)
/sys/module/i915/parameters/modeset          = -1 (use per-chip default)

/sys/class/drm/card0/gt_min_freq_mhz         =   100 [MHz]
/sys/class/drm/card0/gt_max_freq_mhz         =  1400 [MHz]
/sys/class/drm/card0/gt_boost_freq_mhz       =  1400 [MHz]
The minimum and maximum frequency for my GPU is 100 and 1400
Using only this information and my own personal preferences, this is my configuration at /etc/01-kapepr.conf. To create this I just looked through the settings in /etc/tlp.conf and copied over the interesting ones.
TLP_ENABLE=1
TLP_DEFAULT_MODE=AC

# By checking output of `tlp-stat -p`
# + My CPU min freq is 400000; max is 5000000
CPU_SCALING_MIN_FREQ_ON_AC=400000
CPU_SCALING_MAX_FREQ_ON_AC=5000000

CPU_SCALING_MIN_FREQ_ON_BAT=400000
CPU_SCALING_MAX_FREQ_ON_BAT=1000000

# By checking output of `tlp-stat -g`
# + My Intel GPU min freq is 100; Max is 1400; Boost is 1400
INTEL_GPU_MIN_FREQ_ON_AC=100
INTEL_GPU_MAX_FREQ_ON_AC=1400
INTEL_GPU_BOOST_FREQ_ON_AC=1400

INTEL_GPU_MIN_FREQ_ON_BAT=100
INTEL_GPU_MAX_FREQ_ON_BAT=1000
INTEL_GPU_BOOST_FREQ_ON_BAT=1000

# Default: off (AC), on (BAT)
WIFI_PWR_ON_AC=off
WIFI_PWR_ON_BAT=on

# Set to 0 to disable, 1 to enable USB autosuspend feature.
# Default: 1
USB_AUTOSUSPEND=1

# Exclude listed devices from USB autosuspend (separate with spaces).
# Use lsusb to get the ids.
# Note: input devices (usbhid) are excluded automatically
# Default: <none>
#USB_BLACKLIST="1111:2222 3333:4444"

# Bluetooth devices are excluded from USB autosuspend:
#   0=do not exclude, 1=exclude.
# Default: 0
USB_BLACKLIST_BTUSB=0

# Radio devices to disable on startup: bluetooth, wifi, wwan.
# Separate multiple devices with spaces.
# Default: <none>
DEVICES_TO_DISABLE_ON_STARTUP="bluetooth"

# Radio devices to disable on battery: bluetooth, wifi, wwan.
# Default: <none>
#DEVICES_TO_DISABLE_ON_BAT="bluetooth"

# Radio devices to disable on battery when not in use (not connected):
#   bluetooth, wifi, wwan.
# Default: <none>
DEVICES_TO_DISABLE_ON_BAT_NOT_IN_USE="bluetooth"
Do't forget to run tlp start or reboot to apply the changes.
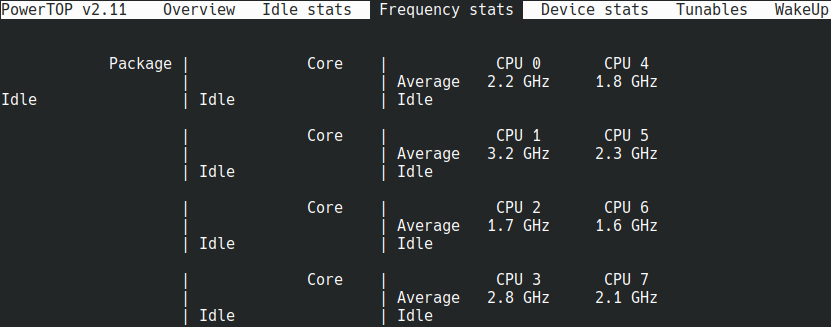
To see that the settings have been applied, you can check on your CPU frequencies and battery usage with and without tlp. Run sudo powertop and check the different tabs. Here's my CPU frequencies without tlp enabled -
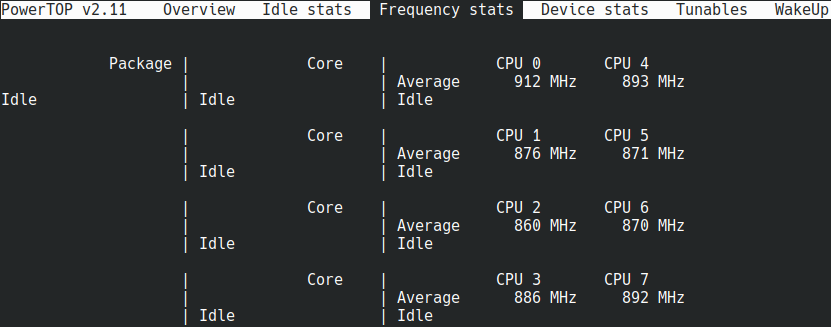
And here it is with tlp enabled
And i'm seeing an hour or two extra on battery life in general. Maybe more in extreme cases where I'm doing really light browsing and not using bluetooth, low backlight, now keyboard backlight, etc.

Docker Power Usage
Surprisingly, I found through monitoring battery usage with powertop that since installing docker I've seen an increase of around ~3W consistent power draw when using my laptop.
This is an insane amount of power draw, - actually it's over 30% of my total power consumtion. To disable the docker network interface causing this power drain, run the following command
sudo ifconfig docker0 down
And when you're actually doing docker things, you can reenable it with a similiar command
sudo ifconfig docker0 up
I just can't reason with leaving this enabled all the time. The docker0 network interface consumes more battery than my display at times, and I can't help but feel that's an unreasonable amount of power draw for something I'm only using some of the time.
No comments to display
No comments to display